Day-39 Part-2: ☁AWS IAM Permissions,Policy,🔐 Role & Trust Policy, Assume Role,STS(Secure Token Service🔑


📢 Introduction
In the last blog Getting Started with AWS Basics☁ we learned about the basics of AWS, What is IAM, Users*,* and User groups. We have also learned about Regions and Availability zones, and we have performed some hands-on.
In this article, we are going to deep dive into the AWS IAM Permissions, Policies, 🔐 IAM Role, Trust policy, Assume Role, and STS (Secure Service Token)🔑.
🔐IAM (Identity and Access Management)
AWS Identity and Access Management (IAM) is a web service that helps you securely control access to AWS resources.
With IAM, you can centrally manage permissions that control which AWS resources users can access.
You use IAM to control who is authenticated (signed in) and authorized (has permissions) to use resources.
🤔 How IAM Works?
IAM verifies that a user or service has the necessary authorization to access a particular service in the AWS cloud.
We can also use IAM to grant the right level of access to specific users, groups, or services.
For example, we can use IAM to enable an EC2 instance to access S3 buckets by requesting fine-grained permissions.

🚷 Policies and permissions in IAM
You manage access in AWS by creating policies and attaching them to IAM identities (users, groups of users, or roles) or AWS resources.
A policy is an object in AWS that, when associated with an identity or resource, defines their permissions.
AWS evaluates these policies when an IAM principal (user or role) makes a request.
Permissions in the policies determine whether the request is allowed or denied. Most policies are stored in AWS as
JSONdocuments.
🔠 IAM Policy types
AWS supports six types of policies: identity-based policies, resource-based policies, permissions boundaries, Organizations SCPs, ACLs, and session policies.
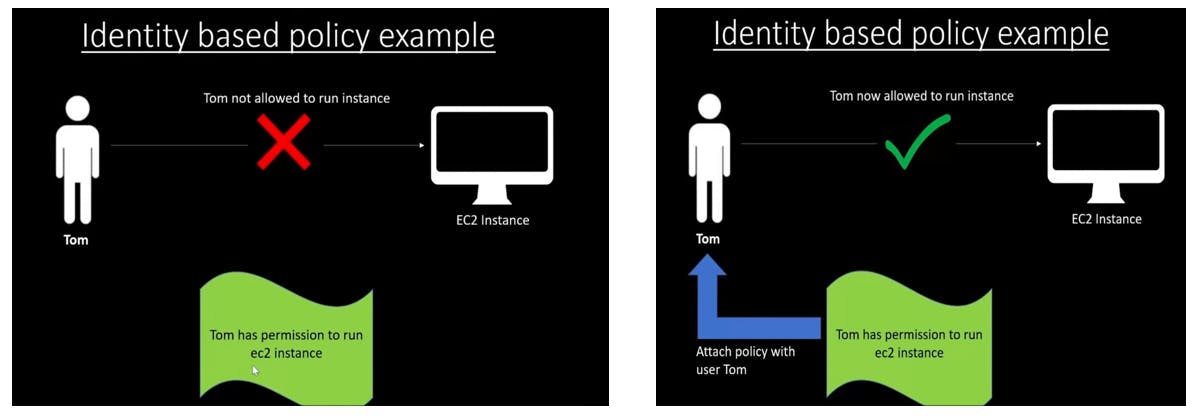
Identity-based policies – Attach managed and inline policies to IAM identities (users, groups to which users belong, or roles). Identity-based policies grant permissions to an identity.
Resource-based policies – Attach inline policies to resources. The most common examples of resource-based policies are Amazon S3 bucket policies and IAM role trust policies.
Permissions boundaries – A permissions boundary in IAM is an advanced feature that sets the maximum permissions a user or group can have, regardless of attached policies.
Organizations SCPs – Use an AWS Organizations service control policy (SCP) to define the maximum permissions for account members of an organization or organizational unit (OU).
Access control lists (ACLs) – Use ACLs to control which principals in other accounts can access the resource to which the ACL is attached. ACLs are similar to resource-based policies, although they are the only policy type that does not use the JSON policy document structure.
Session policies – Pass advanced session policies when you use the AWS CLI or AWS API to assume a role or a federated user. Session policies limit the permissions that the role or user's identity-based policies grant to the session. Session policies limit permissions for a created session.
👩💻 Task 1:
Create the
EC2 instanceas a root user, create theIAM userwithout any permission, and check if the IAM user is able to access the EC2 instance.Later on, provide full EC2 access to the IAM user using identity-based policies.
Launch the Instance:
Log in to the AWS management console and create the EC2 instance.

Create the IAM user:
Go to the IAM section and create the IAM user without any permission.

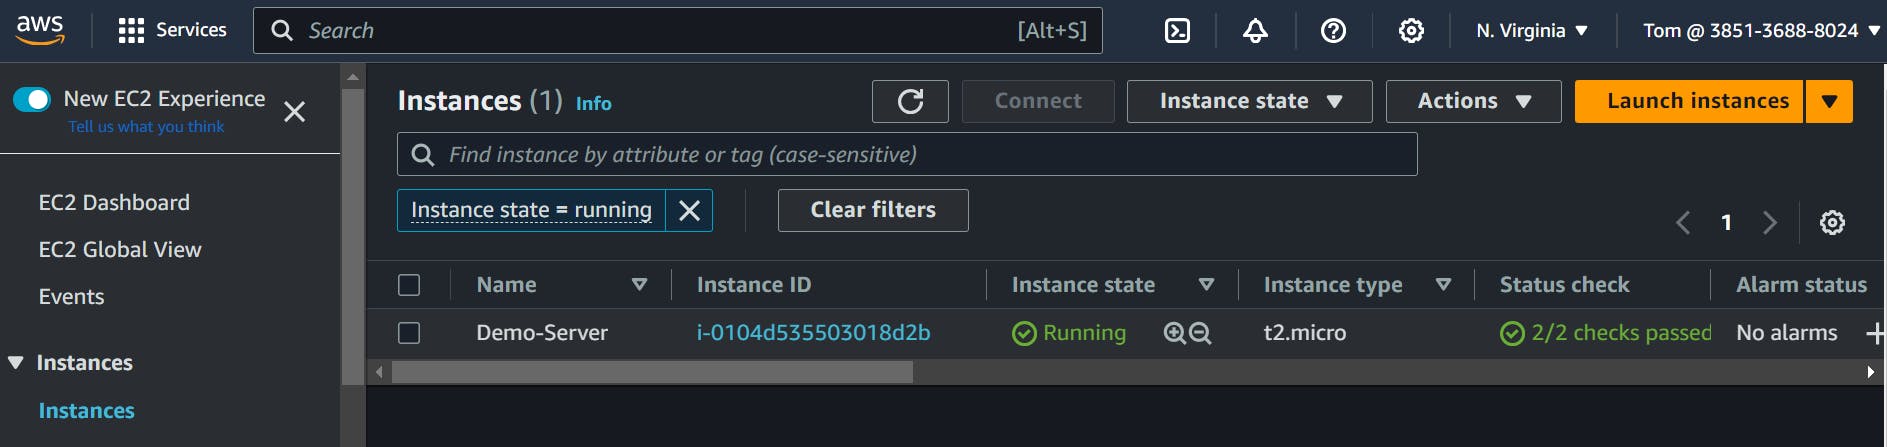
Log in to AWS Console using IAM user and verify:
Go to the AWS management console login with the IAM user and verify if the IAM user is able to access the EC2 instance or not.
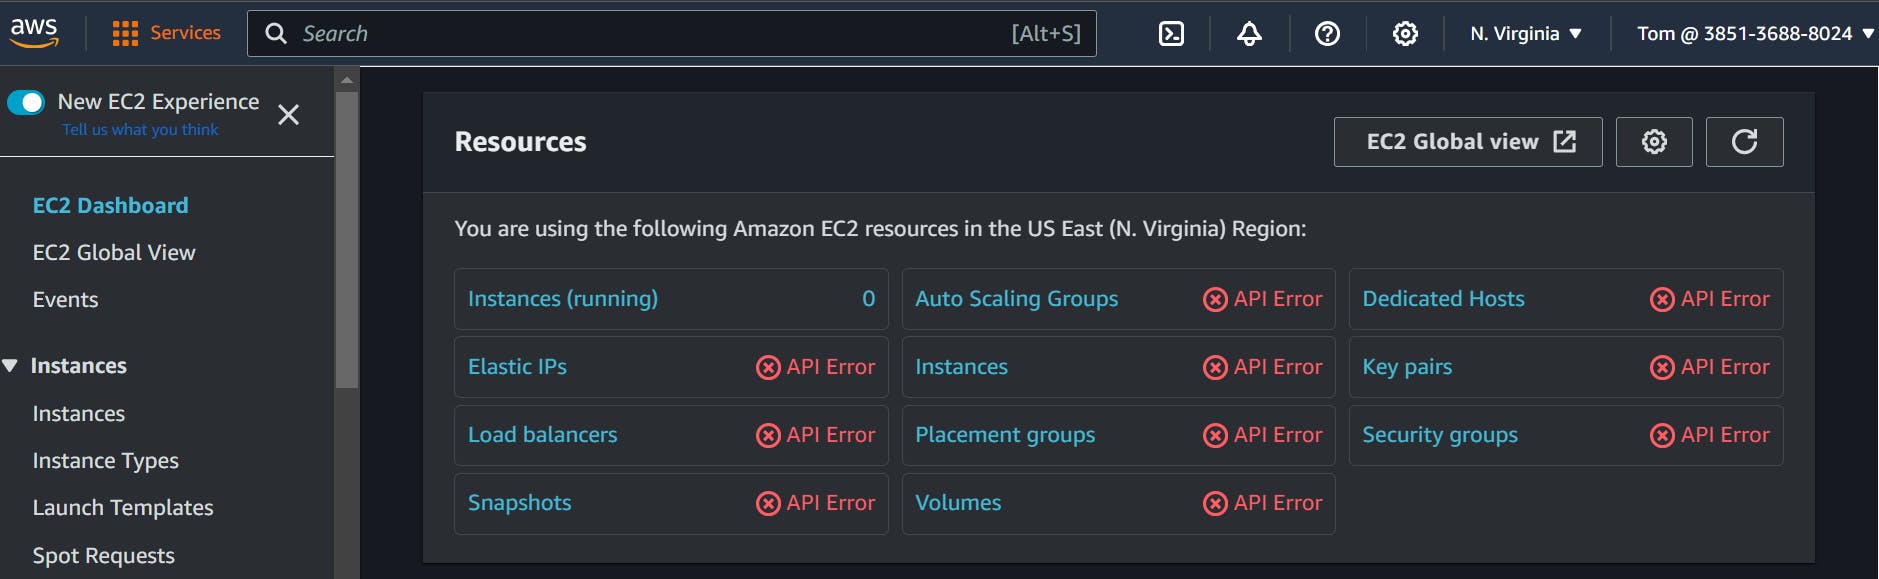
We can see here Tom does not have permission to access the EC2 service.
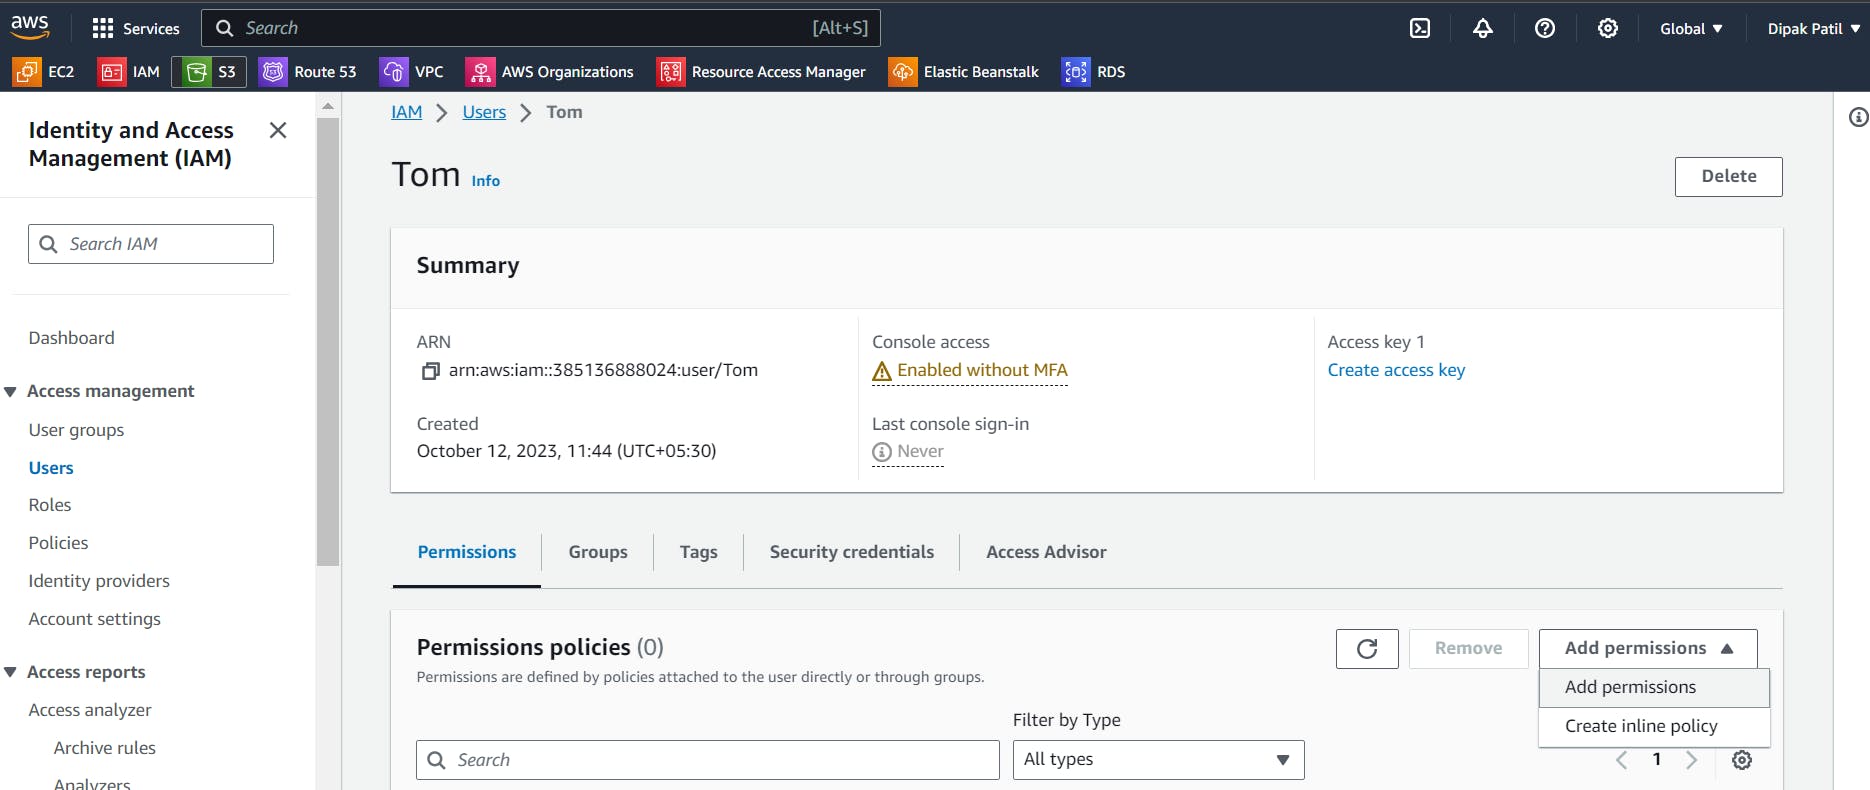
Assign EC2 full access to IAM user:
Now go to your
root account >go to IAM user >go to permission> click onAdd permission> and assignEC2 full accessto the IAM user usingAdd permission.After clicking on Add permission there is two way to add permission
1. Managed policies – Managed policies that are created and managed by AWS.
2. Inline policies – You can create your custom policy and use it.
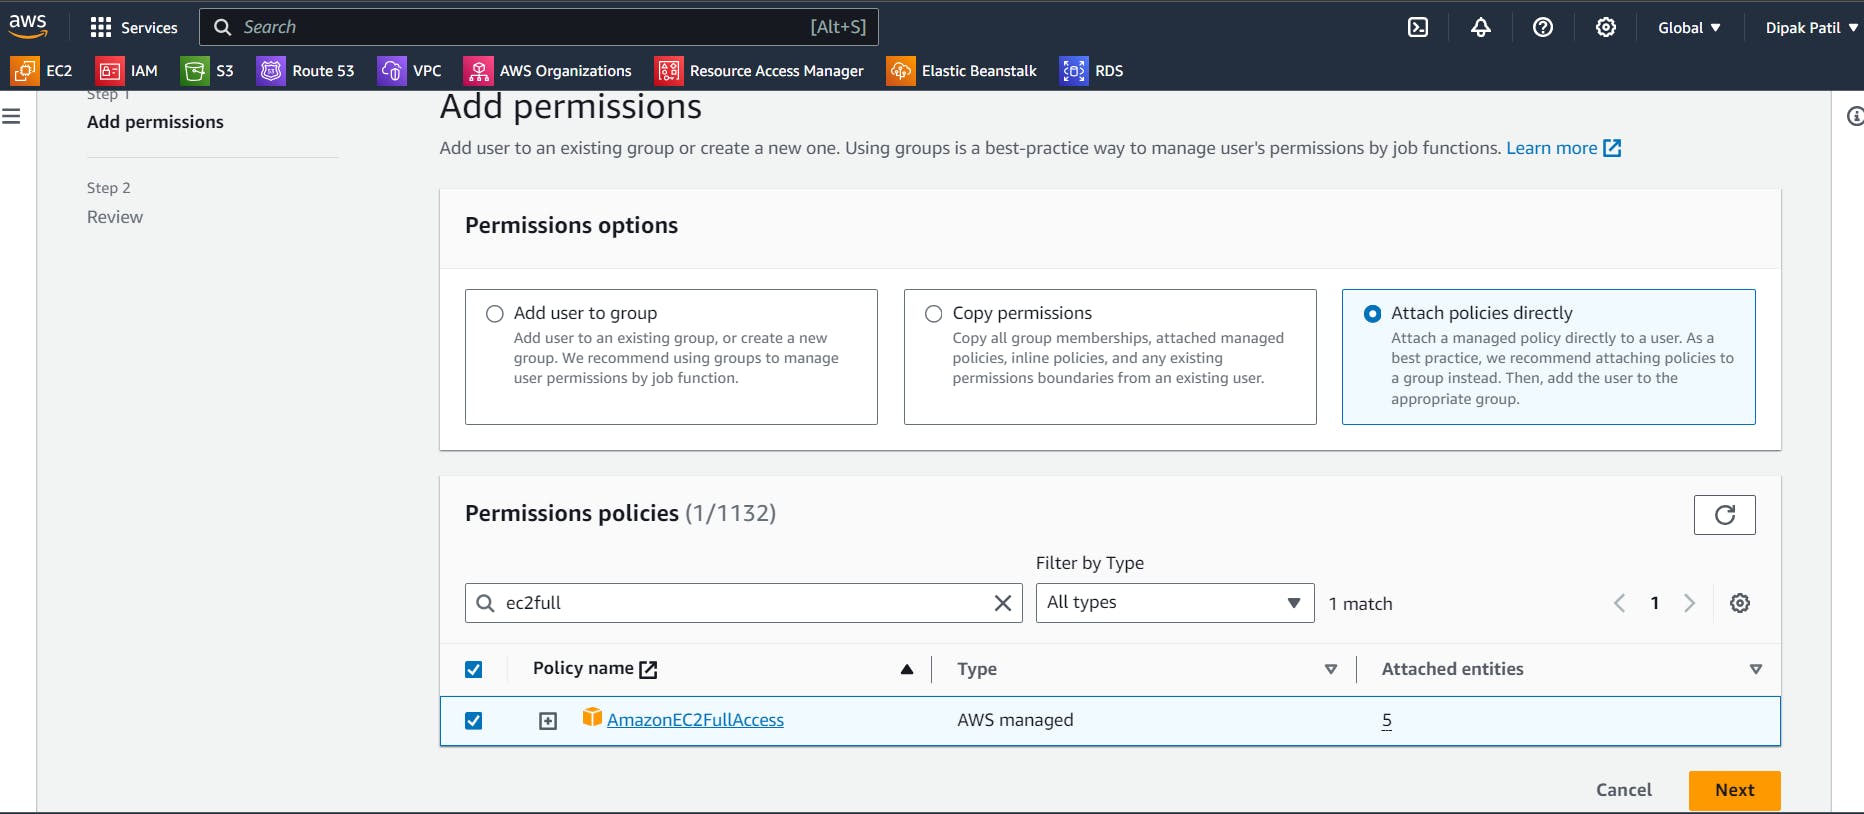
Now after clicking on Add permission on the next page select
Attach policy directlyand inPermissions policiesSearch forAmazonEC2FullAccessand click on next then review and click on add permission.You can see that permission is added to the IAM user.

Log in to AWS Console using IAM user and verify:
Once you log in as an IAM user you can see the IAM user is able to access the EC2 service and the IAM user can perform all the EC2 operations because we have given the EC2 full access to the IAM user.
👩💻 Task 2:
Create the
2 S3 bucketsin the root account, create theIAM userwithAmazonS3ReadOnlyAccesspermission, and check if the IAM user is able to access the S3 buckets and Put objects into the bucket.later on, allow the IAM user to Put the object into one of the bucket using
Resource-based policies.

Create the IAM user:
Create the
IAM userwithAmazonS3ReadOnlyAccesspermission.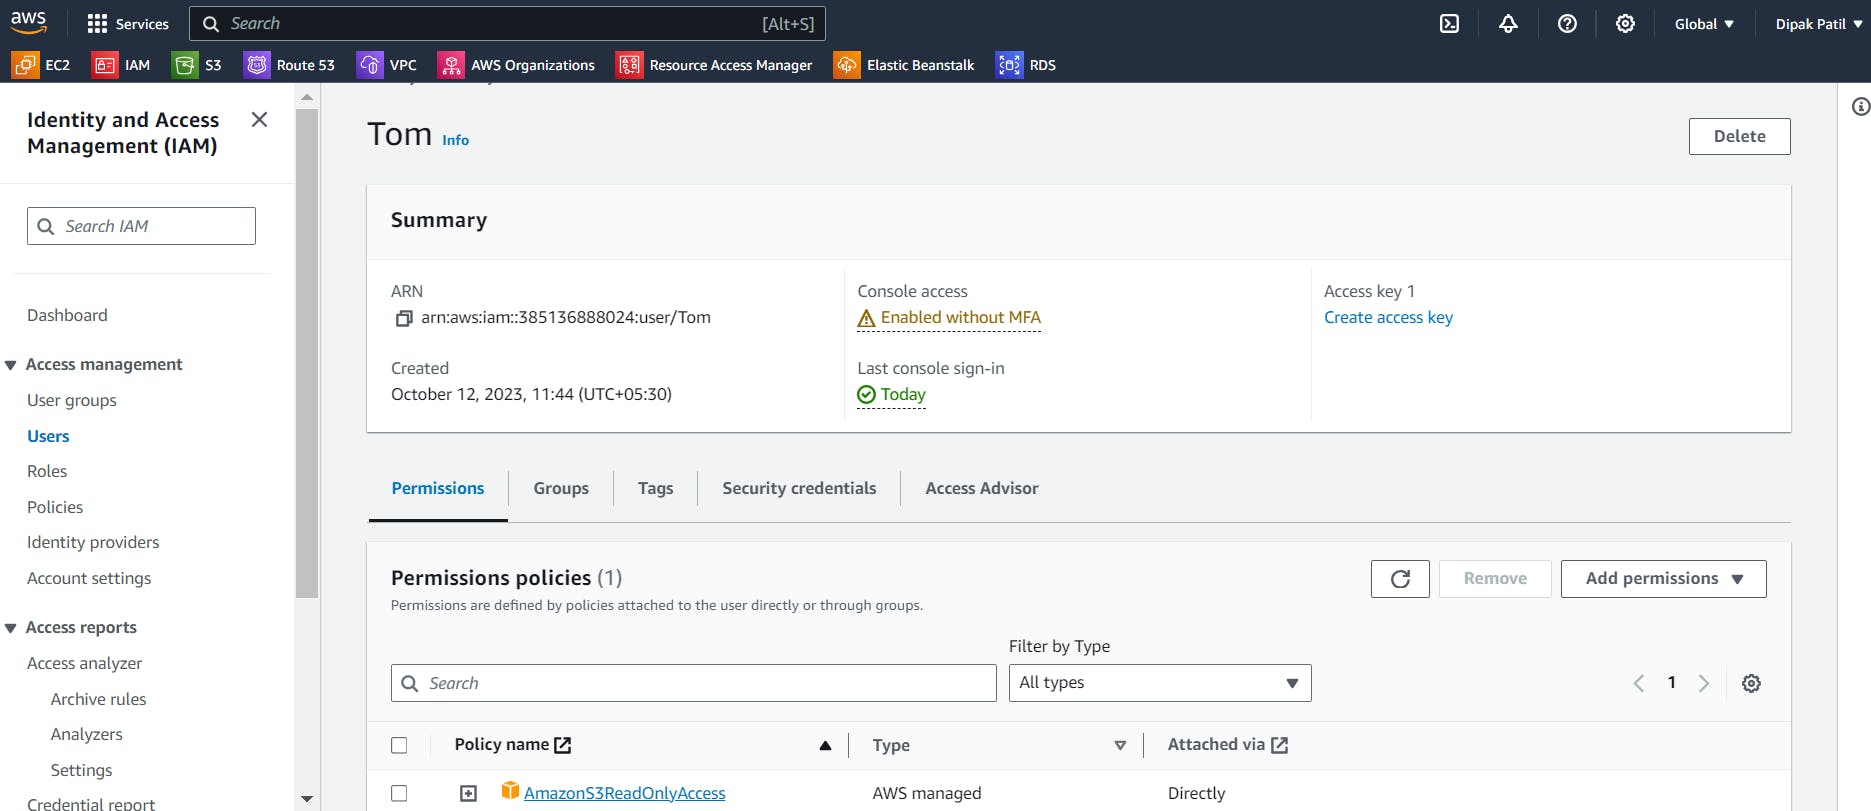
Create 2 S3 Buckets:
Create 2 S3 buckets with the name
tomsnewbucket1,tomsnewbucket2.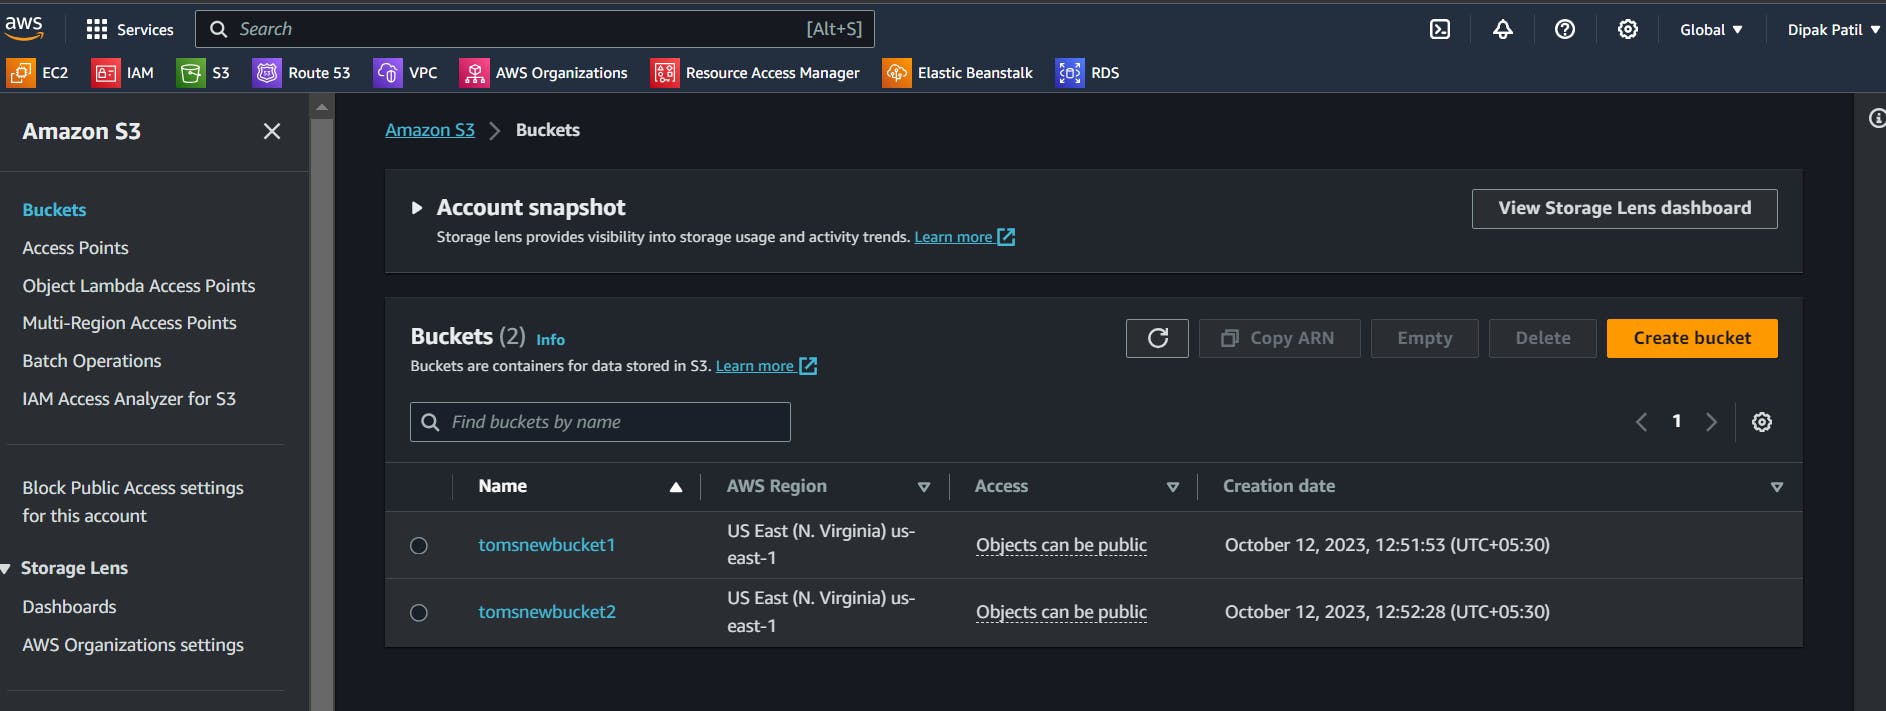
Log in to AWS Console using IAM user and verify:
Go to the AWS management console login with the IAM user
goto S3 bucket serviceand verify if the IAM user is able toPut the object into S3 bucketsor not.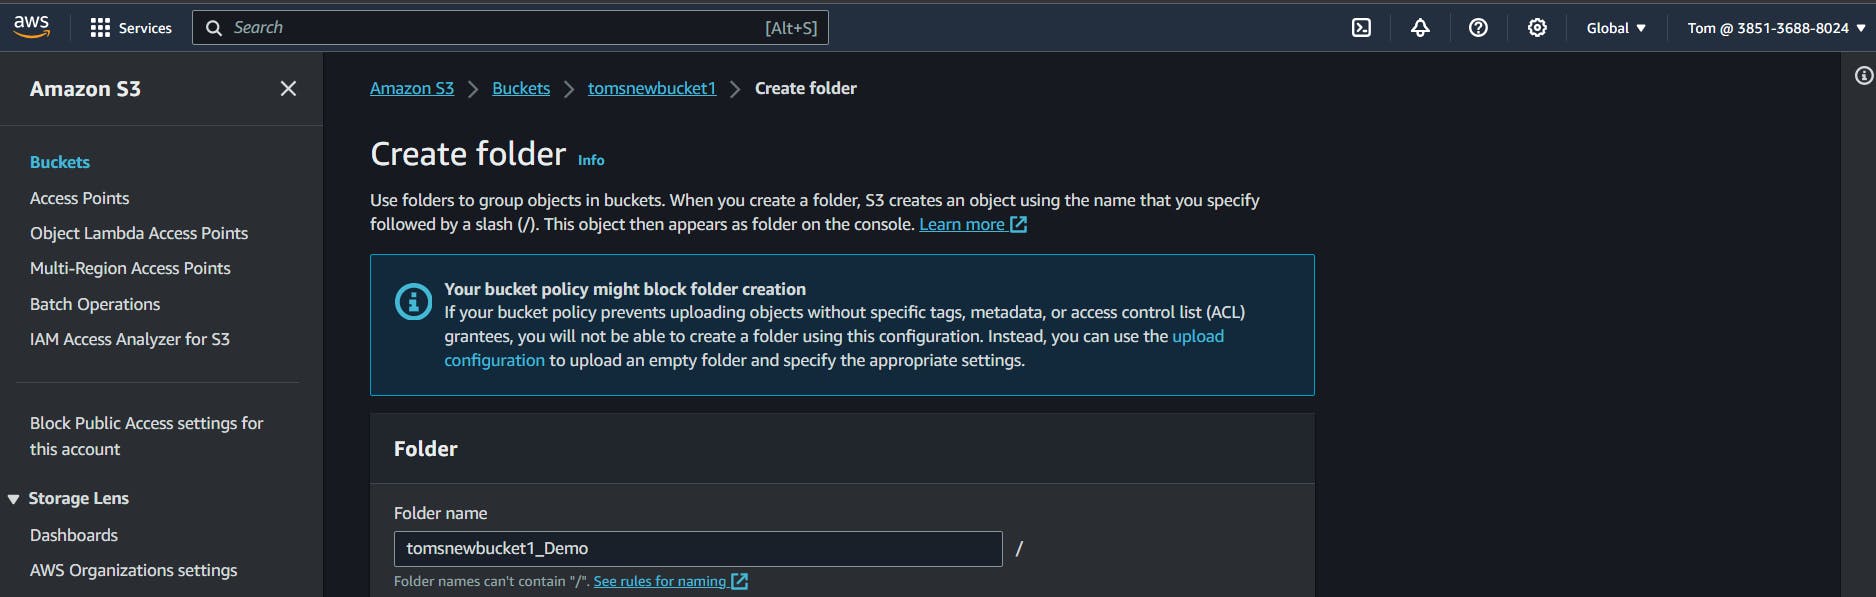

We can see that
Tomcan not create the folder intotomsnewbucket1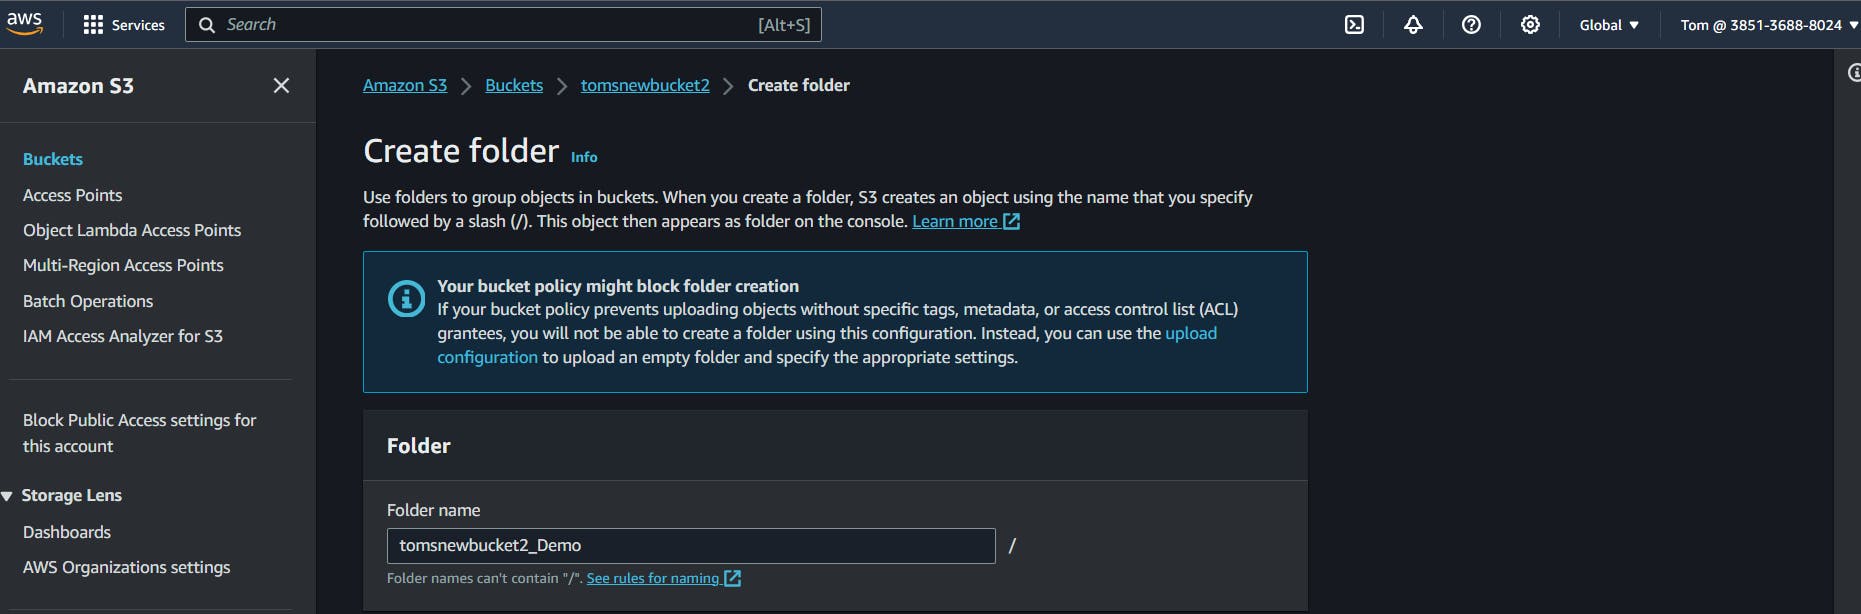
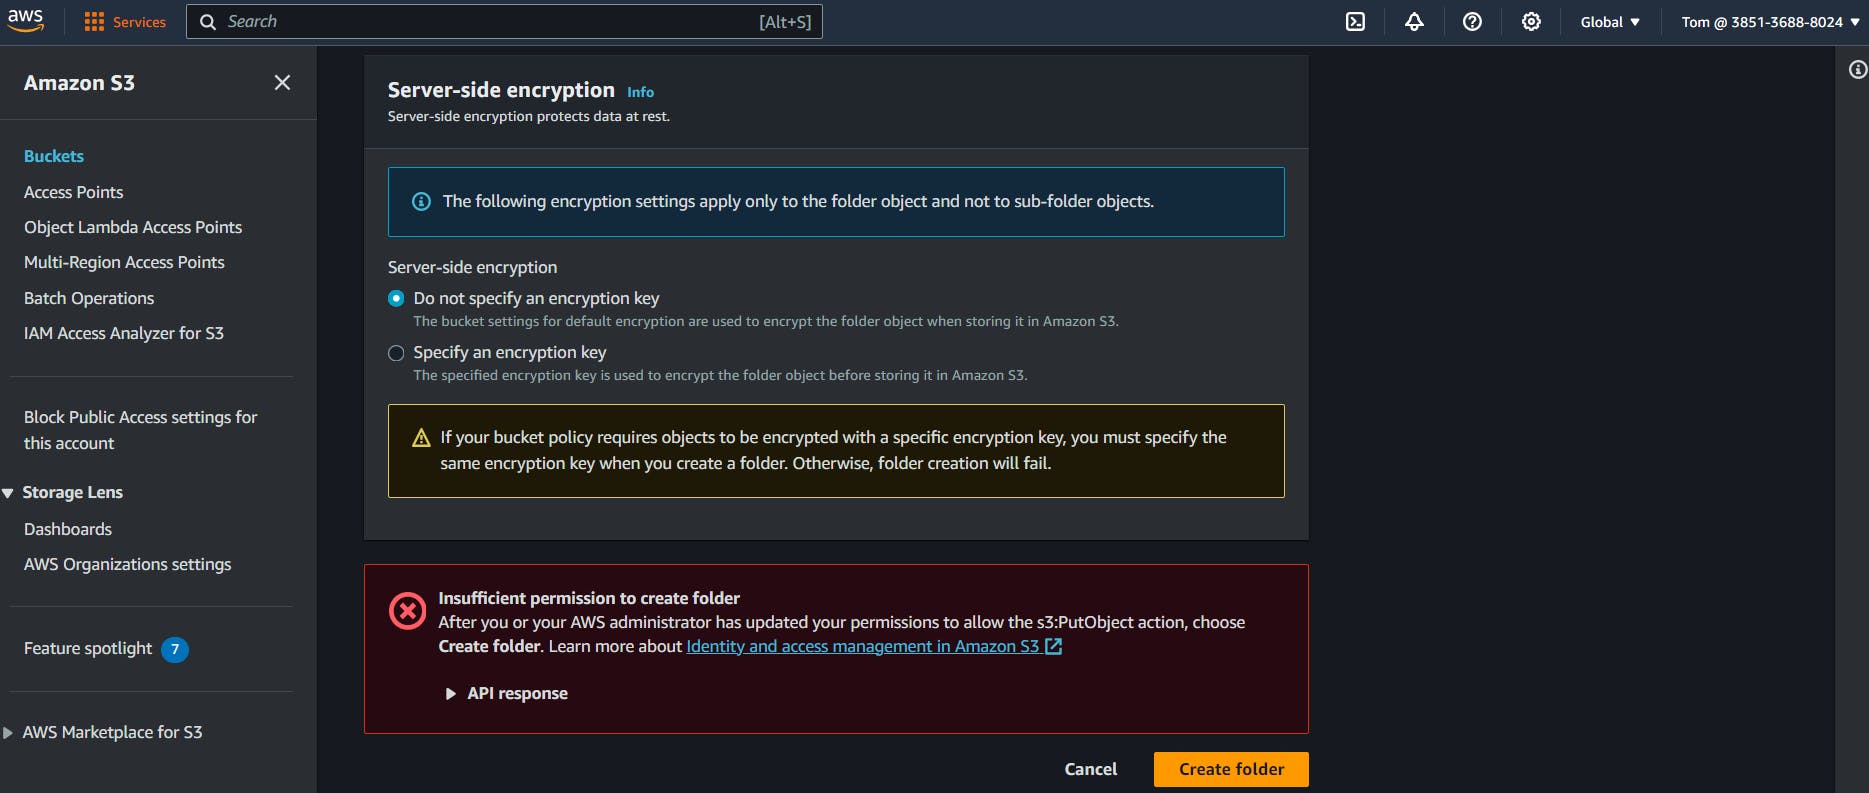
Same, Tom can not create the folder into
tomsnewbucket2as well.Because we have only allowed
Tom to read the bucket.Assign Resource-based policies to the S3 bucket:
Now, we will assign policy permission to the
S3 buckettomsnewbucket1that only IAM userTomcan put the object into the bucket and we will see if theTomcan put an object in the buckettomsnewbucket2.As of now, we have only given the
AmazonS3ReadOnlyAccessto the IAM userTom.Go to
root user account>go to S3>Buskets>go to tomsnewbucket1>go to Permissionsgo down inBucket policyclick onEdit> Add theJSON documentsand click onSave changes.{ "Version": "2012-10-17", "Statement": [ { "Sid": "Statement1", "Effect": "Allow", "Principal": { "AWS": "arn:aws:iam::385136888024:user/Tom" }, "Action": "S3:*", "Resource": "arn:aws:s3:::tomsnewbucket1/*" } ] }
Explanation of the JSON Policy:
Version: This indicates the version of the policy language being used. In this case, it's set to"2012-10-17,"which is the current version.Statement: This is an array of individual statements that define permissions. In your example, there is one statement.Sid: A unique identifier for the statement. In this case, it's set to"Statement1"for easy reference.Effect: Specifies whether the statement allows or denies the specified actions. Here, it's set to "Allow," meaning it grants permissions.Principal: Defines the AWSentity (user, group, role, or service)that the policy is applied to. In this policy:"AWS": "arn:aws:iam::385136888024:user/Tom"indicates that the policy applies to the IAM user with theARN (Amazon Resource Name).Action: Specifies the AWS service API actions allowed or denied. Here, it's set to"S3:*"allow any action (*) on Amazon S3.Resource: Specifies the AWS resources to which the permissions apply. In this case, it's set all permissions apply to objects within the S3 bucket namedtomsnewbucket1.
Log in to AWS Console using IAM user and verify:
Now, Log in with the IAM user
Tomand go toS3>Buckets>tomsnewbucket1>Create folderand add a folder in the buckettomsnewbucket1.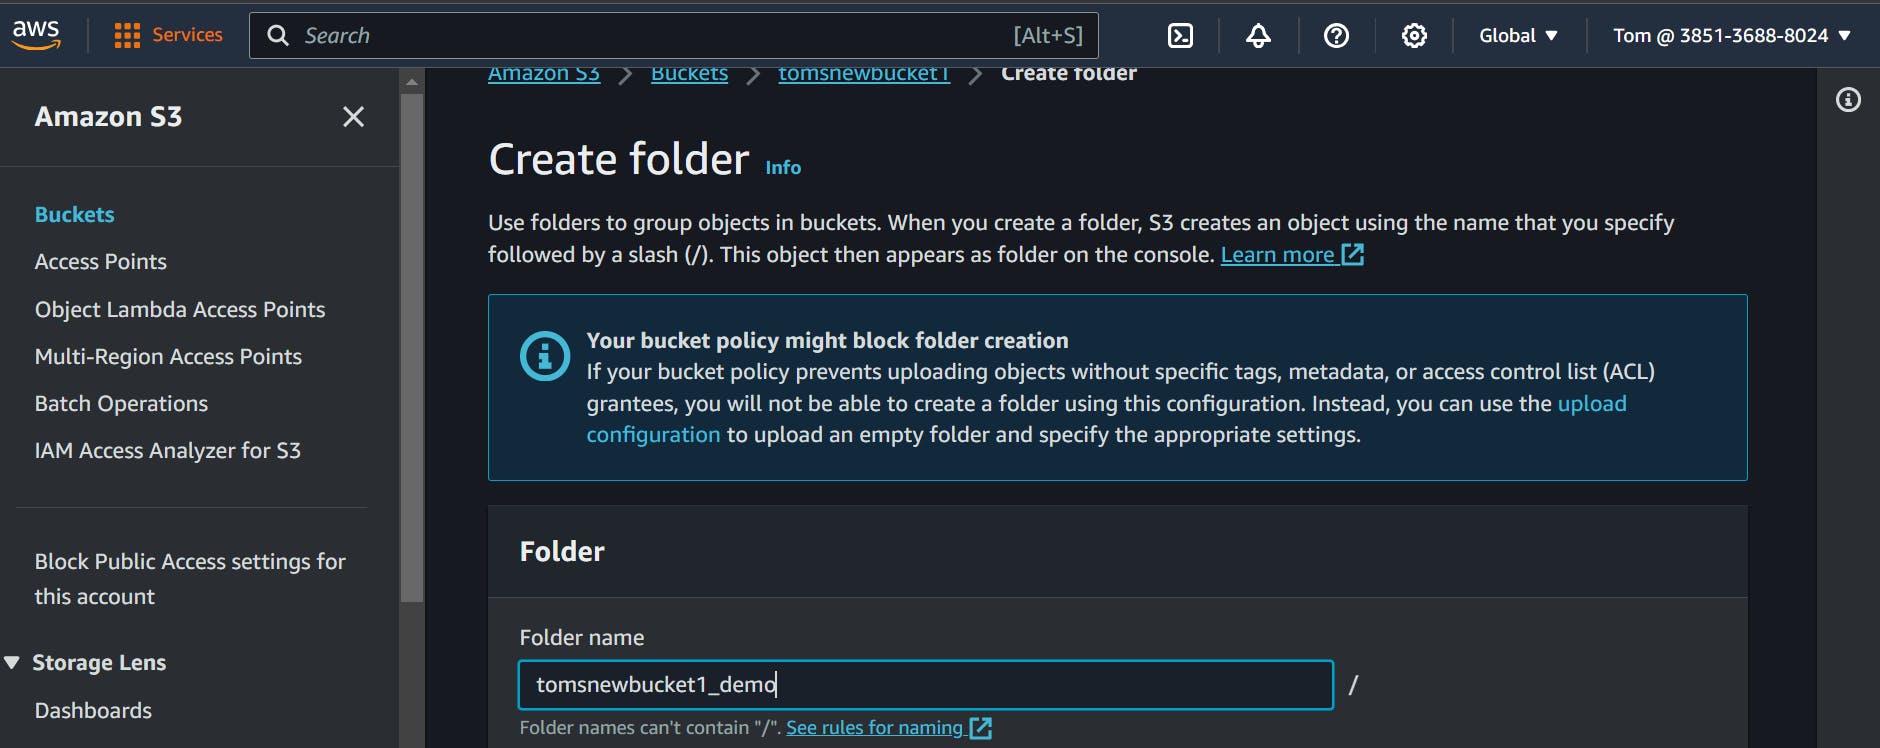
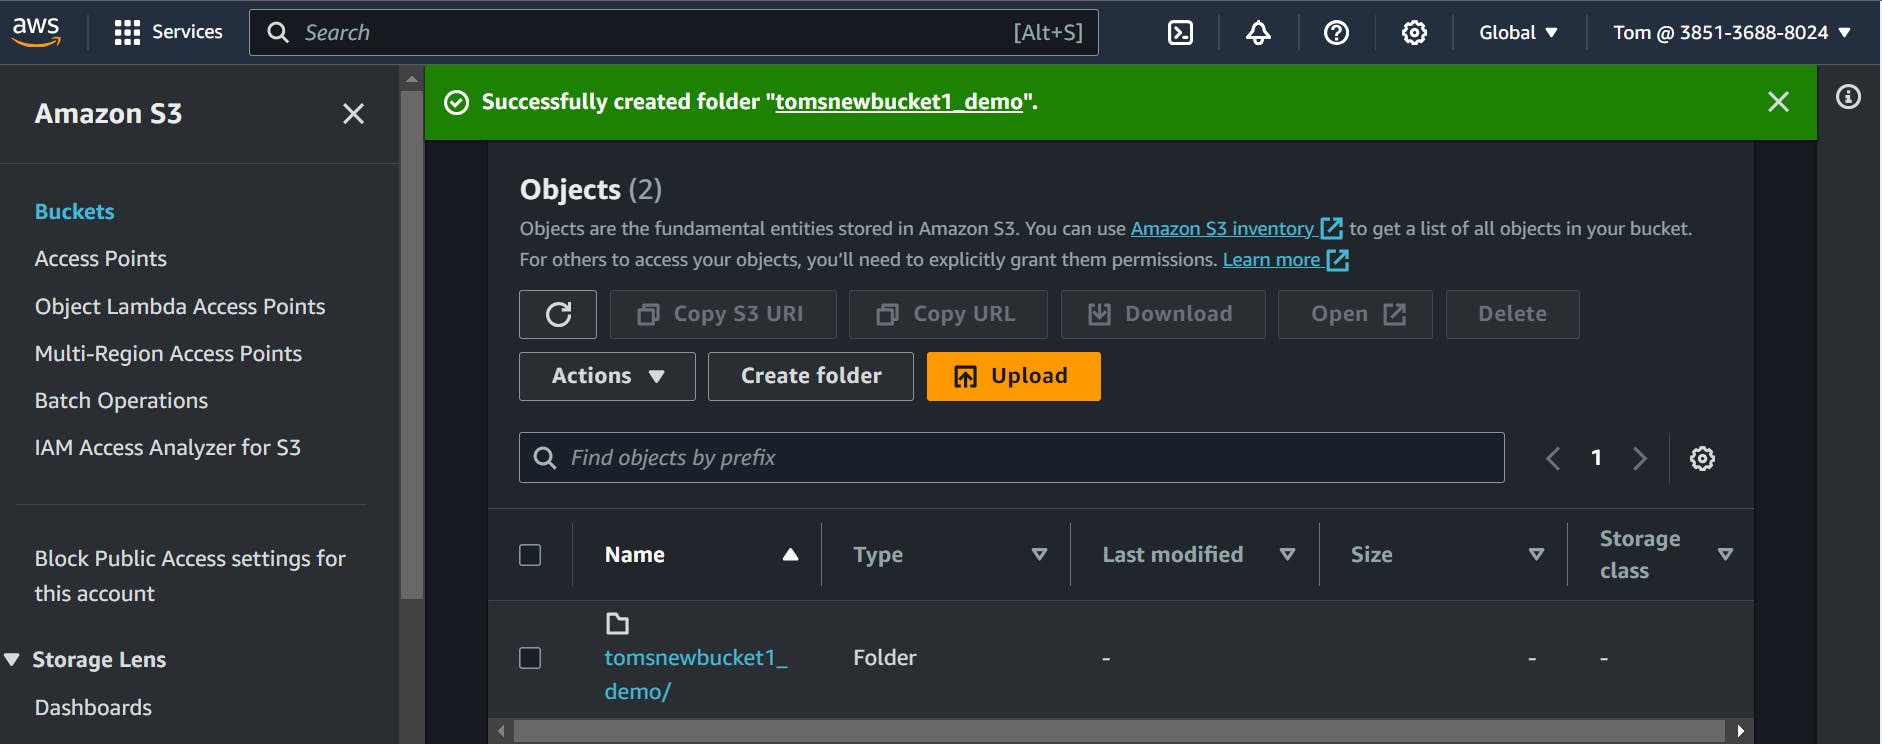
Here we can see we have assigned the permission policy to the
S3 buckettomsnewbucket1that only IAM user Tom can perform the operation on the buckettomsnewbucket1.Now, go to the bucket
tomsnewbucket2and add the folder to it.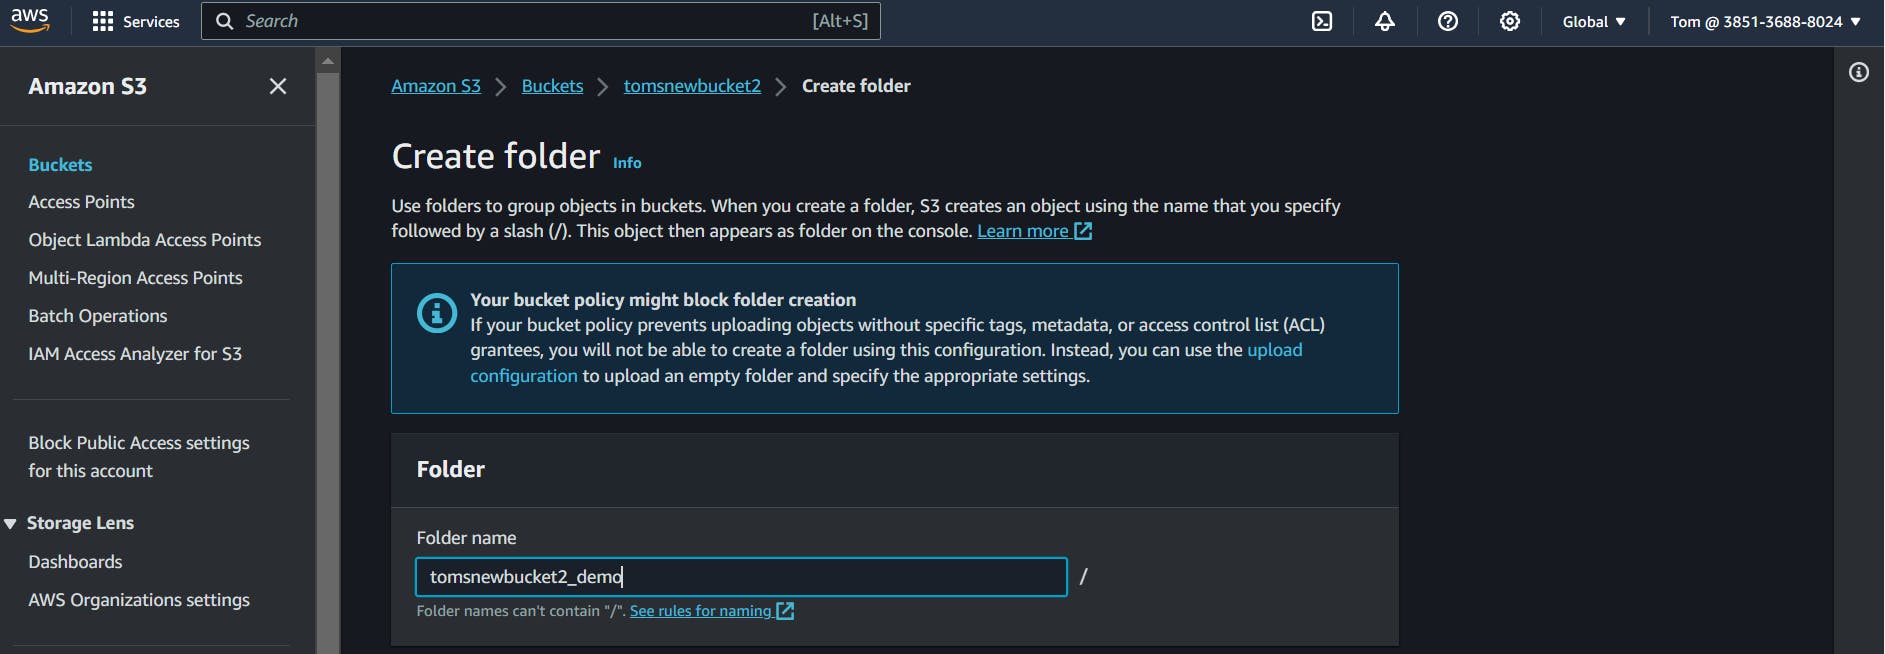

Here we can see Tom can not perform any operation on
tomsnewbucket2because we have assigned the resource base policy here on the buckettomsnewbucket1only that user Tom can perform any operation on onlytomsnewbucket2.
🎭 IAM Role & Trust Policy
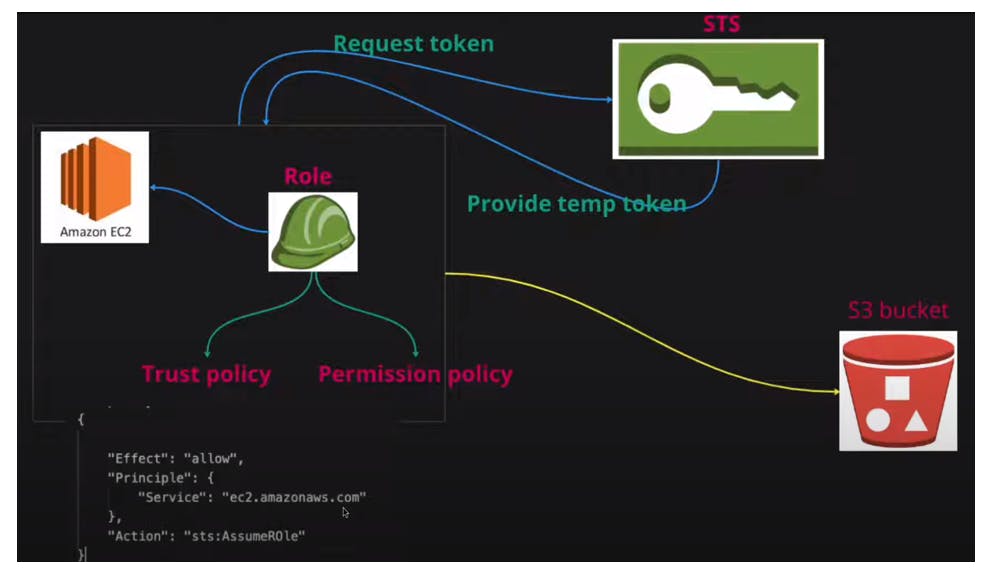
Purpose:An IAM role has some similarities to an IAM user and is used to grant permissions to AWS services or non-human entities.Usage:They are commonly used to provide access to applications running on AWS services.Authentication:IAM Roles provide temporary credentials for entities assuming the role.Permission:Permissions are attached to the role and are assumed by entities.Trust Relationship:IAM Roles define trust relationships that specify which entities are allowed to assume the role.Credential Rotation:IAM Roles provide temporary credentials that are automatically rotated by AWS.Auditing and Compliance:Actions performed by entities assuming a role are logged under the role’s activity.
🤝 Trusted entity type
Roles can be used by the following:
AWS service:Allow AWS services like EC2, Lambda, or others to perform actions in this account.AWS account:Allow entities in other AWS accounts belonging to you or a 3rd party to perform actions in this account.Web identity:Allows users federated by the specified external web identity provider to assume this role to perform actions in this account.SAML 2.0 federation:Allow users federated with SAML 2.0 from a corporate directory to perform actions in this account.Custom trust policy:Create a custom trust policy to enable others to perform actions in this account.
🤳 Assume Role in AWS
Assuming a role involves using a set of temporary security credentials that you can use to access AWS resources that you might not normally have access to
🔑 STS (Secure Token Service)
Returns a set of temporary security credentials that you can use to access AWS resources. These temporary credentials consist of an access key ID, a secret access key, and a security token. Typically, you use AssumeRole within your account or for cross-account access.
👩💻 Task 2:
Create the EC2 instance and connect using SSH and access the S3 bucket list.
Later on, Create the IAM Role, and attach the S3 full access permission to the role, Create the
Trust PolicyusingTrusted entitywhere we will selectAWS service, And will provide theEC2to assume the role within an AWS account.
Launch the Instance:
Log in to the AWS management console and create the EC2 instance.

Connect EC2 Instance & List S3 Bucket:
Connect to the EC2 instance using SSH and use the command to list all S3 buckets.
Note: Please install the
aws clibefore using the aws command.sudo apt update -y sudo apt install awscli aws --versionaws s3 ls
We can see here we can not access the list of the S3 buckets. As we don't have permission or we can't configure our credentials
(access key & secret key)with aws cli. But here we will use theIAM Role,Trust Policy, andSTS (Secure Token Service)now.Create IAM Role:
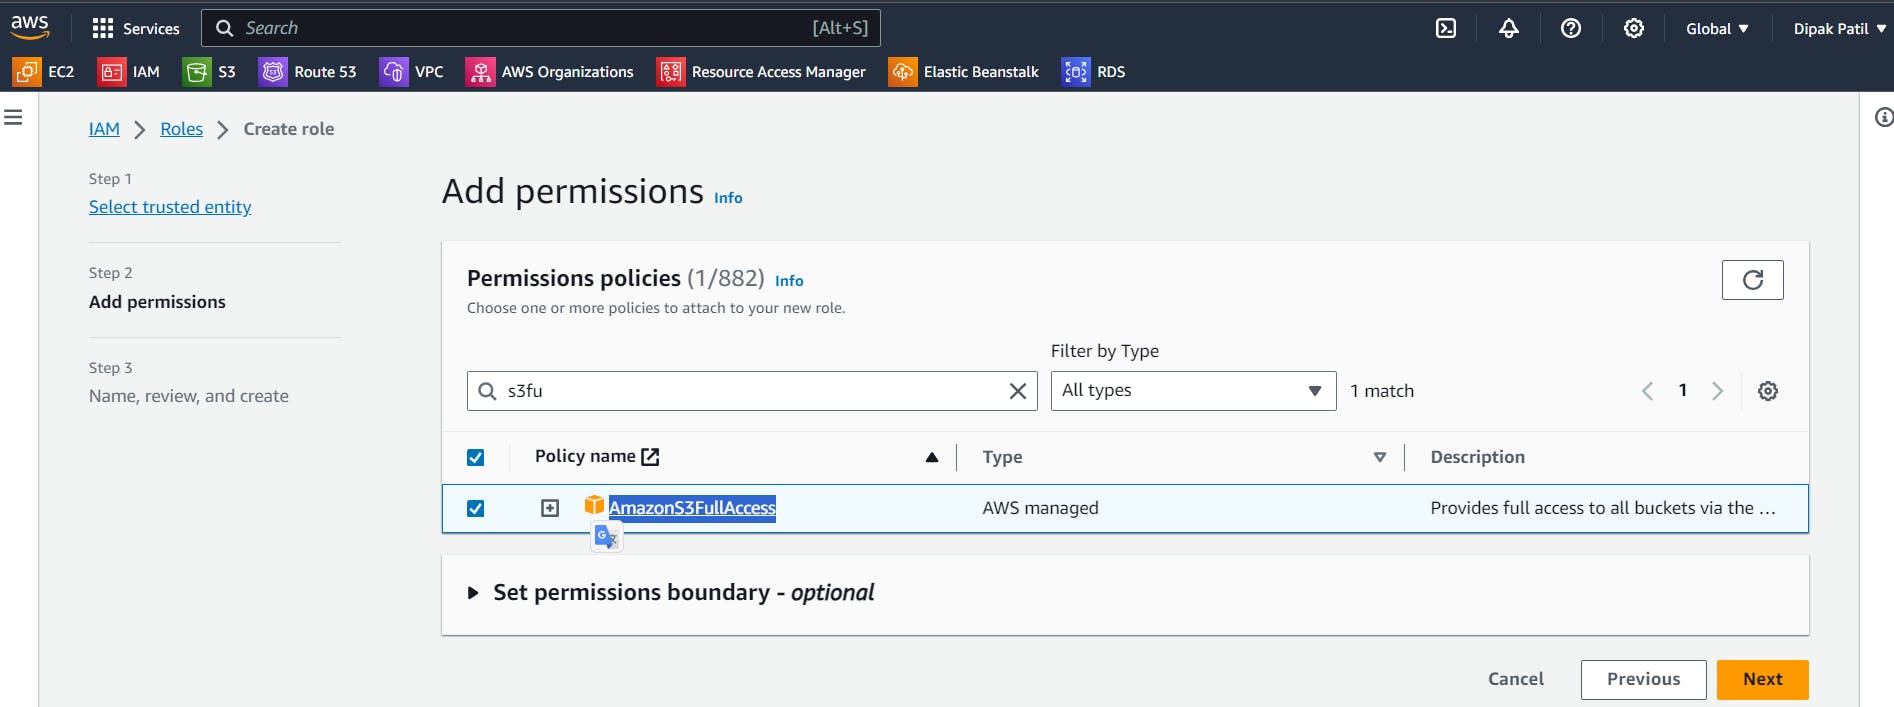
Go to IAM>go to Roles>Create role>Select trusted entity as AWS service> In theUse case>EC2 (Allows EC2 instances to call AWS services on your behalf)> Click onNext> On the next page inPermissions policiesselect >AmazonS3FullAccess> Click onNext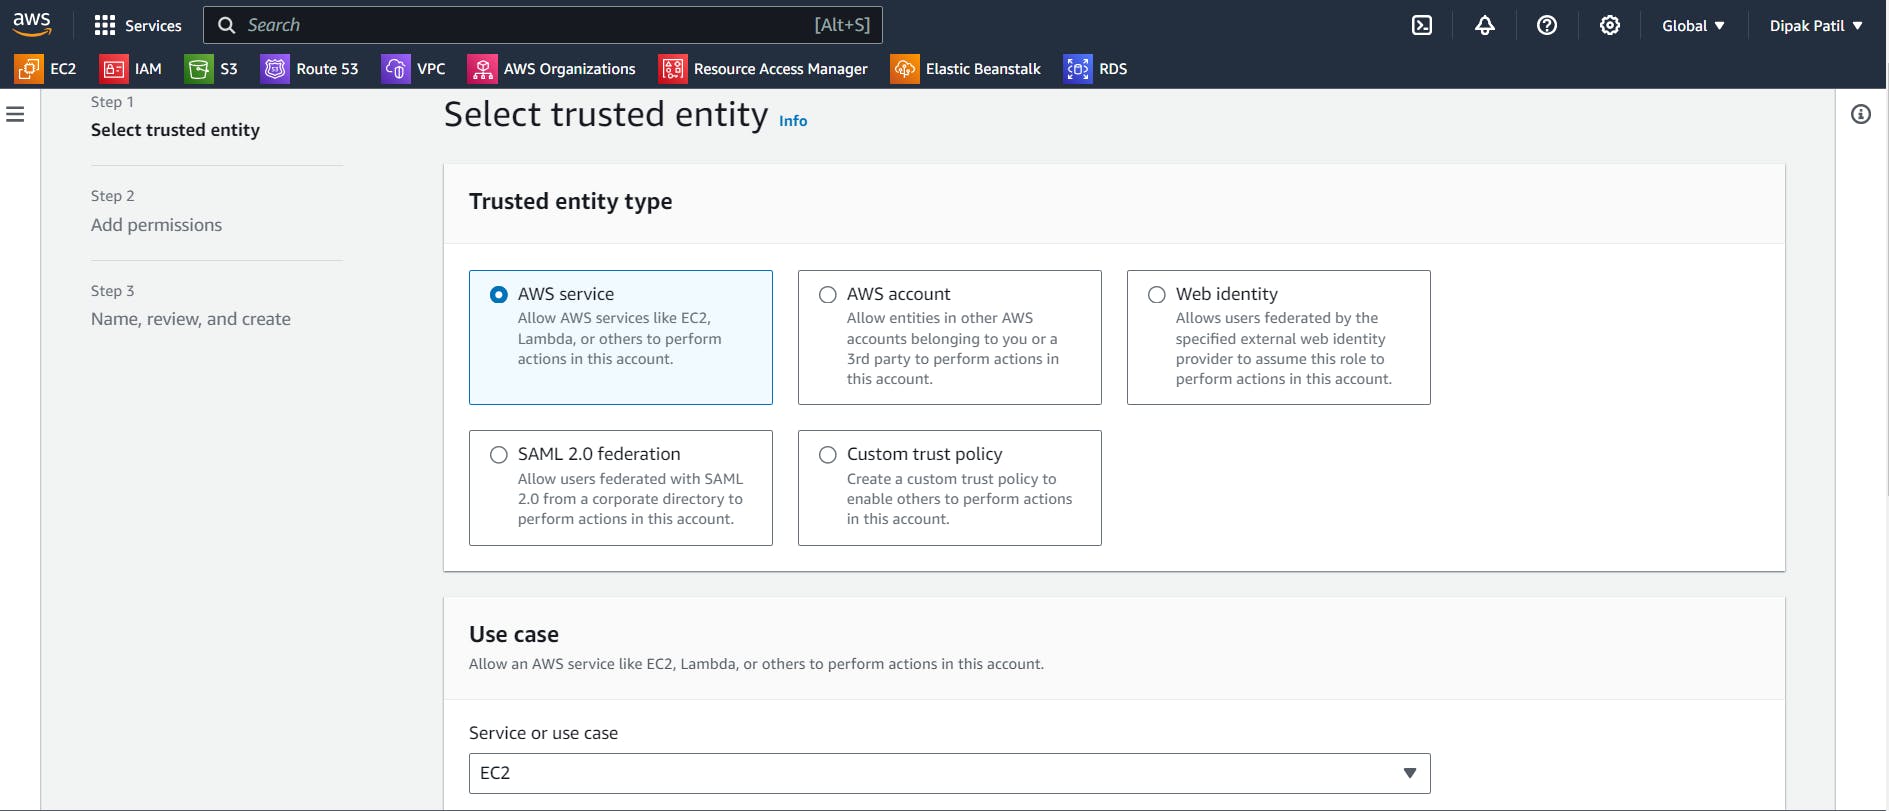
On the next page Give the
Role nameandDescription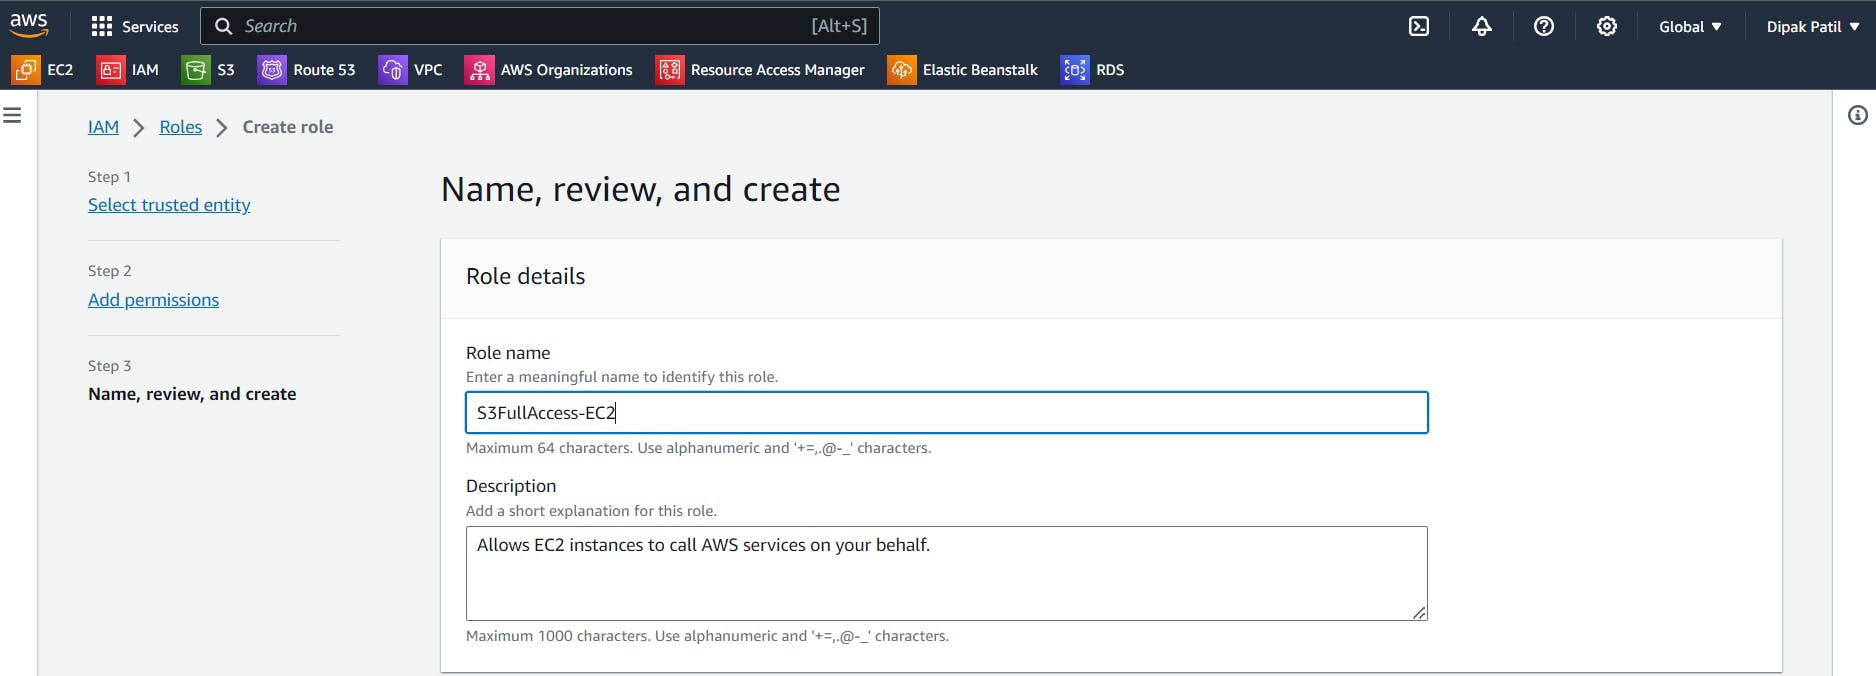
In the
Select trusted entitiesyou can see the Trust Policy is written in JSON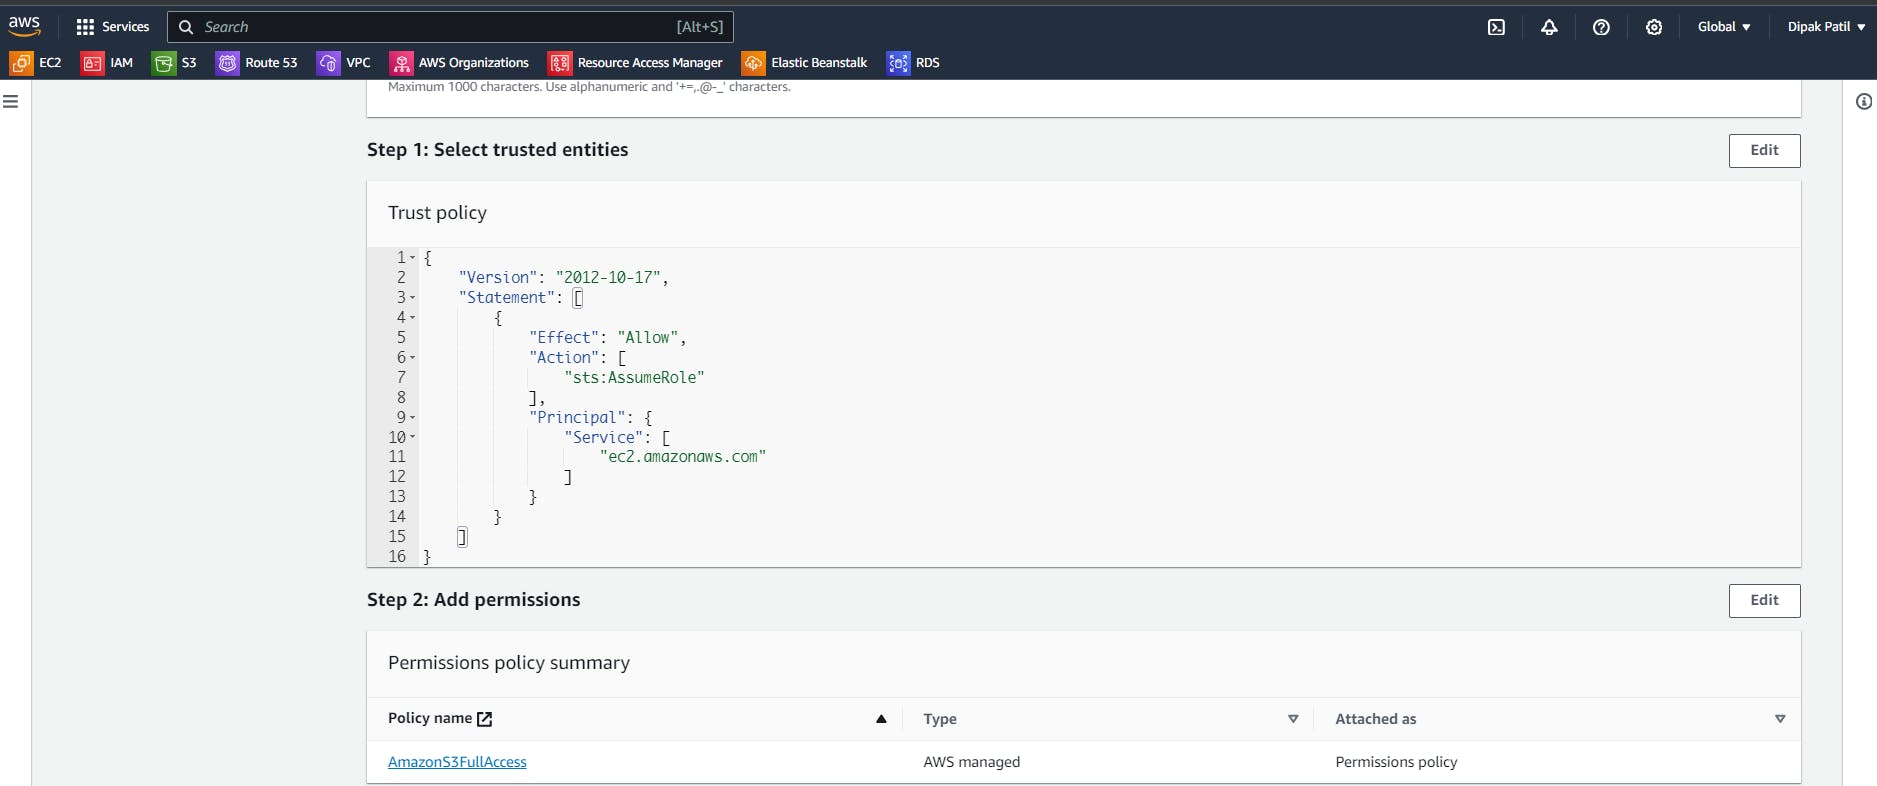
As we have seen in the previous example the Policy JSON document, Here the new thing is
sts:AssumeRoleaction. This action is used to request temporary security credentials to assume an IAM role.Principal: The policy allows EC2 instances to assume the specified role.Attach Role To Instance:
Here we will attach the created
Role to the EC2 instancemeans the EC2 instance will assume the role on behalf of the user.Go to the
EC2 instance and select> On the right side click onAction> click onSecurity> Click onModify IAM Role
Now select the
IAM Rolethat we have created and click onUpdate IAM role.
Connect EC2 Instance & List S3 Bucket:
Connect to the EC2 instance using SSH and use the command to list all S3 buckets.


Now you can see we are able to list the S3 buckets with the help of
IAM Role,Trust Policy(Assume Role), andSTS.
📜 Conclusion
In this tutorial, we have learned about AWS Identity and Access Management (IAM) is a web service that helps you securely control access to AWS resources.
We have learned how permissions and policies are used in AWS to allow and deny the set of operations with the help of hands-on
We also learned about the IAM Role, Trust policy, Assume role, and STS.
Thank you🙏🙏... for taking the time to read this blog. I hope you found the information helpful and insightful. So please keep yourself updated with my latest insights and articles on DevOps 🚀 by following me on
So, Stay in the loop and stay ahead in the world of DevOps!
Happy Learning !... Keep Learning ! 😊