Day-38 Task: Getting Started with AWS Basics☁
AWS, Regions, Availability Zones, Local Zones, Edge Locations, AWS Services, AWS Users, User Group, AWS Identity and Access Management (IAM)


Table of contents
📖 Introduction
Well, till now we have discussed about Git, Linux, Shell Scripting, Docker, Jenkins, and Kubernetes. It’s time to move to the cloud. Let’s get started with AWS!
☁ Cloud Computing
Cloud computing is the on-demand availability of computer system resources, especially data storage and computing power, without direct active management by the user. Large clouds often have functions distributed over multiple locations, each of which is a data center.
🌐 What is AWS?
Definition: AWS, or Amazon Web Services, is a comprehensive cloud computing platform provided by Amazon.
Purpose: It offers a bunch of services, allowing businesses to host applications, store data, and innovate without the burden of physical infrastructure.
🏗️ AWS Global Infrastructure

At the moment of writing this blog, The AWS Cloud spans 99 Availability Zones within 31 geographic regions around the world, with announced plans for 15 more Availability Zones and 5 more AWS Regions in Canada, Israel, Malaysia, New Zealand, and Thailand.
Amazon Web Services (AWS) has a global network of 450+ Points of Presence (PoPs), 400+ Edge Locations, and 13 Regional Edge Caches. These PoPs, Edge Locations, and Edge Caches are used to deliver content to end users with lower latency.
🌎 What are Regions?
A region is a geographical area.
Each region consists of 3 or more availability zones.
Each Amazon Region is designed to be completely isolated from the other Amazon Regions.
Each AWS Region has multiple Availability Zones and data centers.
🗺️ What are Availability Zones?
Availability Zones are physically separate and isolated from each other.
AZs span one or more data centers and have direct, low-latency, high throughput, and redundant network connections between each other.
Each AZ is designed as an independent failure zone.
An Availability Zone is represented by a region code followed by a letter identifier; for example,
us-east-1afor theUS East (N. Virginia)region.
🌌 What are Local Zones?
AWS Local Zones place compute, storage, database, and other select AWS services closer to end-users.
With AWS Local Zones, you can easily run highly demanding applications that require single-digit millisecond latencies to your end-users.
Each AWS Local Zone location is an extension of an AWS Region where you can run your latency-sensitive applications using AWS services such as Amazon Elastic Compute Cloud, Amazon Virtual Private Cloud, Amazon Elastic Block Store, Amazon File Storage, and Amazon Elastic Load Balancing in geographic proximity to end-users.
🚉 Edge Locations and Regional Edge Caches
Edge locations are Content Delivery Network (CDN) endpoints for CloudFront.
Currently, there are over 200 edge locations.
Regional Edge Caches sit between your CloudFront Origin servers and the Edge Locations.
A Regional Edge Cache has a larger cache width than each of the individual Edge Locations.
🛠️ AWS Services: Tools of Transformation
Let’s dive into the AWS services, each designed to cater to specific needs.
Compute Services 🖥️
EC2 (Elastic Compute Cloud): Provides resizable compute capacity in the cloud, serving as virtual servers for various applications.
Lambda: A serverless compute service, allowing you to run code without provisioning or managing servers
Storage Services 🗄️
S3 (Simple Storage Service): Scalable object storage, perfect for storing and retrieving any amount of data.
EBS (Elastic Block Store): Offers high-performance block storage for use with EC2 instances, ideal for databases and applications.
Database Services 🎲
RDS (Relational Database Service): Managed database service supporting multiple database engines like MySQL, PostgreSQL, and SQL Server.
DynamoDB: A fast and flexible NoSQL database service for applications requiring seamless and quick scalability.
Networking Services 🌐
VPC (Virtual Private Cloud): A logically isolated section of AWS where you can launch resources in a virtual network.
Route 53: A scalable domain name system (DNS) web service, ensuring seamless and secure routing to end-users.
Developer Tools 🛠️
CodeCommit: Fully managed source control service, ensuring secure and scalable code collaboration.
CodePipeline: Continuous integration and continuous delivery service, automating the software release process for fast and reliable updates.
Security and Identity Services 🔐
IAM (Identity and Access Management): A robust service for managing user permissions and ensuring secure access control to AWS resources.
Cognito: Identity management service enabling you to add authentication, authorization, and user management to your applications.
🔐IAM (Identity and Access Management)
AWS Identity and Access Management (IAM) is a web service that helps you securely control access to AWS resources.
With IAM, you can centrally manage permissions that control which AWS resources users can access.
You use IAM to control who is authenticated (signed in) and authorized (has permissions) to use resources.
✍️ Task1:
Create an IAM user with the username of your own wish and grant EC2 Access. Launch your Linux instance through the IAM user that you created now and install Jenkins and Docker on your machine via a single Shell Script.
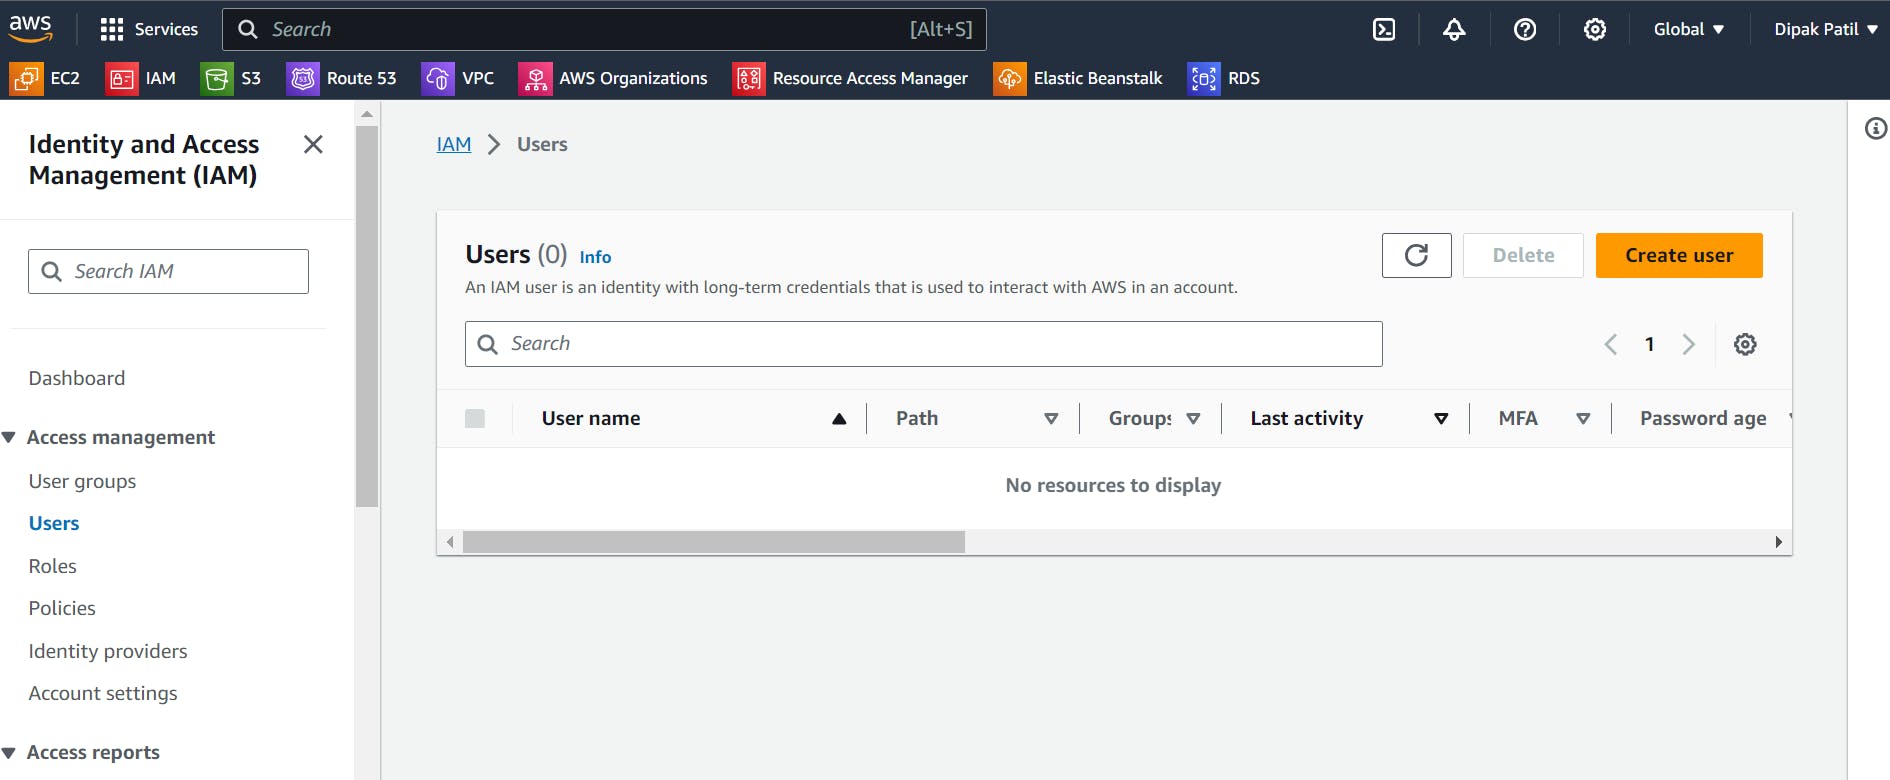
Go To the IAM Dashboard:
Search for IAM in the search bar. The IAM dashboard like the below one appears:
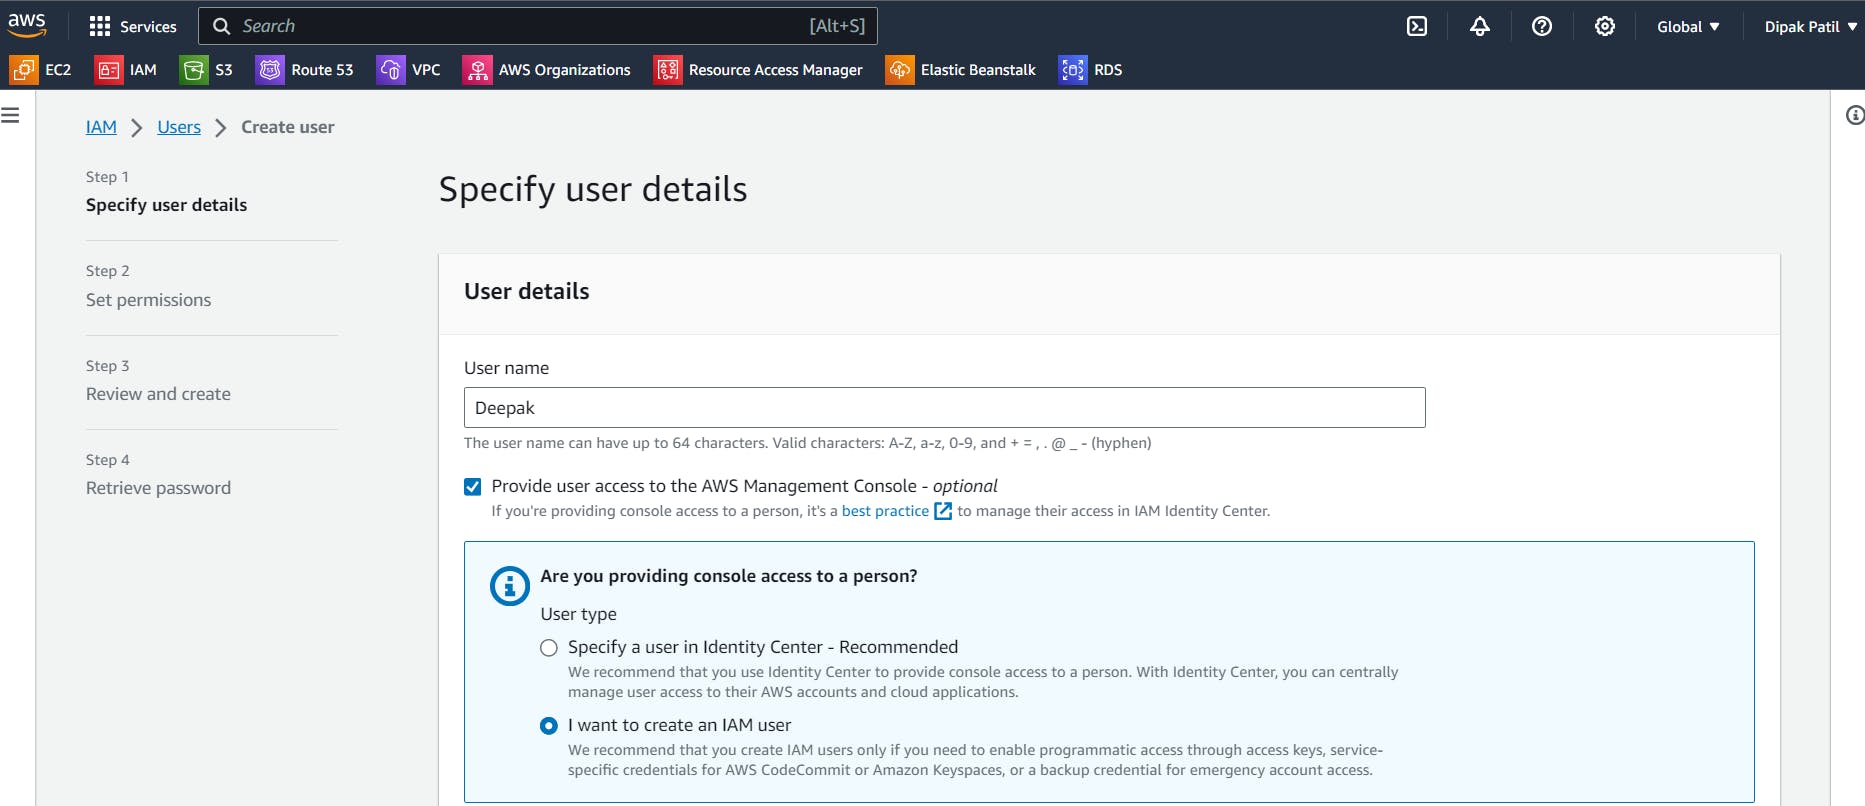
Create User:
Now go to
UsersIn the left corner click onCreate user.Provide the username of the user and Select the required information as shown.
In
Console passwordselect the required field as shown below and create your custom password.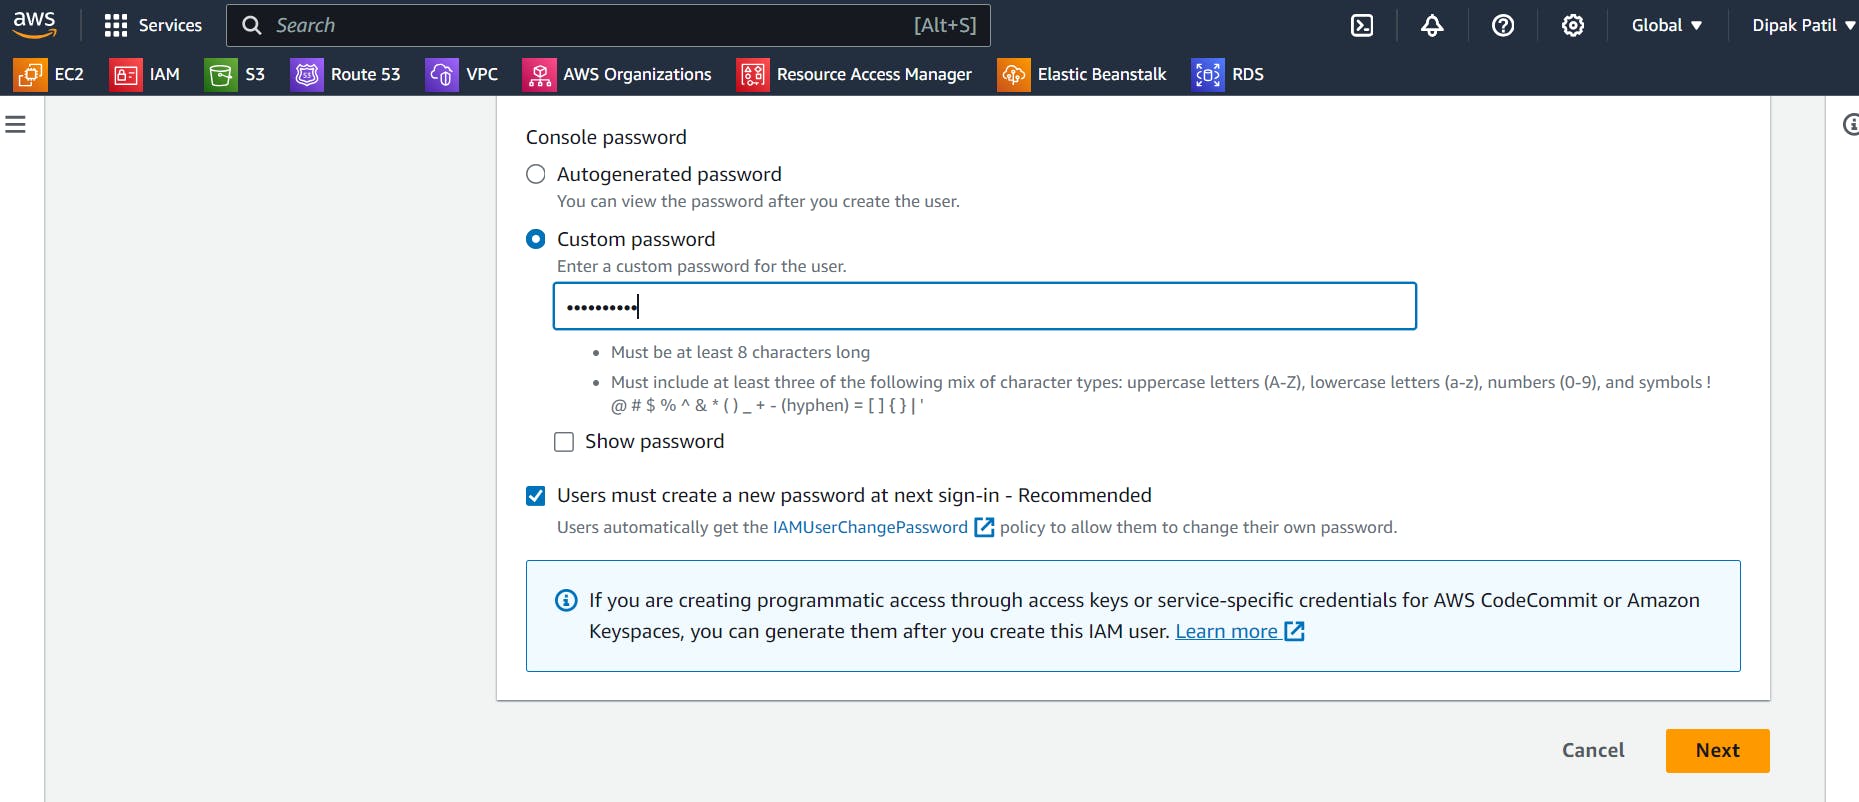
Set the Permissions:
Select “
Attach policies directly” in the Permission Options.In the Permission Policies search bar, search for EC2 and select
“AmazonEC2FullAccess”. And Click onNext.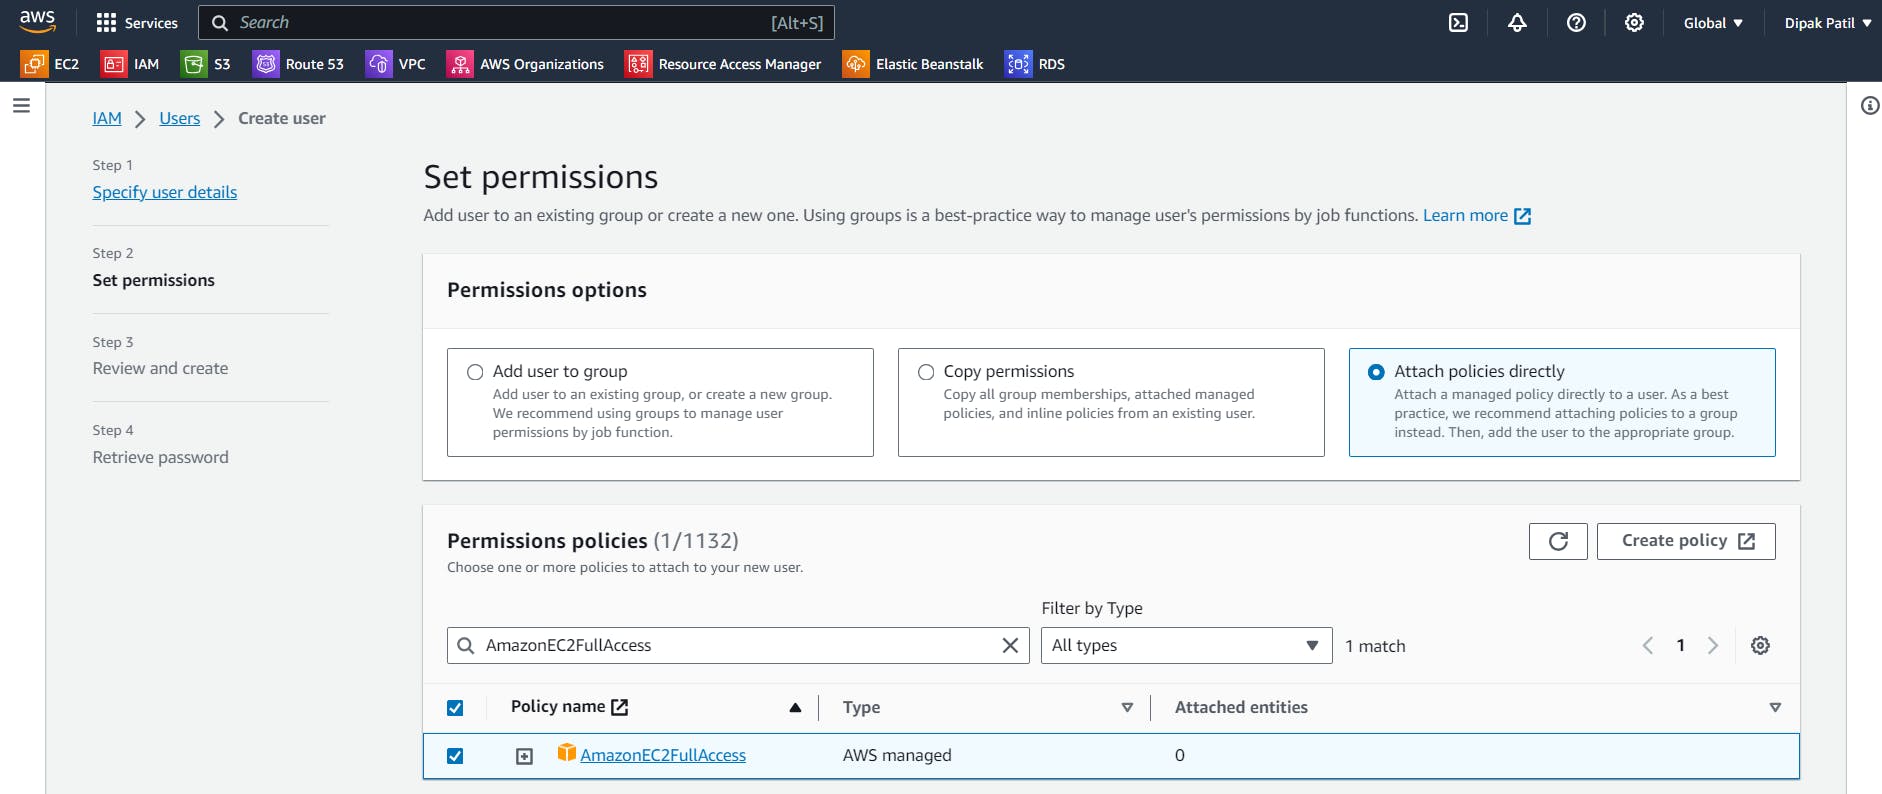
Next, Review the information and click on
Create.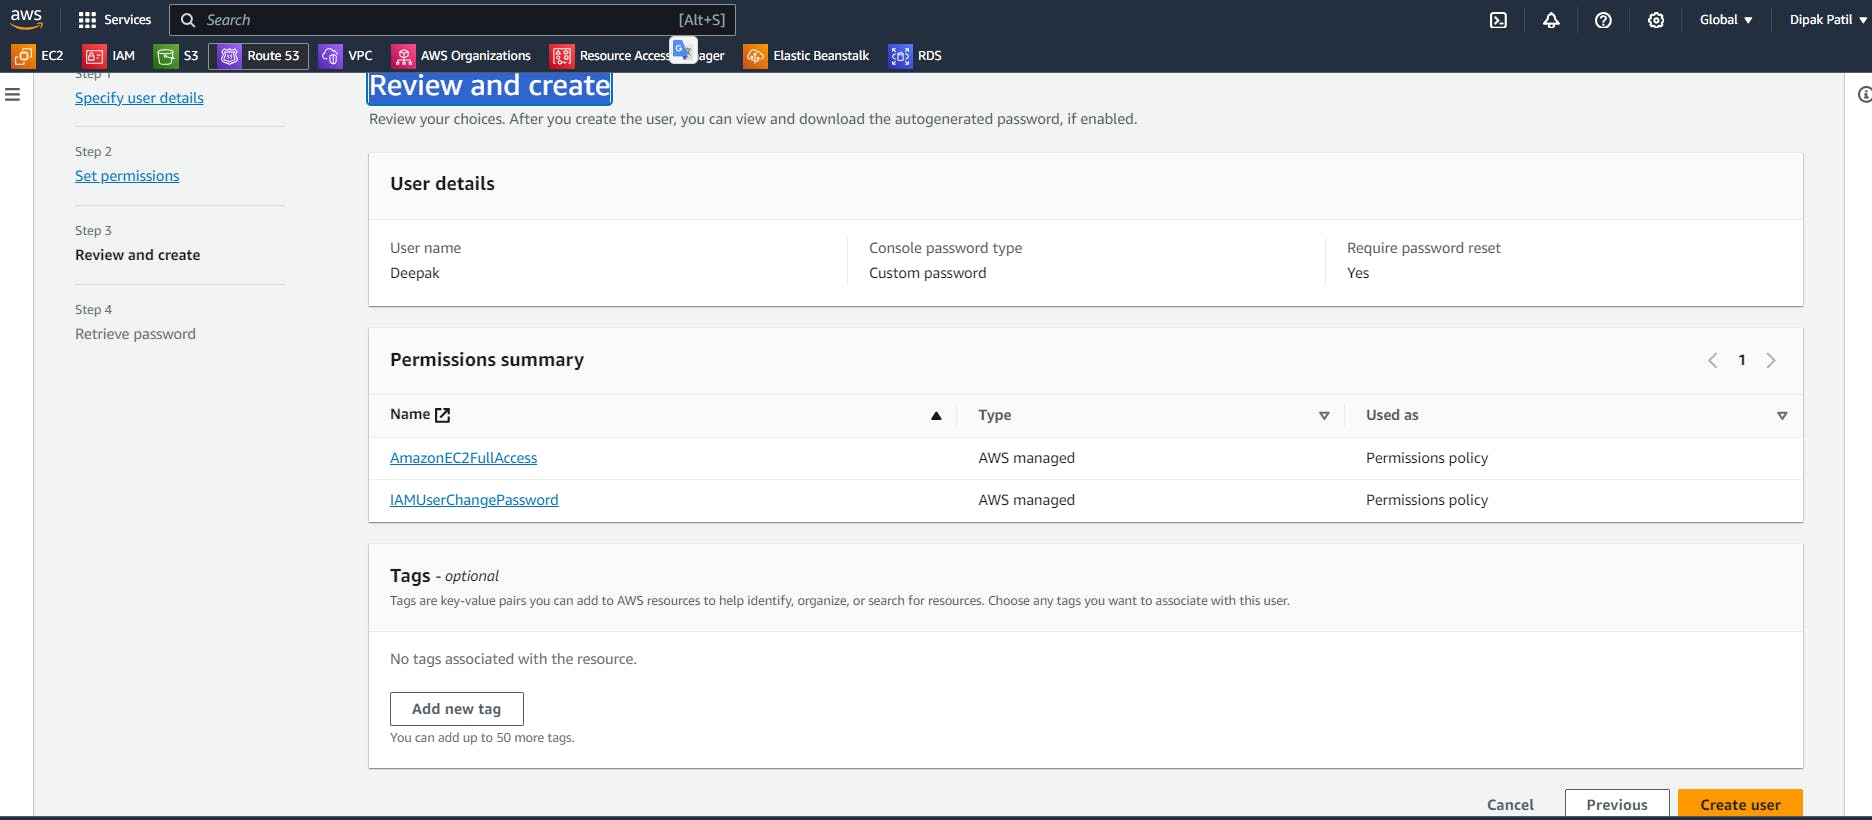
Retrieve the password:
You can view and download the user’s password below or email the user’s instructions for signing in to the AWS Management Console. This is the only time you can view and download this password.

Make it a point to download the .csv file, if you are not accessing the AWS through an IAM user immediately.
Click on Return to User’s list. and you can see the user is created.

Log in to AWS as an IAM user:
Sign out and go to the sign-in page of the AWS Management Console.
Select
IAM userand Provide the12 digit Account ID. and Click onNext.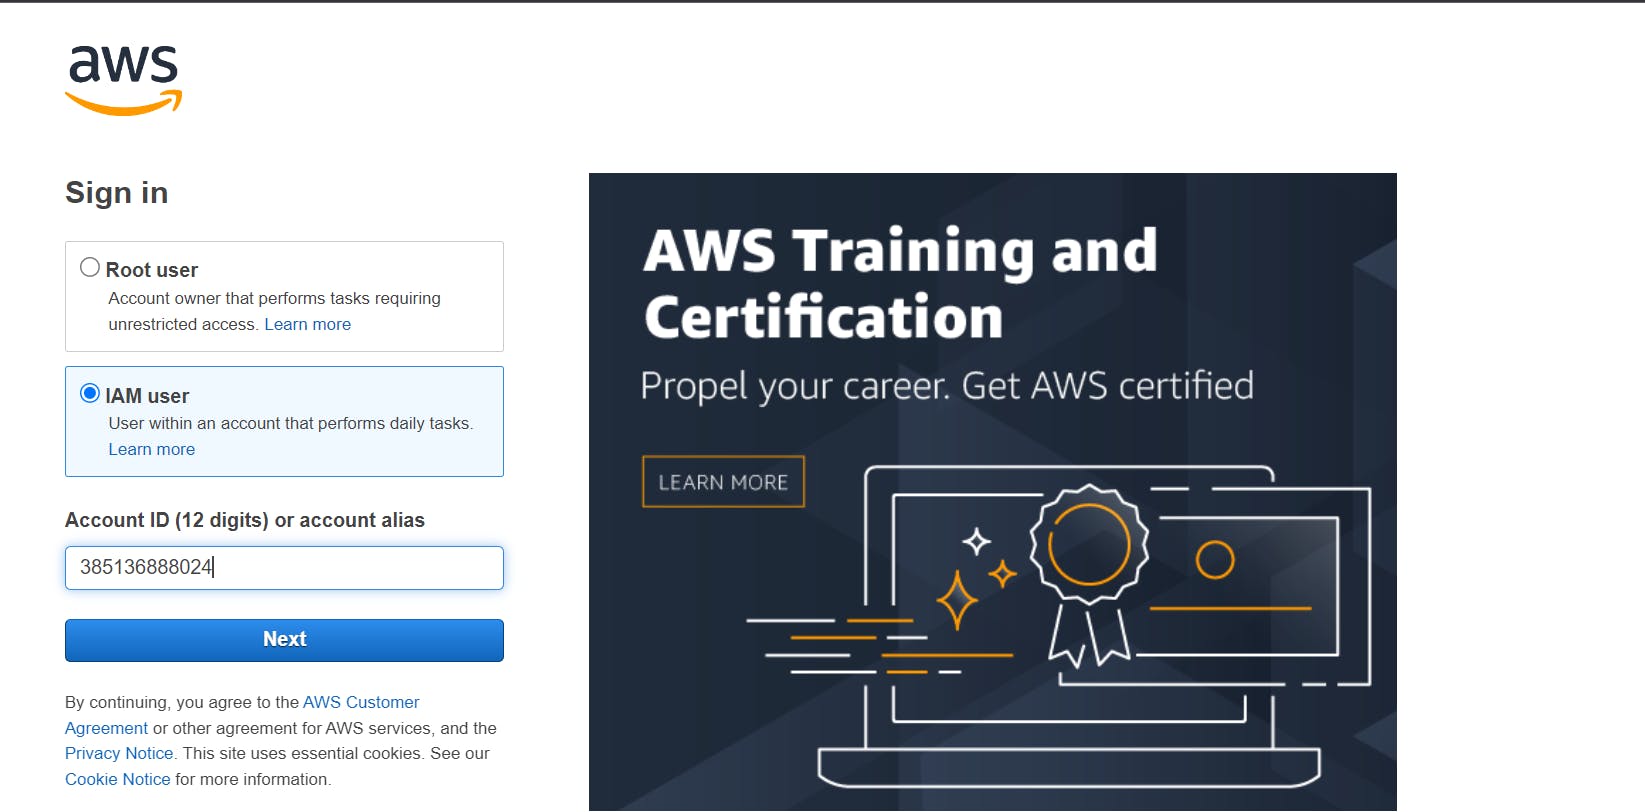
Now sign in as an IAM user using the
usernameandpasswordthat you have created. And Click onSign in.
Now, You will be asked to reset the password. Go ahead and change the password using the details you have. Click on
Confirm password change.
Launch EC2 Instance:
Once you logged in as an IAM user go to the
EC2 sectioncreate the EC2 instance andconnect to the EC2 instance.Note that you can’t connect to the instance using “
EC2 Instance Connect”as you have not given the user access to ec2:InstanceConnect. So log in using SSH.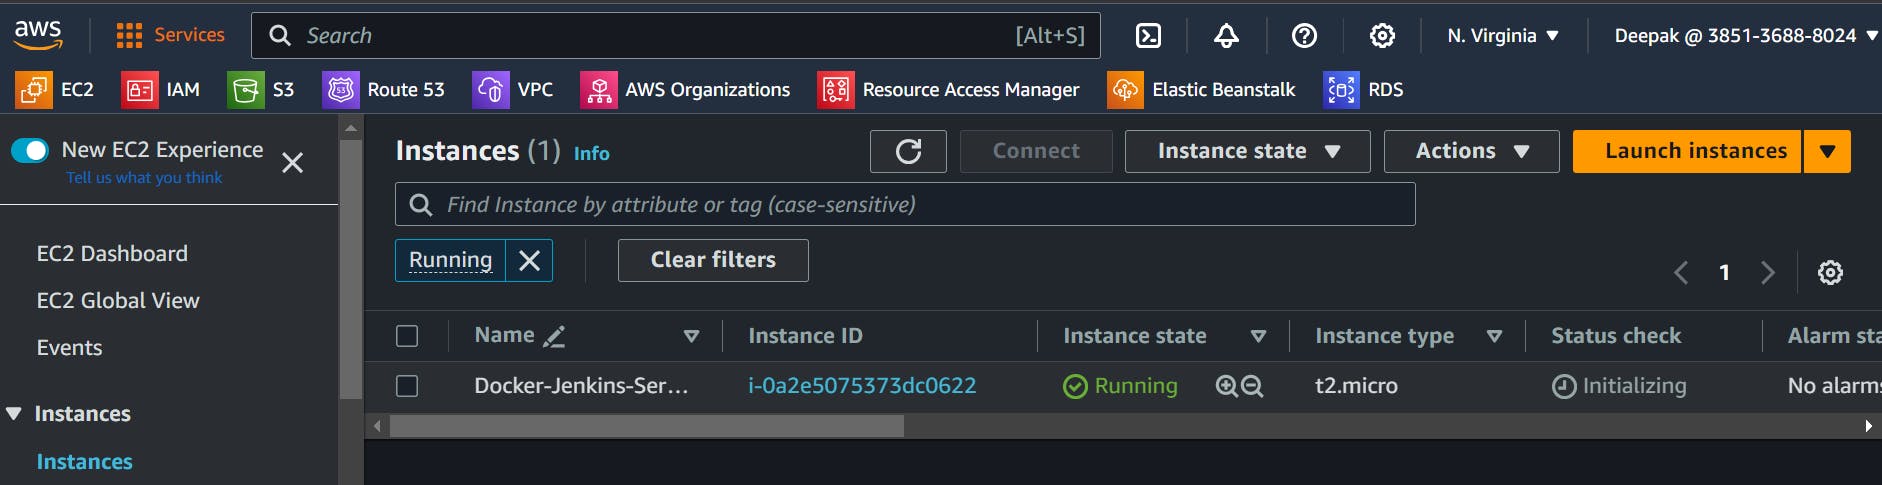
Install Docker & Jenkins:
Let’s install docker and Jenkins in this instance using a shell script.
Here is the shell script file for installing
Docker and Jenkins.#!/bin/bash sudo apt update sudo apt install openjdk-11-jre -y curl -fsSL https://pkg.jenkins.io/debian-stable/jenkins.io-2023.key | sudo tee \ /usr/share/keyrings/jenkins-keyring.asc > /dev/null echo deb [signed-by=/usr/share/keyrings/jenkins-keyring.asc] \ https://pkg.jenkins.io/debian-stable binary/ | sudo tee \ /etc/apt/sources.list.d/jenkins.list > /dev/null sudo apt-get update sudo apt-get install jenkins -y sudo systemctl enable jenkins sudo systemctl start jenkins sudo apt-get update sudo apt-get install docker.io -y sudo systemctl start docker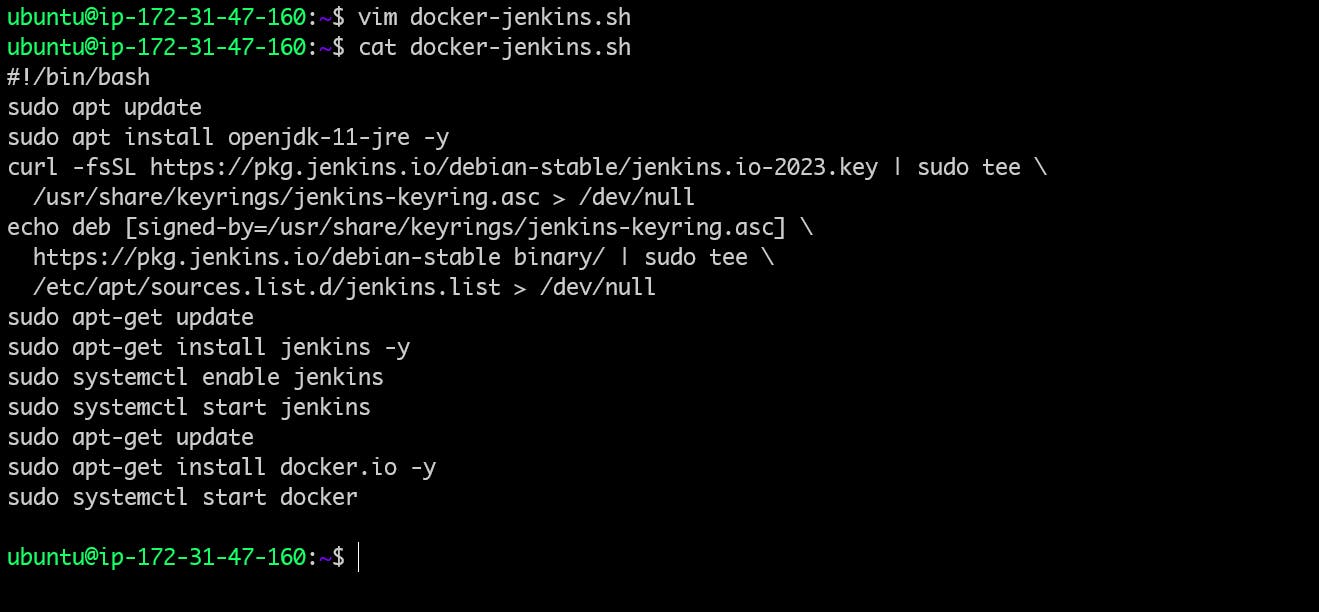
Now, Execute the Shell Script file
Before that assign
executable permissionit to the shell script file otherwise, it will throw the permission denied error.To provide the executable permission use below the command.
chmod +x <file-name>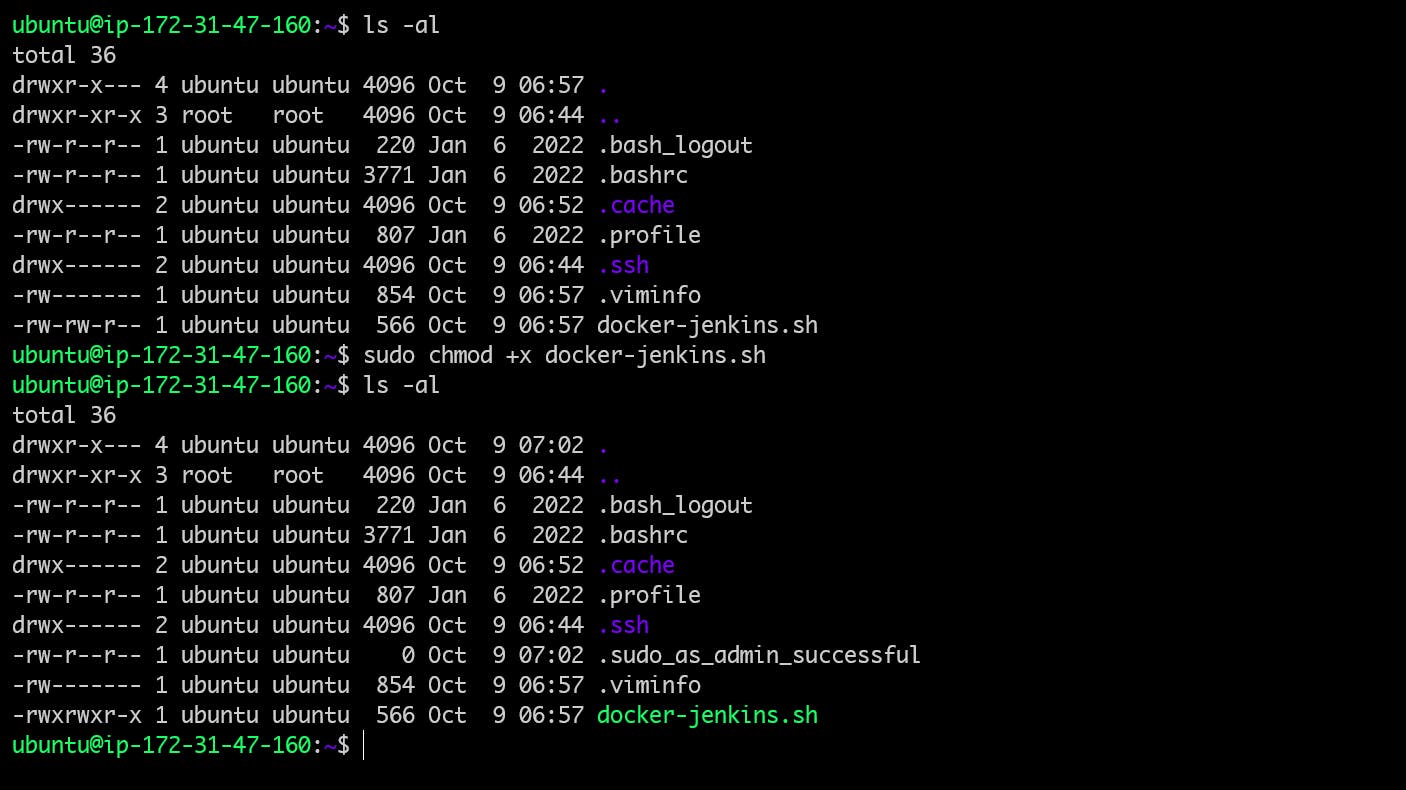
Once you execute the shell script file it will download and install the Docker and Jenkins for you with a single click.
Verify if Jenkins and Docker Installation:
To verify whether Docker and Jenkins are installed successfully or not use the command.
  sudo systemctl status jenkins
  sudo systemctl status docker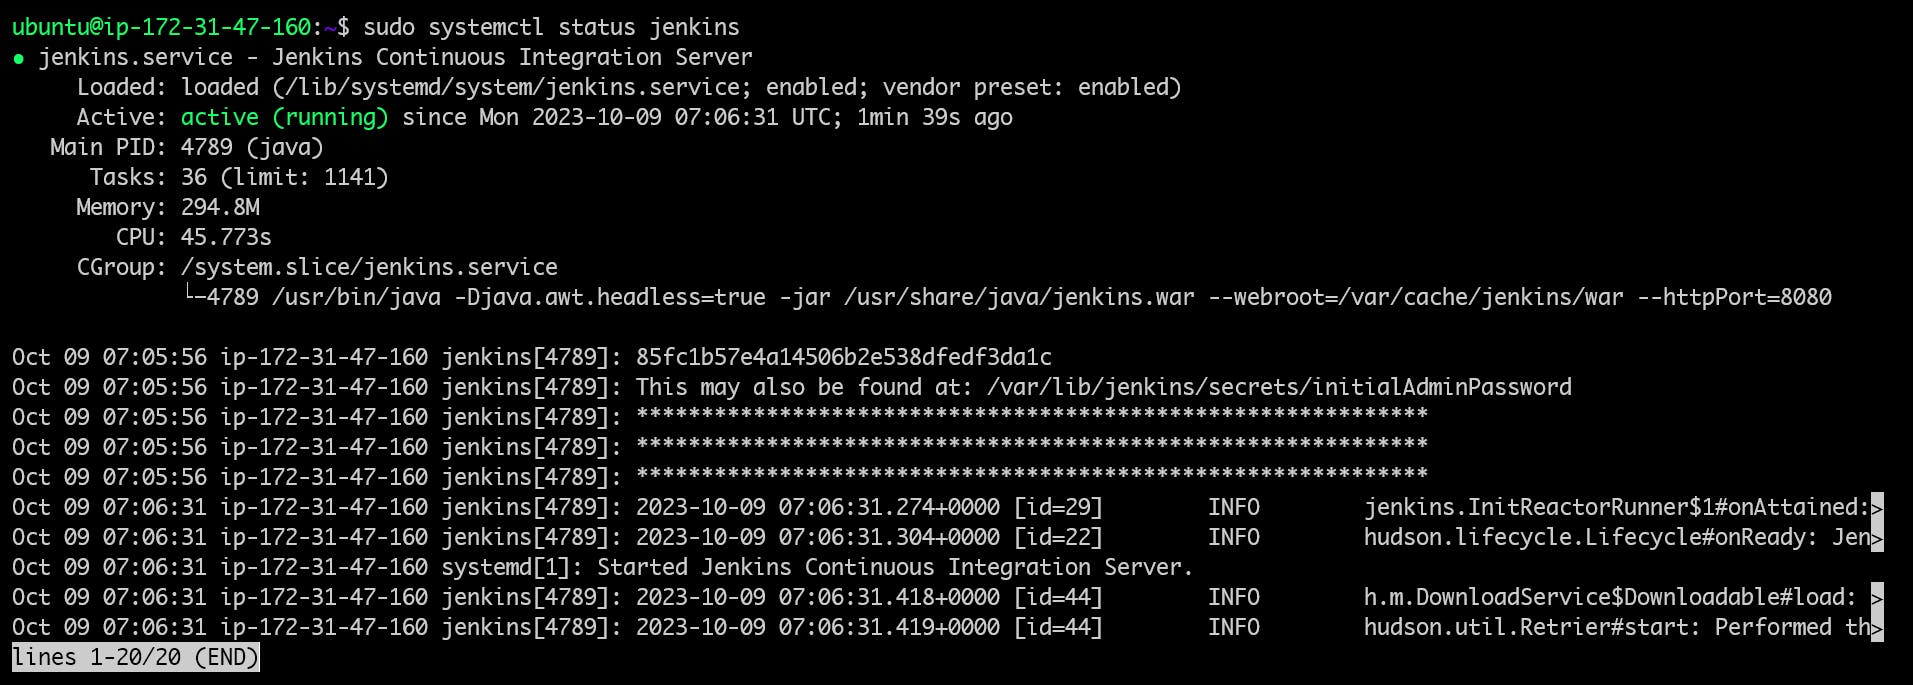
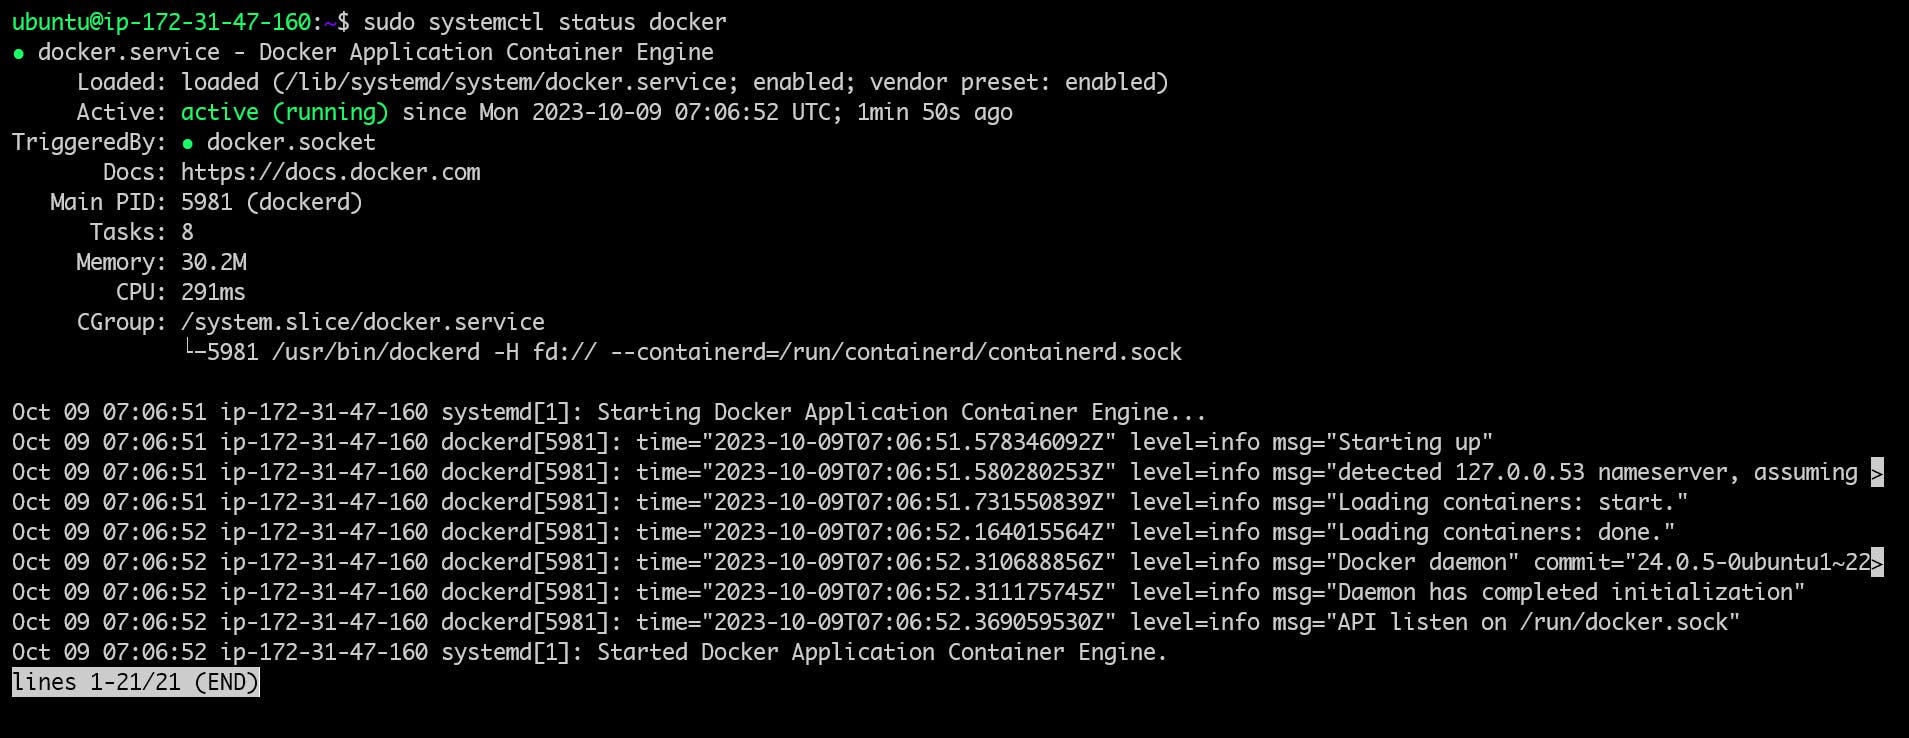
The status of both
DockerandJenkinsisActive(Running),which means the installation was successful.Allow the
port 8080in yourEC2 instance security group.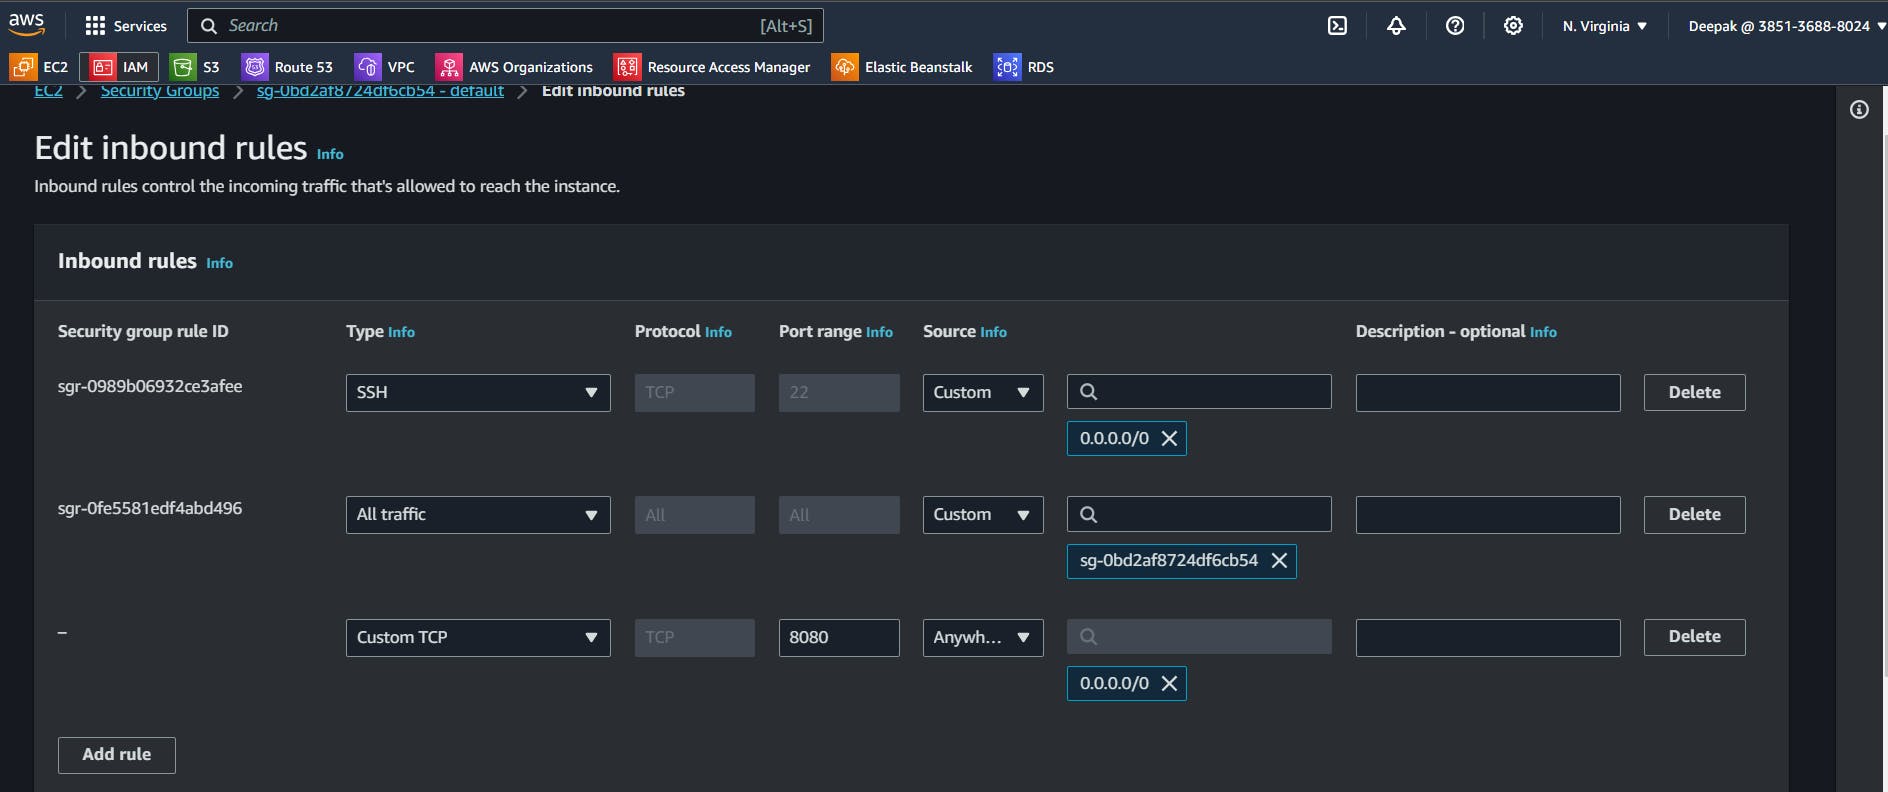
Now go to your browser, open
<EC2-PublicIP:8080>and you must be able to see theUnlock Jenkinspage.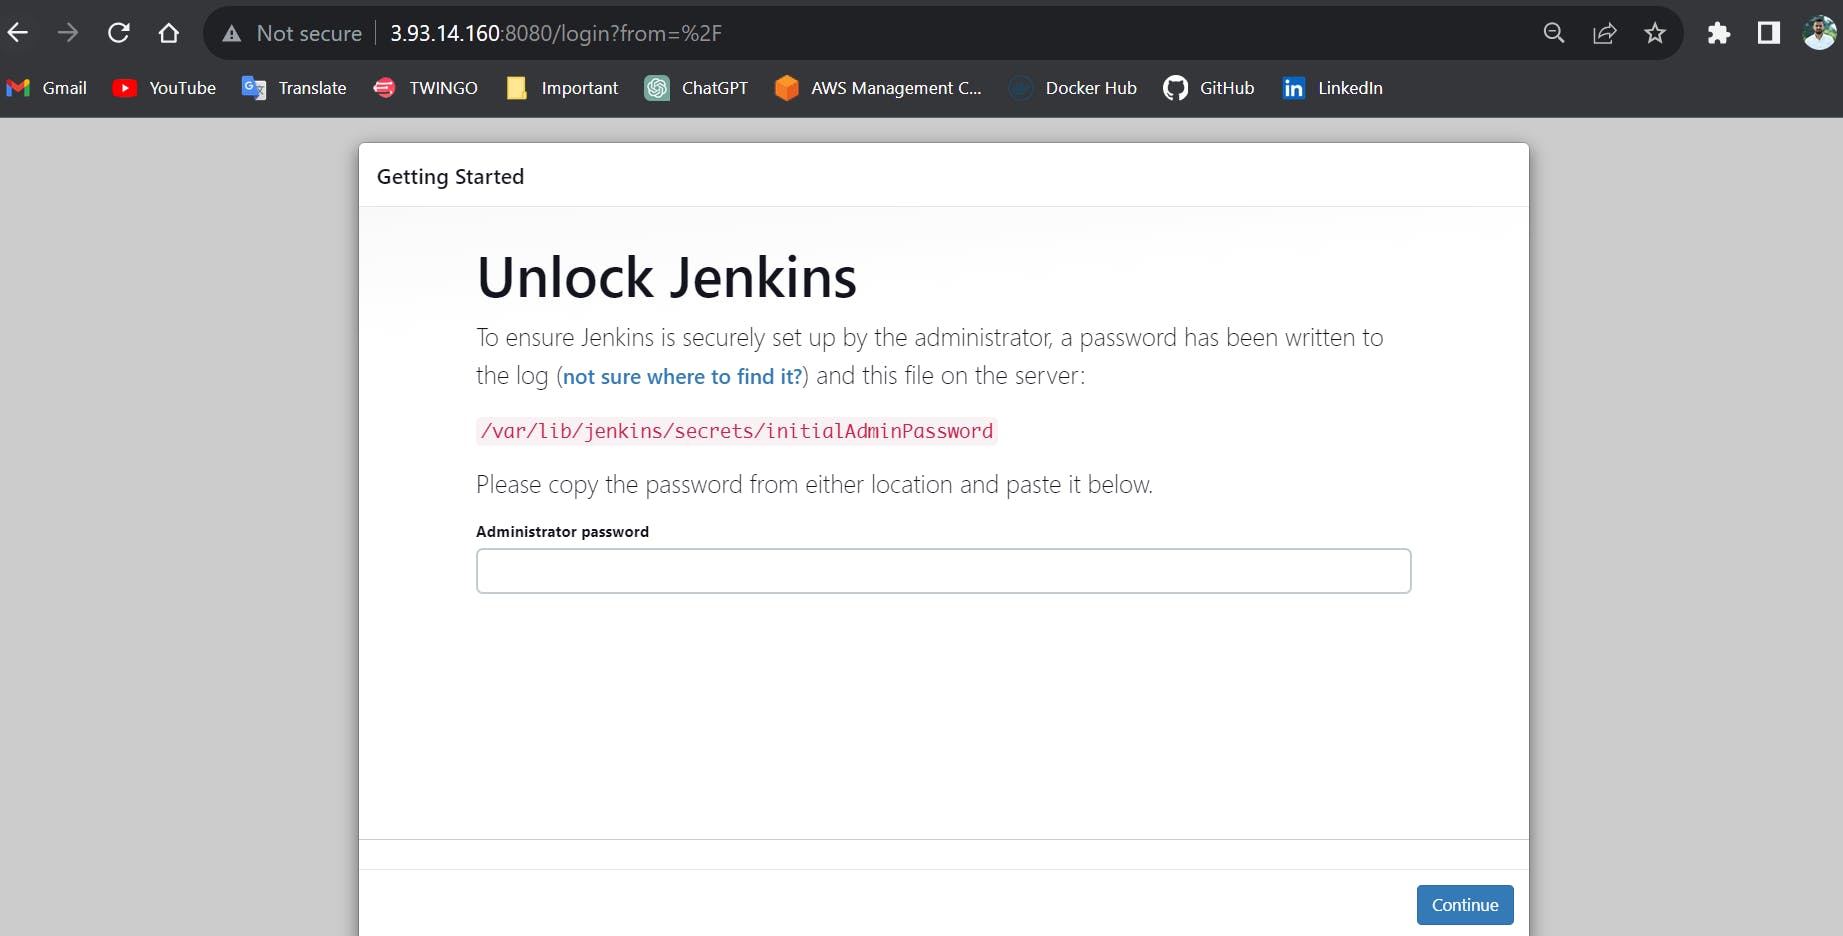
✍️ Task2:
In this task, you need to prepare a DevOps team of avengers. Create 3 IAM users of Avengers and assign them to devops groups with IAM policy
Login as Root User:
- Log in to AWS Management Console as a root user.
Create 3 Users:
In
Task-1we have learned about IAM user creation.Create the 3 users with the name "
IronMan", "SpiderMan", "Thor".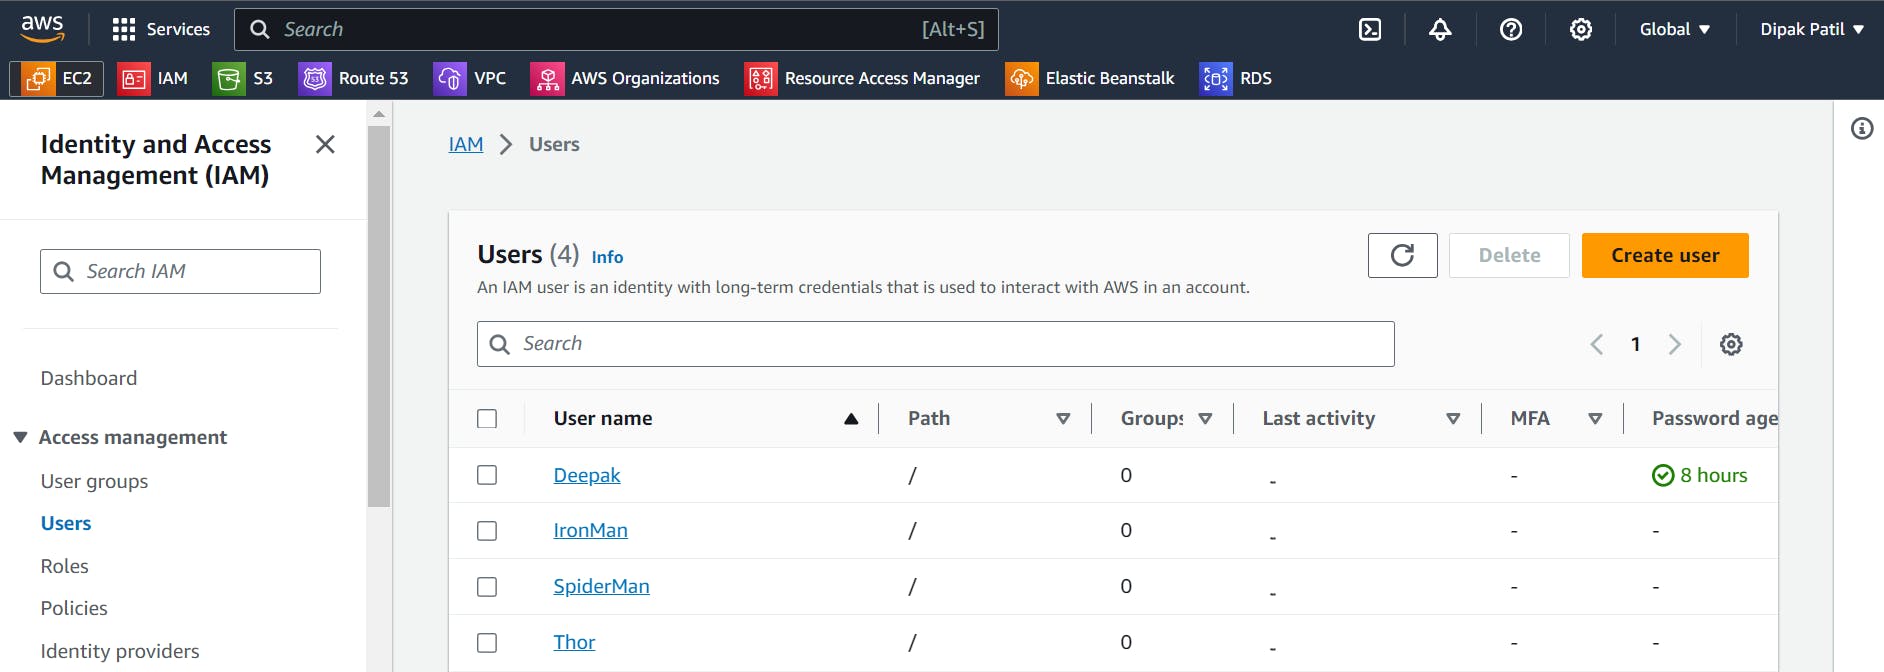
Create User Group:
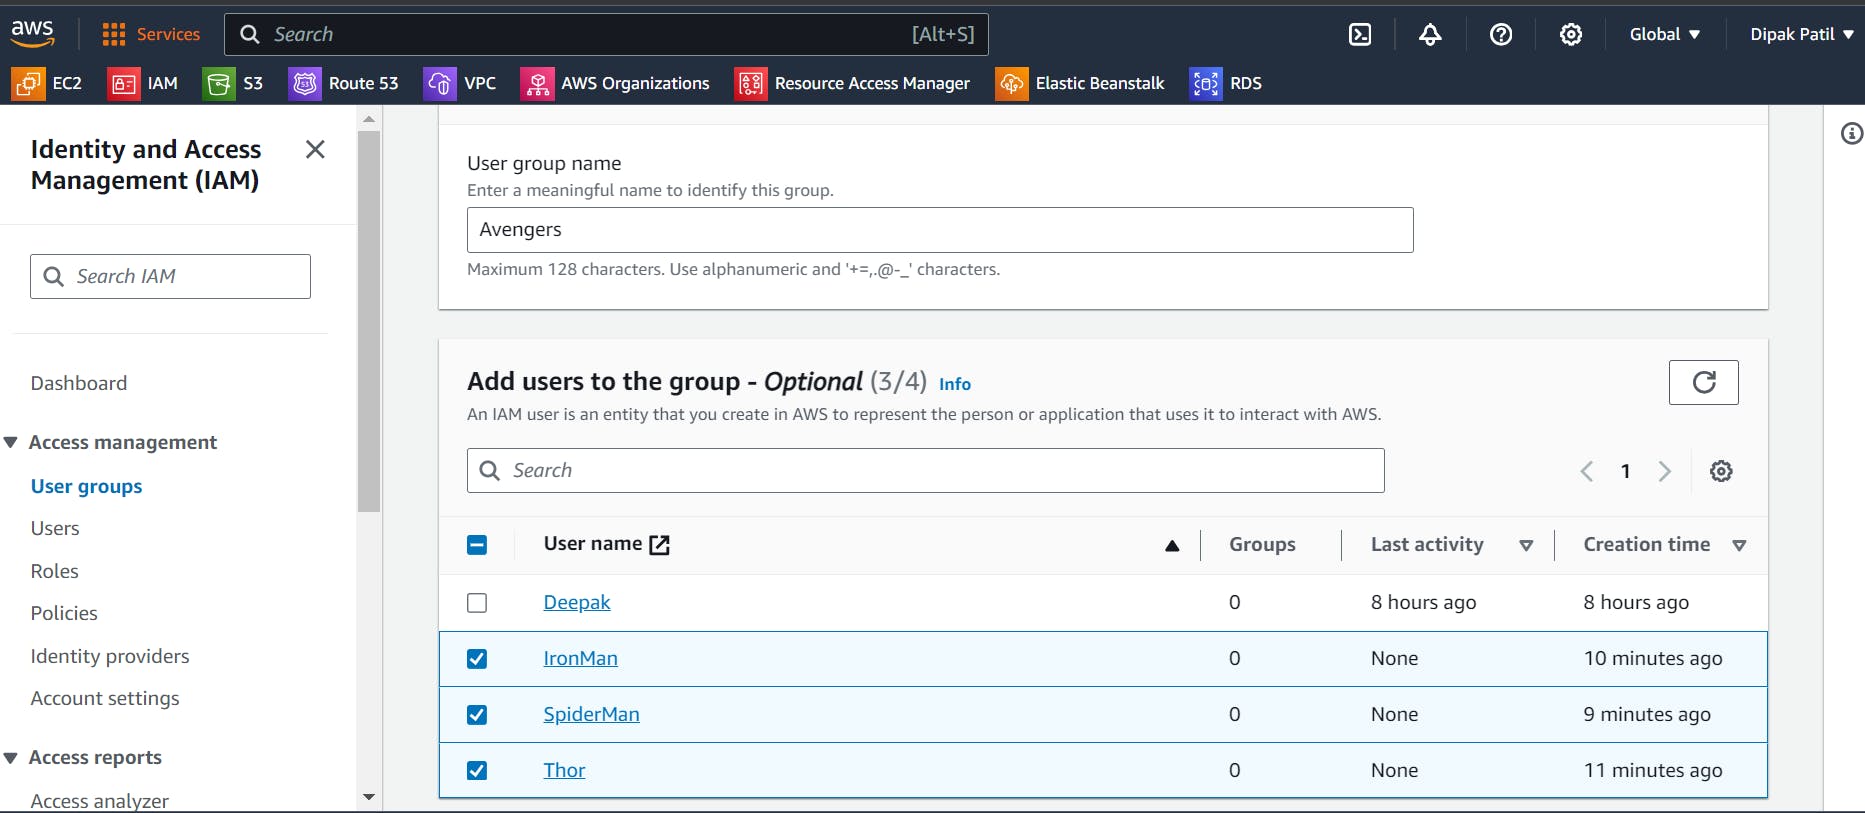
Go to
IAM>User Groups>Create Group> User Group Name“Avengers”.Add created 3 users to the group.
Attach permissions policies > Give this user group access to
S3 Full AccessandEC2 Full Access> Click on Create User Group.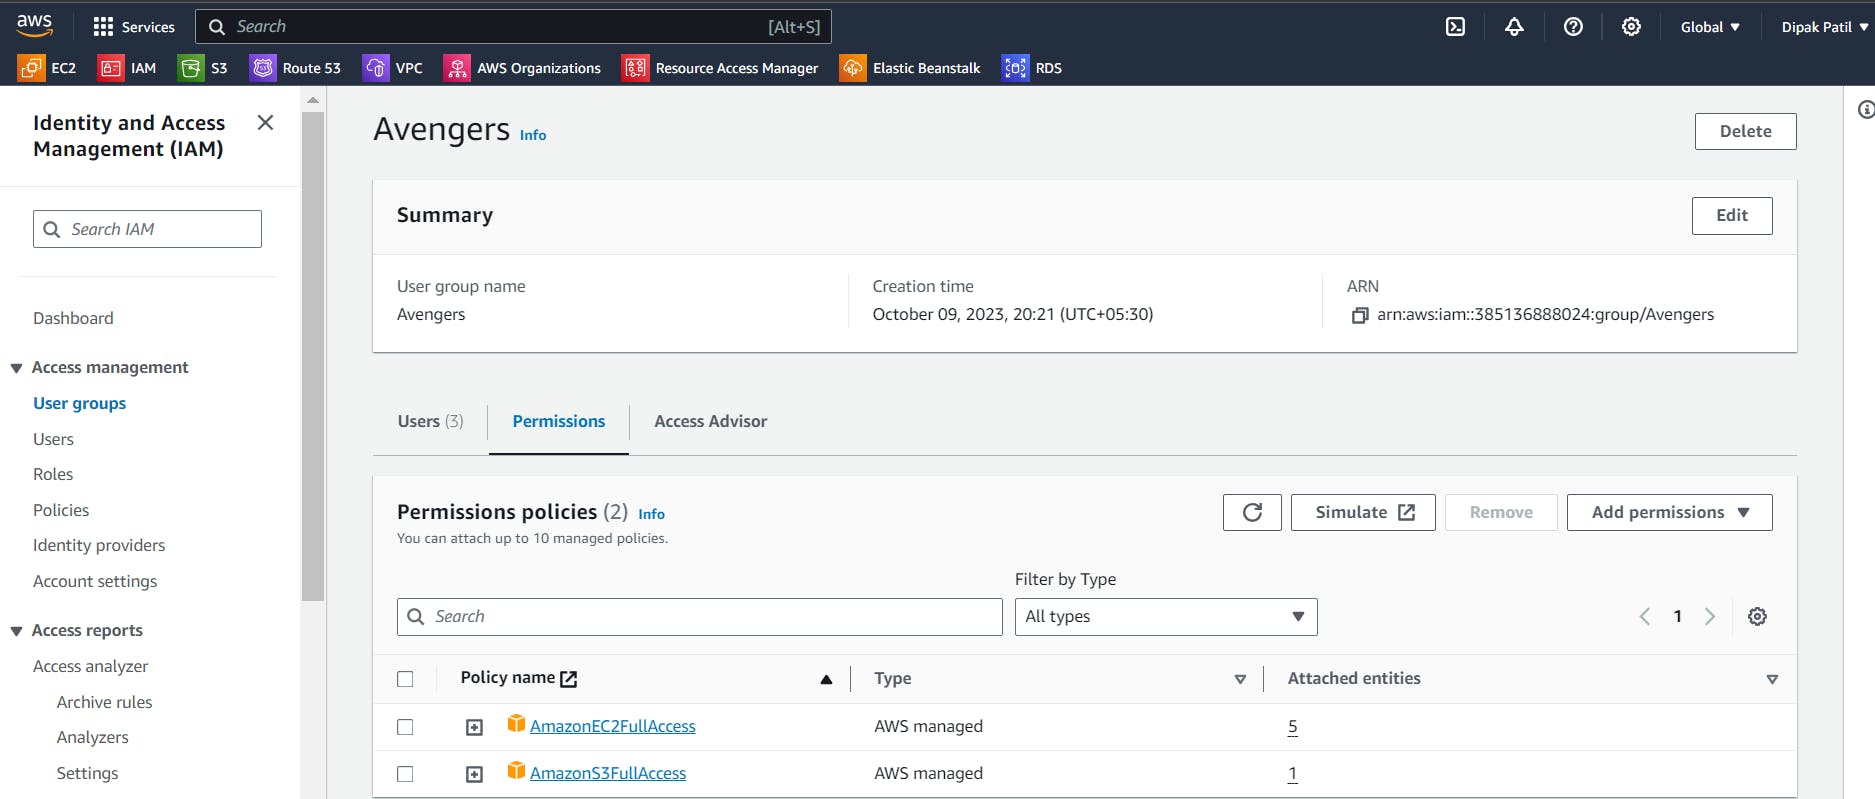
Check the User Permissions:
Now goto
usersclick on any one of the user and see the permissions inPermissionthe section.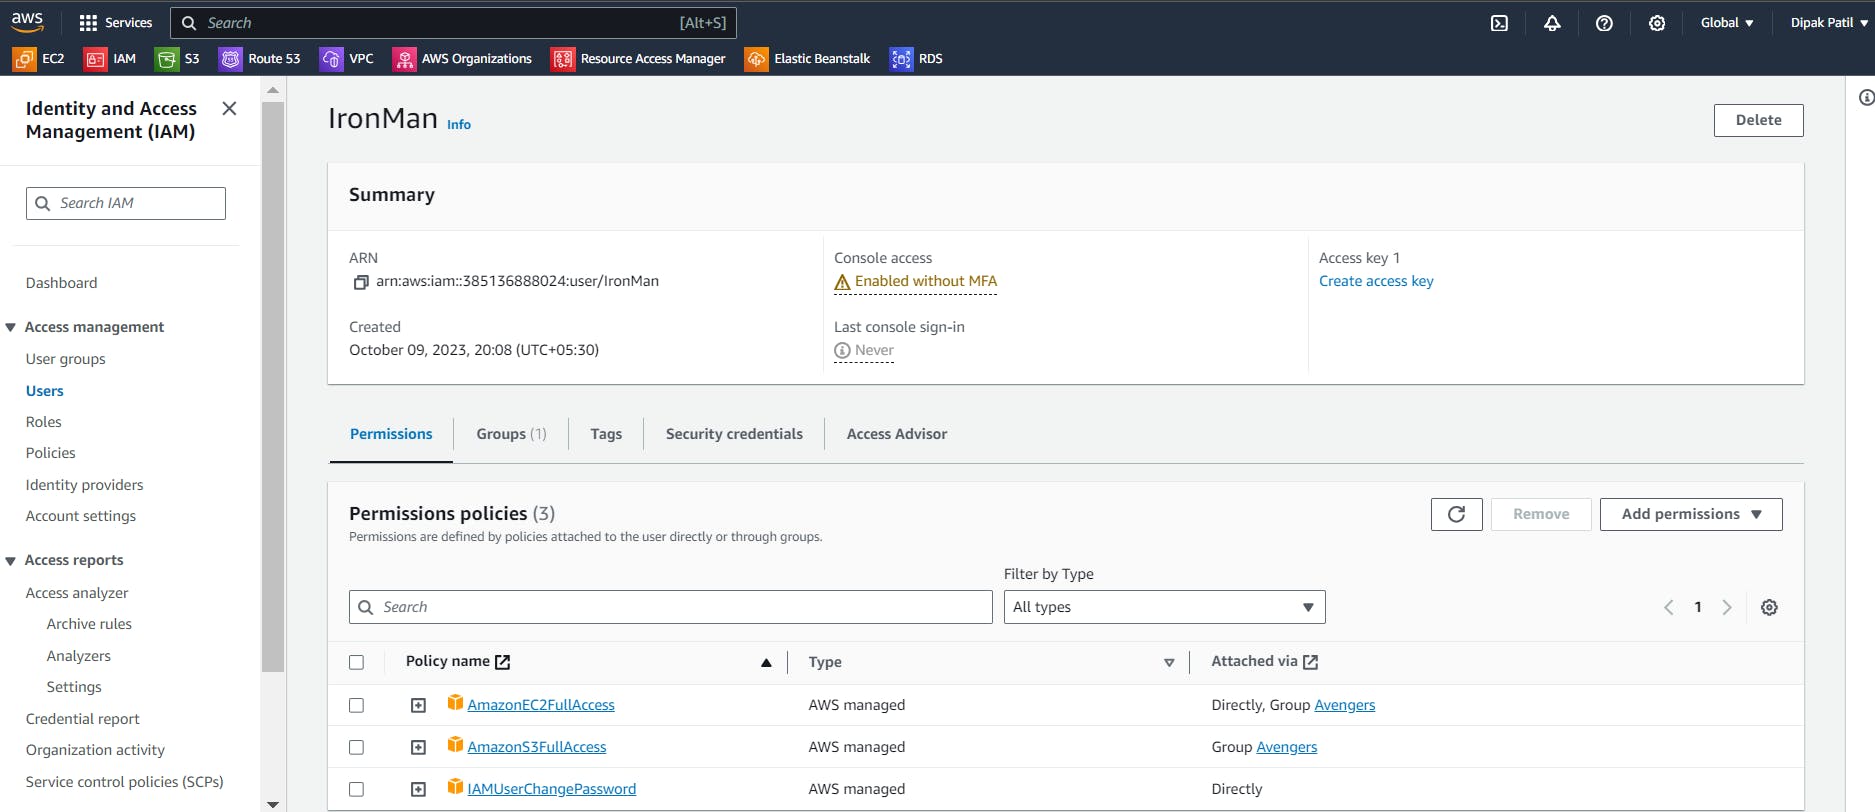
What we have achieved here, I had not given any
permissionsto theseuserswhile creating them. After adding them to theUser Group, they have got the permissions attached to the policy of theAvengersgroup.
📝Summary
In this blog, we have learned about AWS, Regions, Availability Zones, Local Zones, Edge Locations, and Regional Edge Caches, Some of the overviews of AWS services, AWS Identity and Access Management (IAM).
We have also performed some hands-on on IAM user creation and installing applications using Shell script.
We have learned about User Groups, Adding users to the group assigning permissions to the group, and how automatically those permissions are assigned to the added users.
Thank you🙏🙏... for taking the time to read this blog. I hope you found the information helpful and insightful. So please keep yourself updated with my latest insights and articles on DevOps 🚀 by following me on
So, Stay in the loop and stay ahead in the world of DevOps!
Happy Learning !... Keep Learning ! 😊