Day-24 Task: Complete Jenkins CI/CD Project

Hey there! I am Deepak!! Passionate About Cloud & AWS☁️| DevOps ♾️ Technologies 👩🏻💻 And Skilled with Git 🔀 | Docker 🐳 | Kubernetes ☸ | Jenkins 🛠️
👏 Welcome to my blog!!
Hey, I am going to Integrate and Deploy the Node JS To-Do app using EC2server, GitHub, Docker, and most important SSH connection between Jenkins Job and GitHub and Jenkins with a GitHub hook trigger for GITScm polling feature of Jenkins.
Prerequisite
Git Understanding
GitHub Account
AWS Account for the Virtual Machine(EC2 Instance)
Docker Understanding
Docker Compose Understanding
Jenkins Understanding
Note: Here we will use AWS EC2 with Ubuntu Linux OS
Now Let's get started implementing the complete Jenkins CI/CD pipeline
Fork Project To Your GitHub Account
You can use this TO-DO app in case you do not have any project
Here is the link TO Do App Git Repo

Create EC2 Instance (Virtual Machine)
Here we will use Ubuntu as an AWS EC2 Instance(Virtual Machine)
Please check here-> How to Create EC2 Instance step by step
Now we will install Jenkins on this EC2 instance and below are the commands.
Installation Off Jenkins
Please Check Here -> Installation of Jenkins on Ubuntu
Connection Between Jenkins Job & GitHub Repository via GitHub Integration.
To Create an SSH connection between your Server(EC2 Instance) and GitHub we need SSH key, Let's create it.
Connect your
EC2 instanceand go to theTerminaland use the belowssh-keygencommand to generateSSH keyssh-keygen
You can see the message as
"Your identification has been saved in /home/ubuntu/.ssh/id_rsaYour public key has been saved in /home/ubuntu/.ssh/id_rsa.pubThe key fingerprint is:"
Adding SSH & GPG keys In GitHub And Jenkins Project
Go to
GitHub>>Setting>>SSH and GPG keys.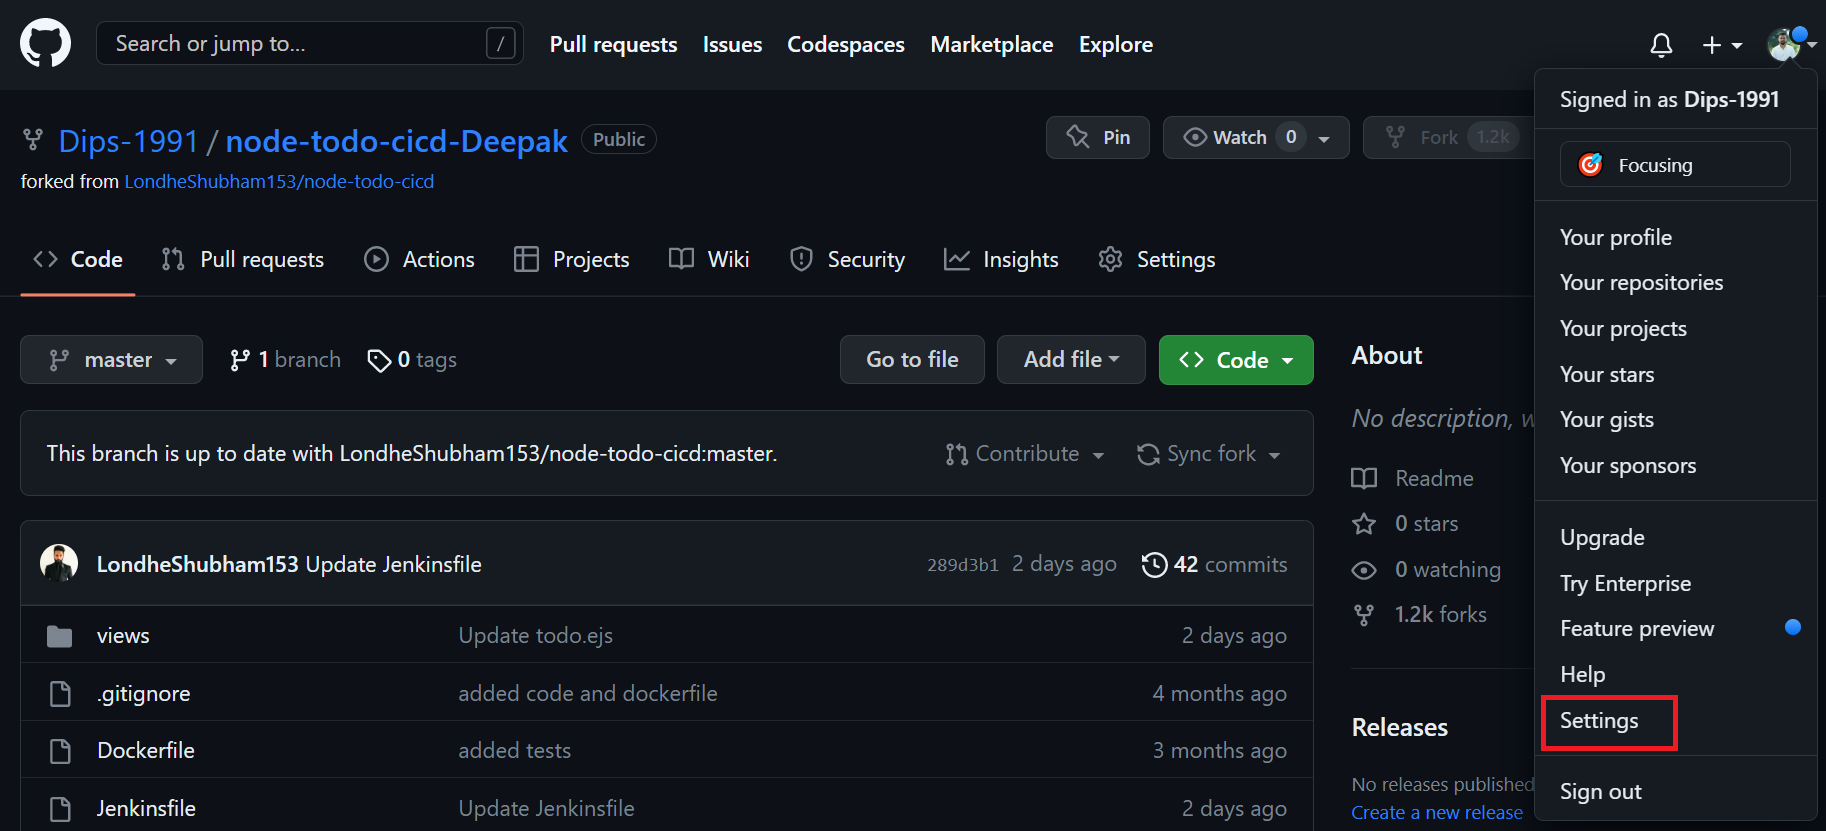

Click on
New SSH key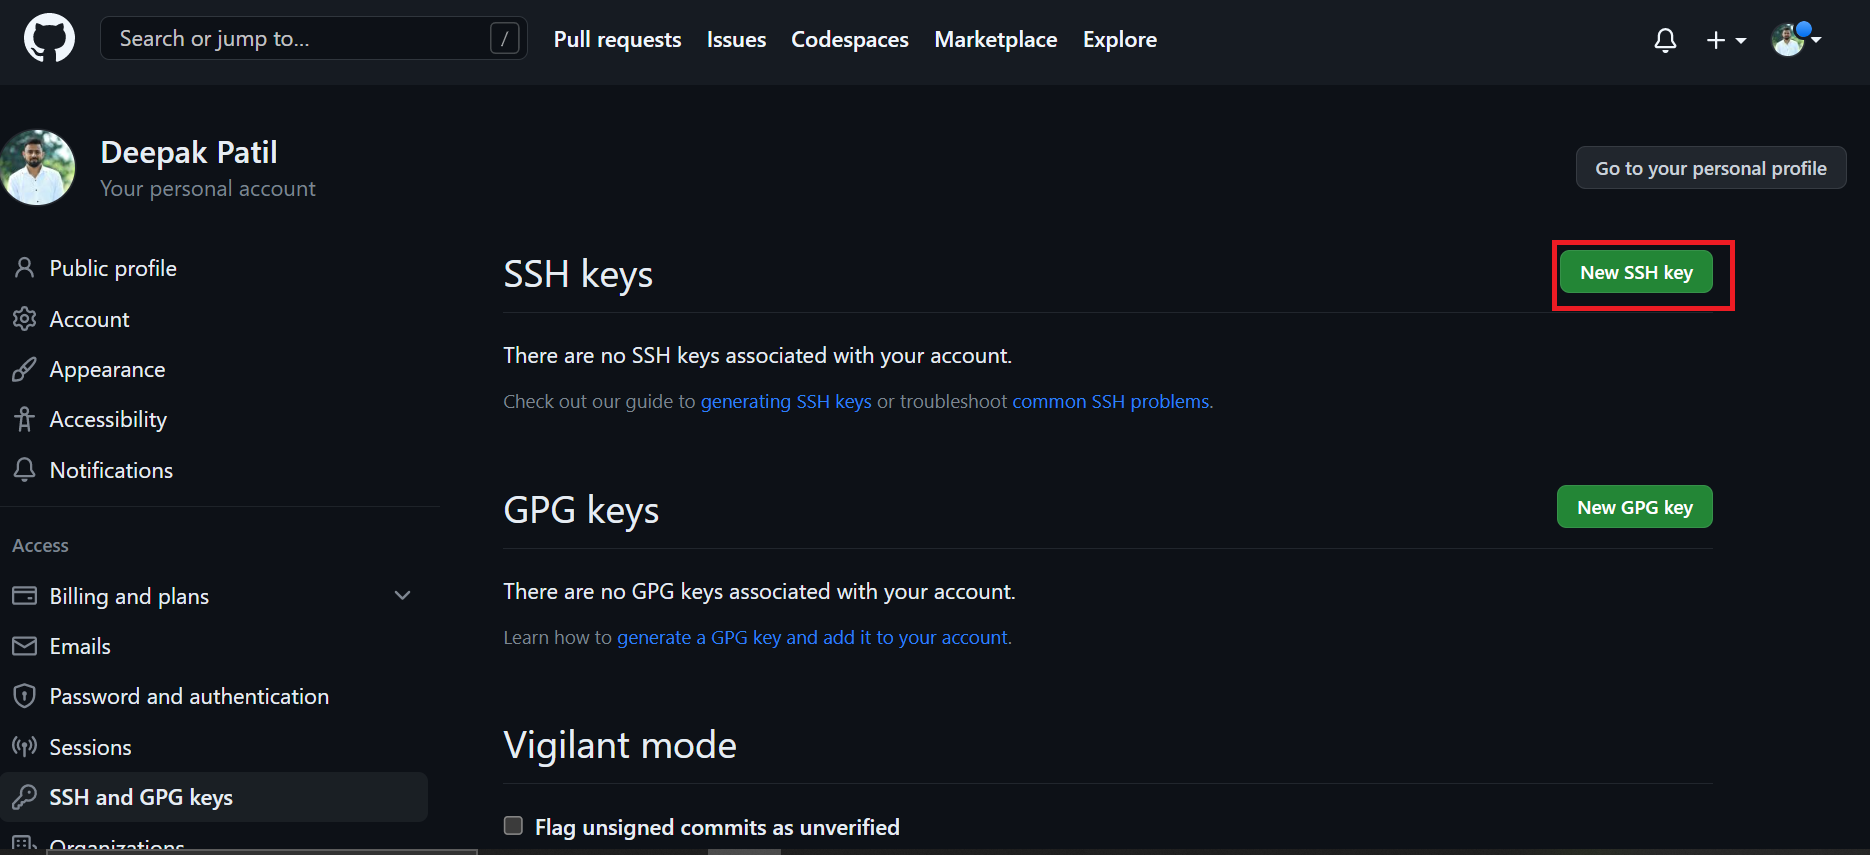
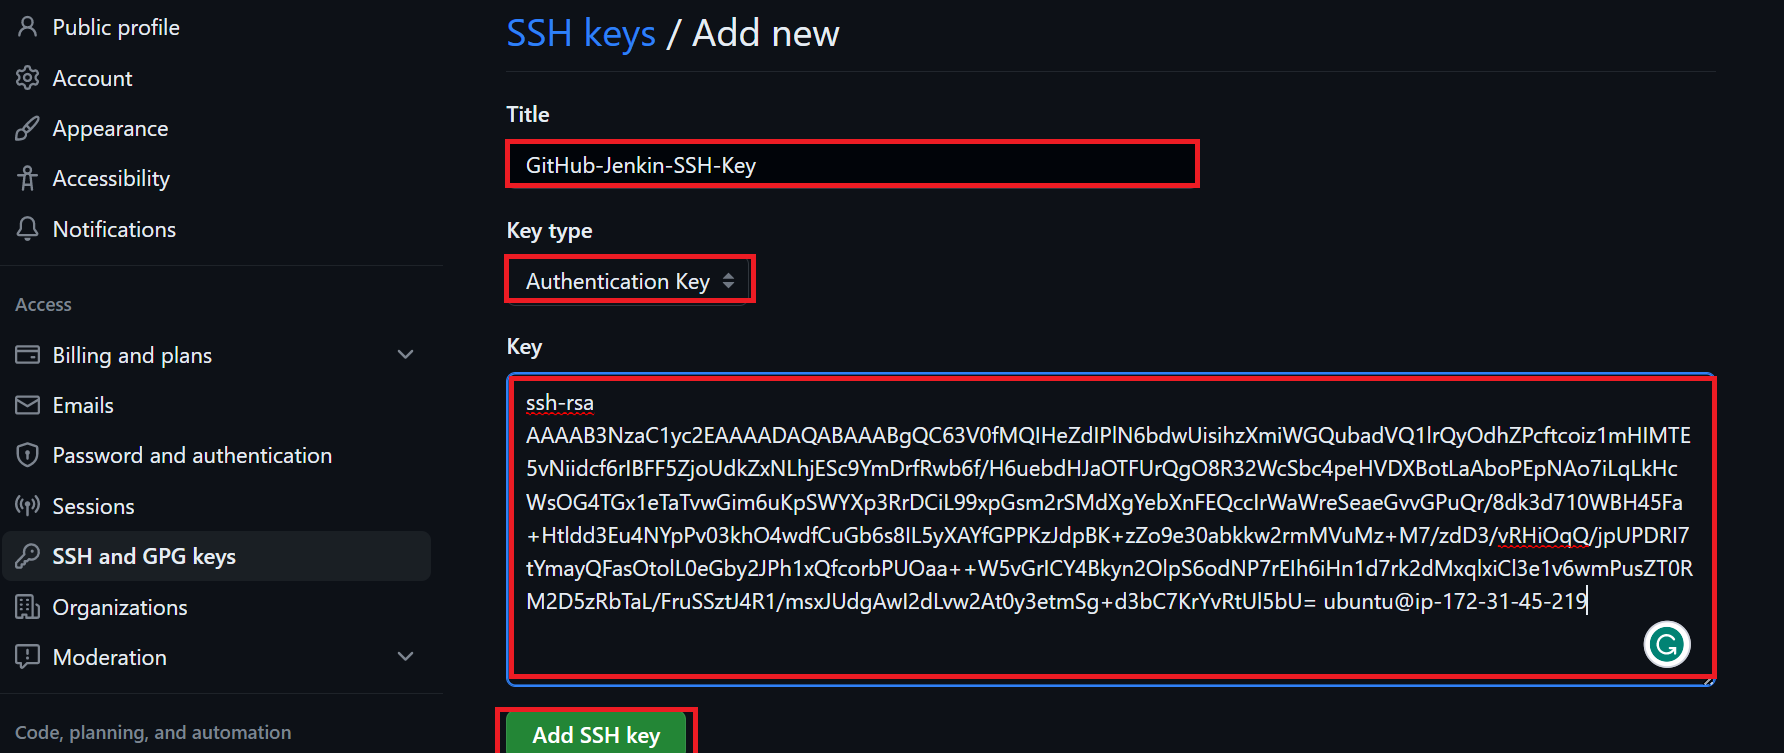
Provide the
Titleand select theKey typeasAuthentication Keyand also addpublic keyin the key field that we created using ssh-keygenClick on
Add SSH Keyand provide your GitHub password to confirm and you will see the SSH key is added

Create Jenkins Project
As earlier we have installed Jenkins on our server and make sure port 8080 is open in the server security group to access the Jenkins dashboard
Here we will use Docker, Docker-compose to deploy the application in the Docker container
Access the
Jenkins dashboardusingserver ipwithport 8080as shown below<server-ip>:8080Now go to the
dashboardand createNew Item/Create a job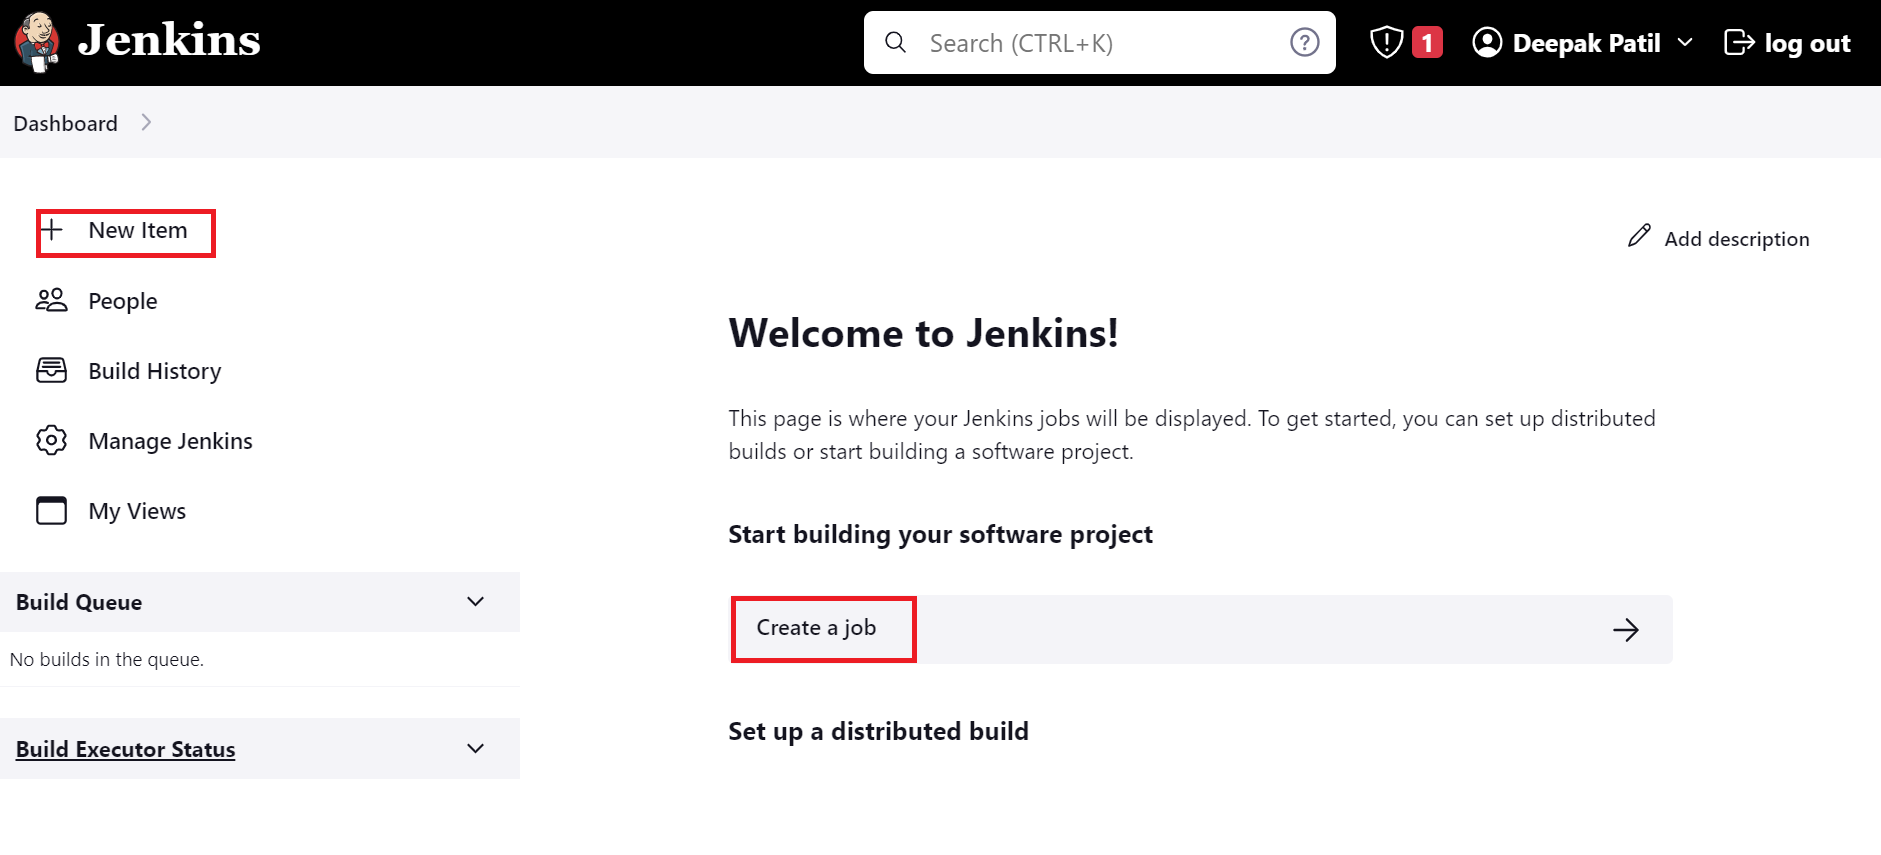
Enter the
Item/project Nameand select theFreestyle projectand click onOk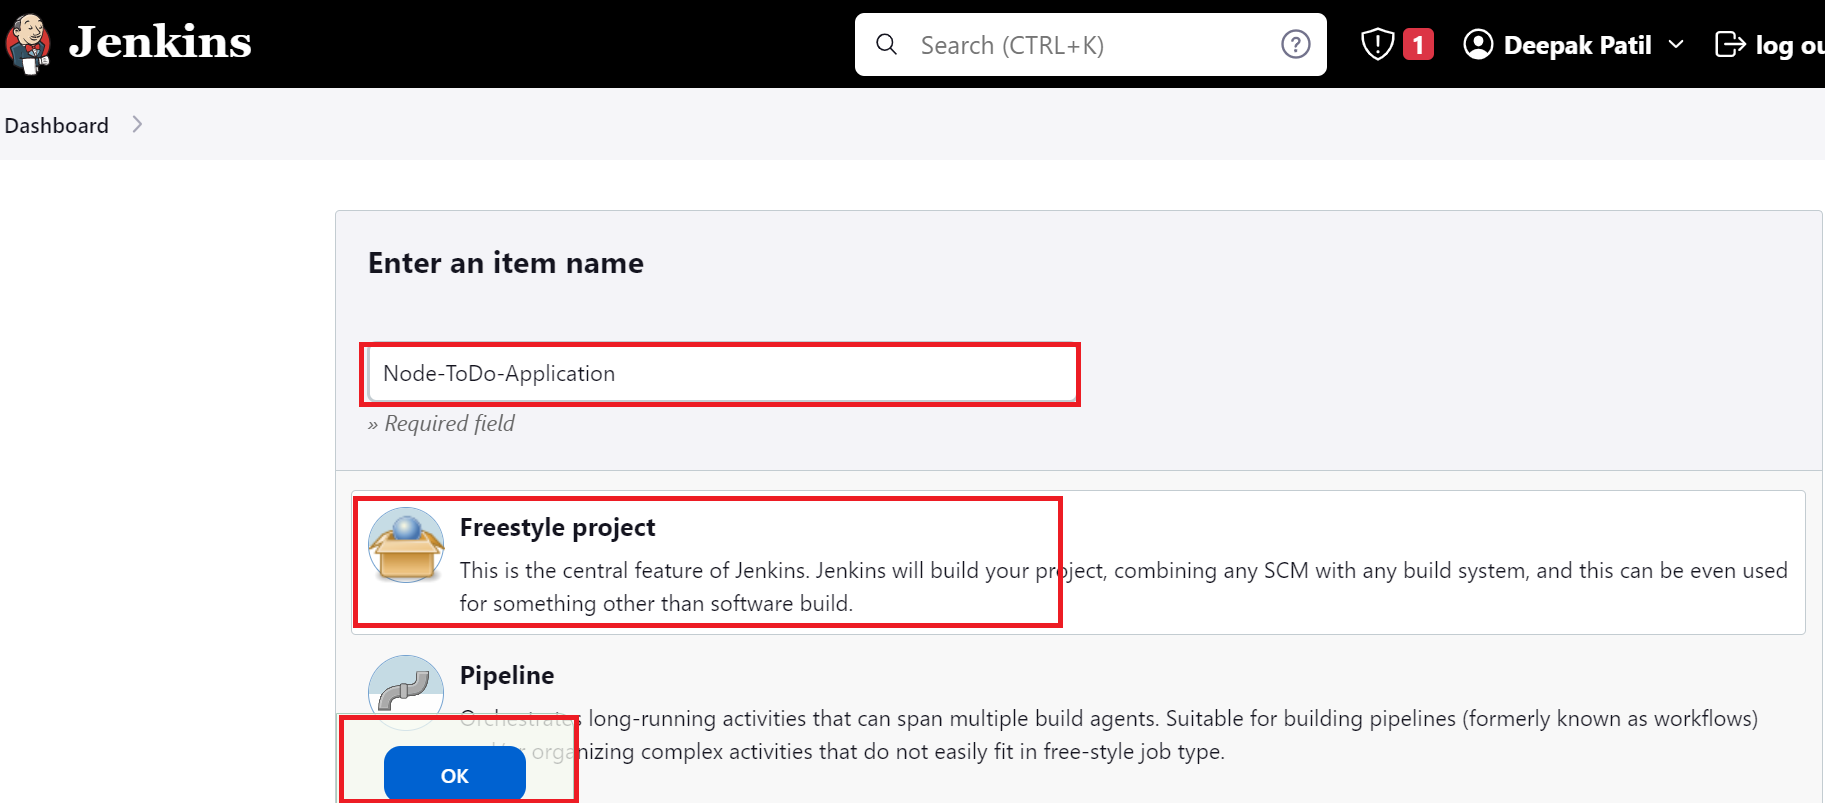
Now once you created the job enters the
Descriptionand select theGitHub projectand copy and enter the GitHub repository project URL asProject url

Now in
Source Code Managemententer the same repository url we have copied asRepository URLfieldIn the
Credentialssection click onAdd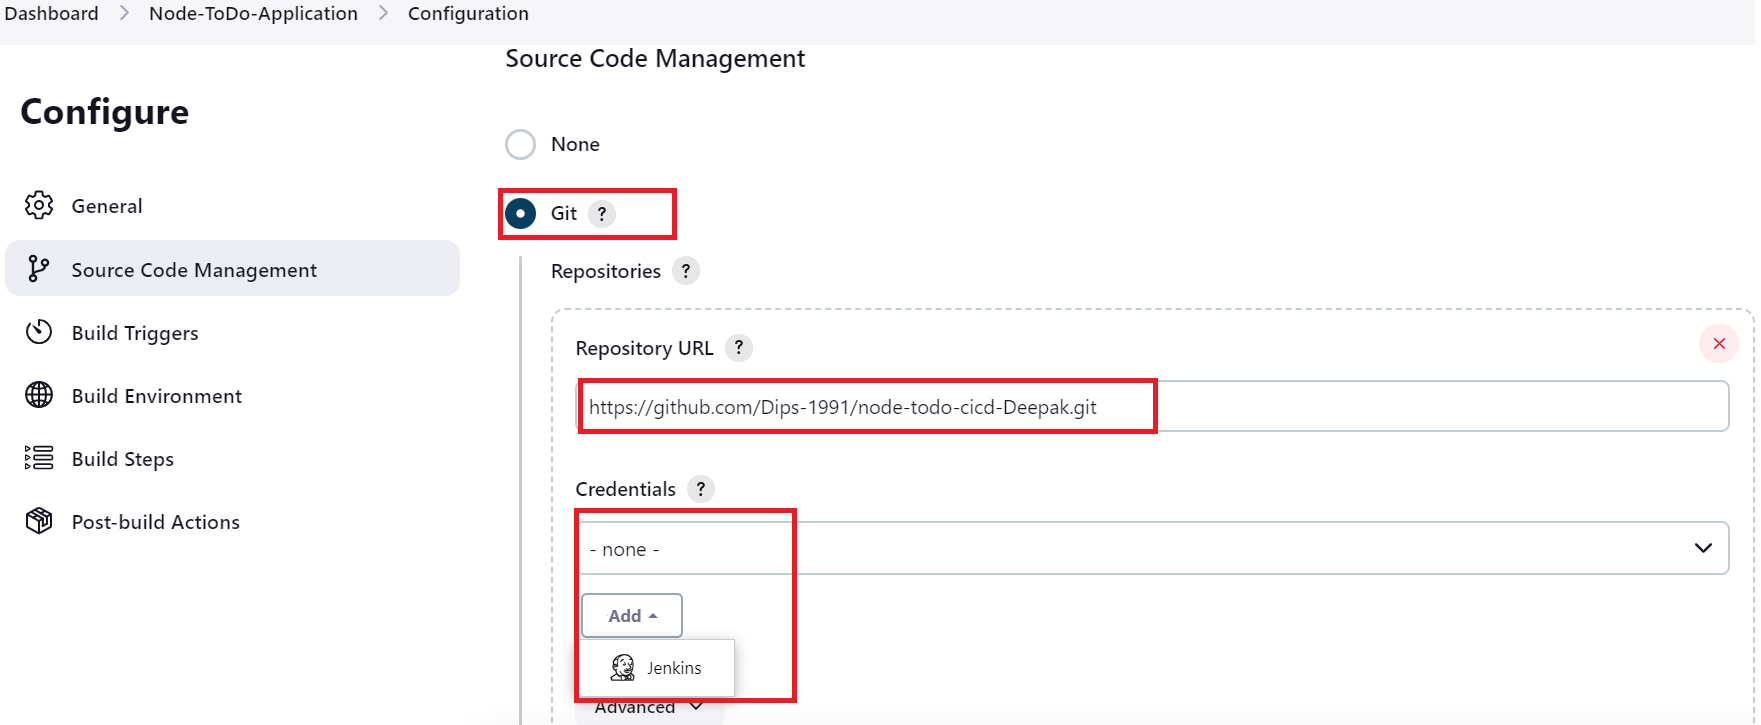
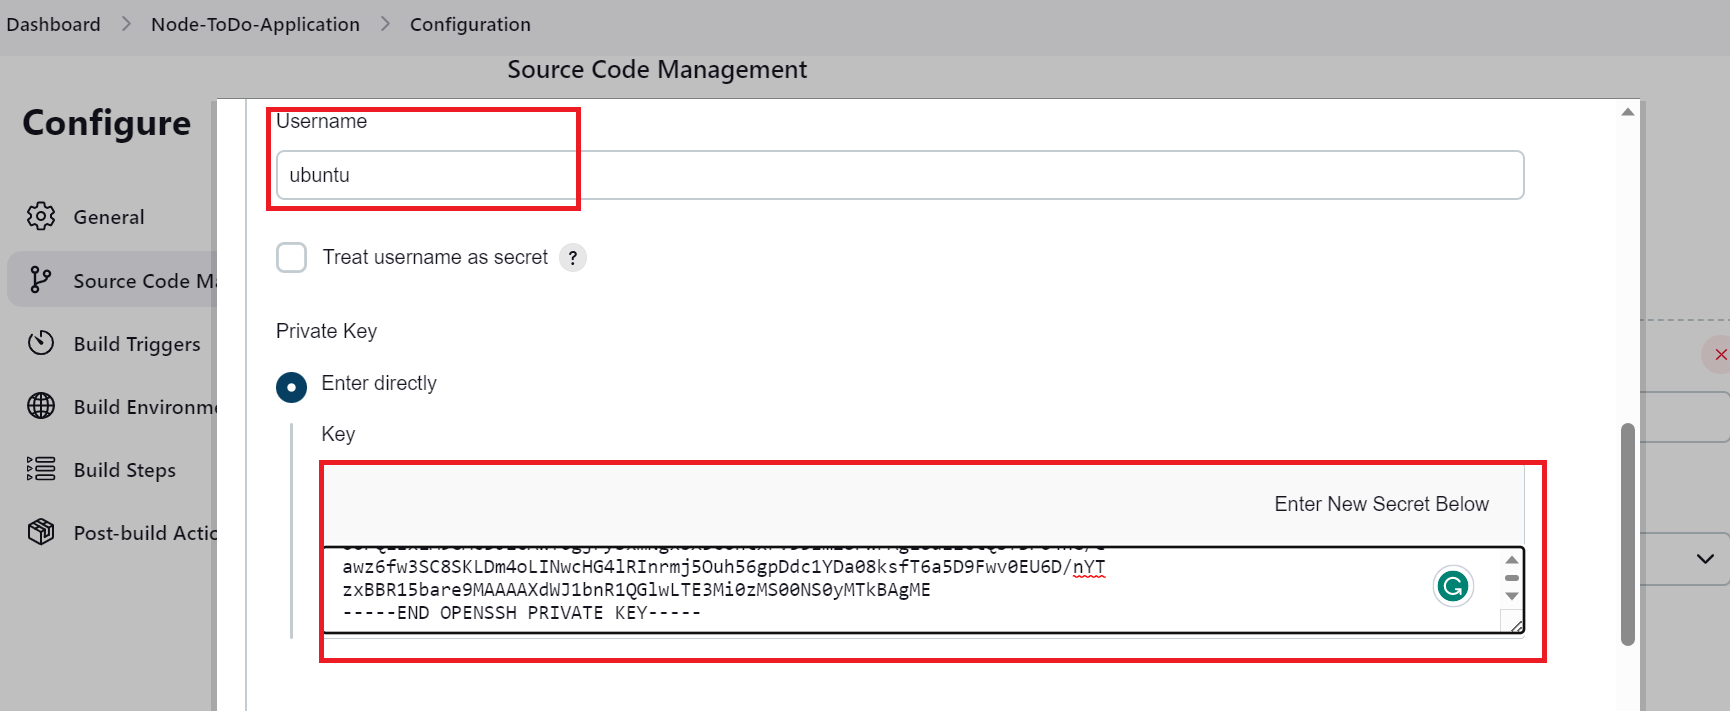
Now in the pop-up window keep
Domainas it isIn the
KindselectSSH Username with private keyIn the
Scopekeep it as it isIn the
IDprovide as per yourIn the
Descriptionprovide as perIn the
Usernameprovide your server username in my case it isubuntuIn the Private key add the
private keywhich we created using thessh-keygen commandand click onAdd
Now in Credentials select which we have created now
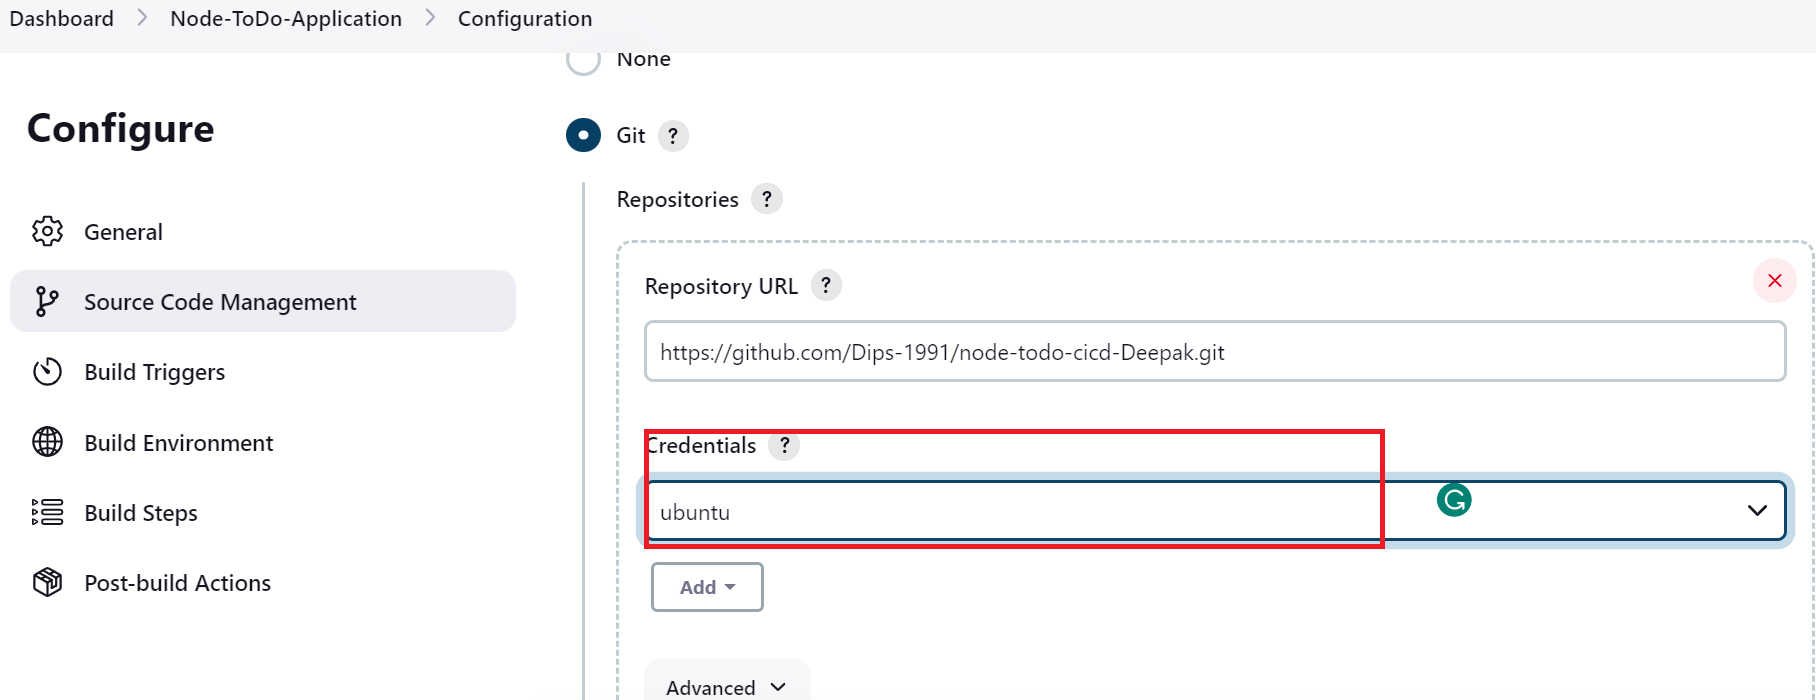
In the
Brances to buildkeep theBranch Specifieras it is in my case it is*master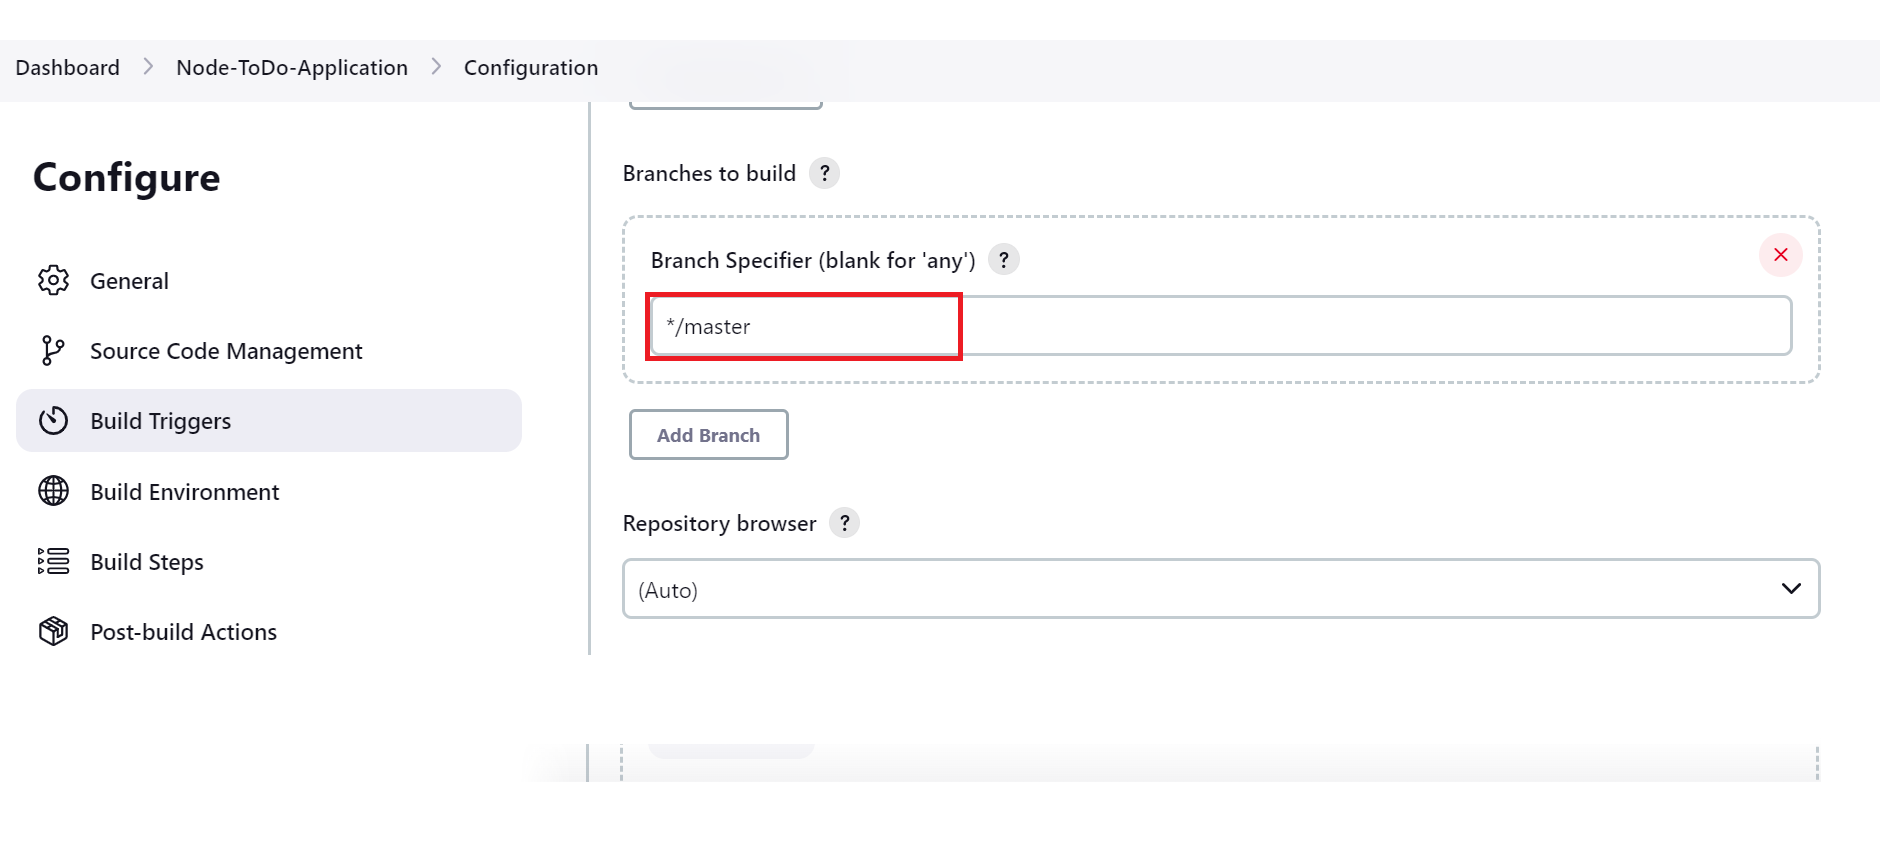
Automate Building And Running Containers
Note: make sure Docker and Docker-compose should install on the server
Please check Here -> Install Docker on Ubuntu Server
To install Docker-compose use sudo apt install docker-compose -y command
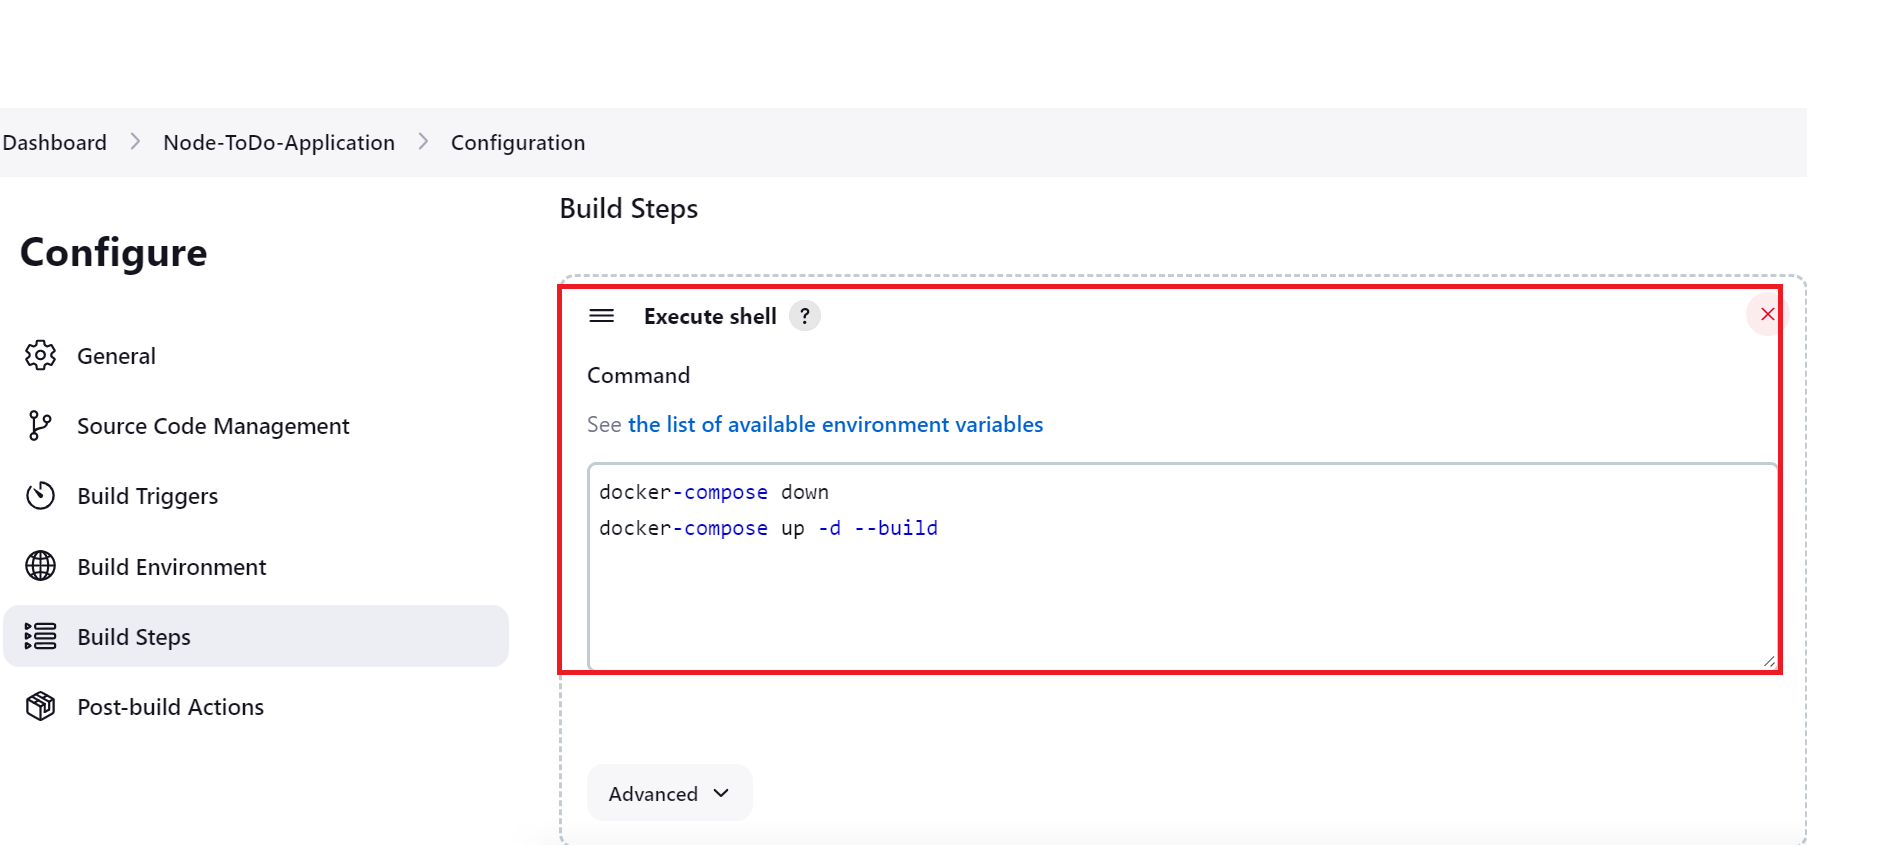
Now in the
Build StepunderExecute shellrun the application usingDocker composeadd the commandApply and SaveFor this first, we have to create the
Docker compose fileto deploy theDocker container
It is best practice to keep theDocker compose filein theRepository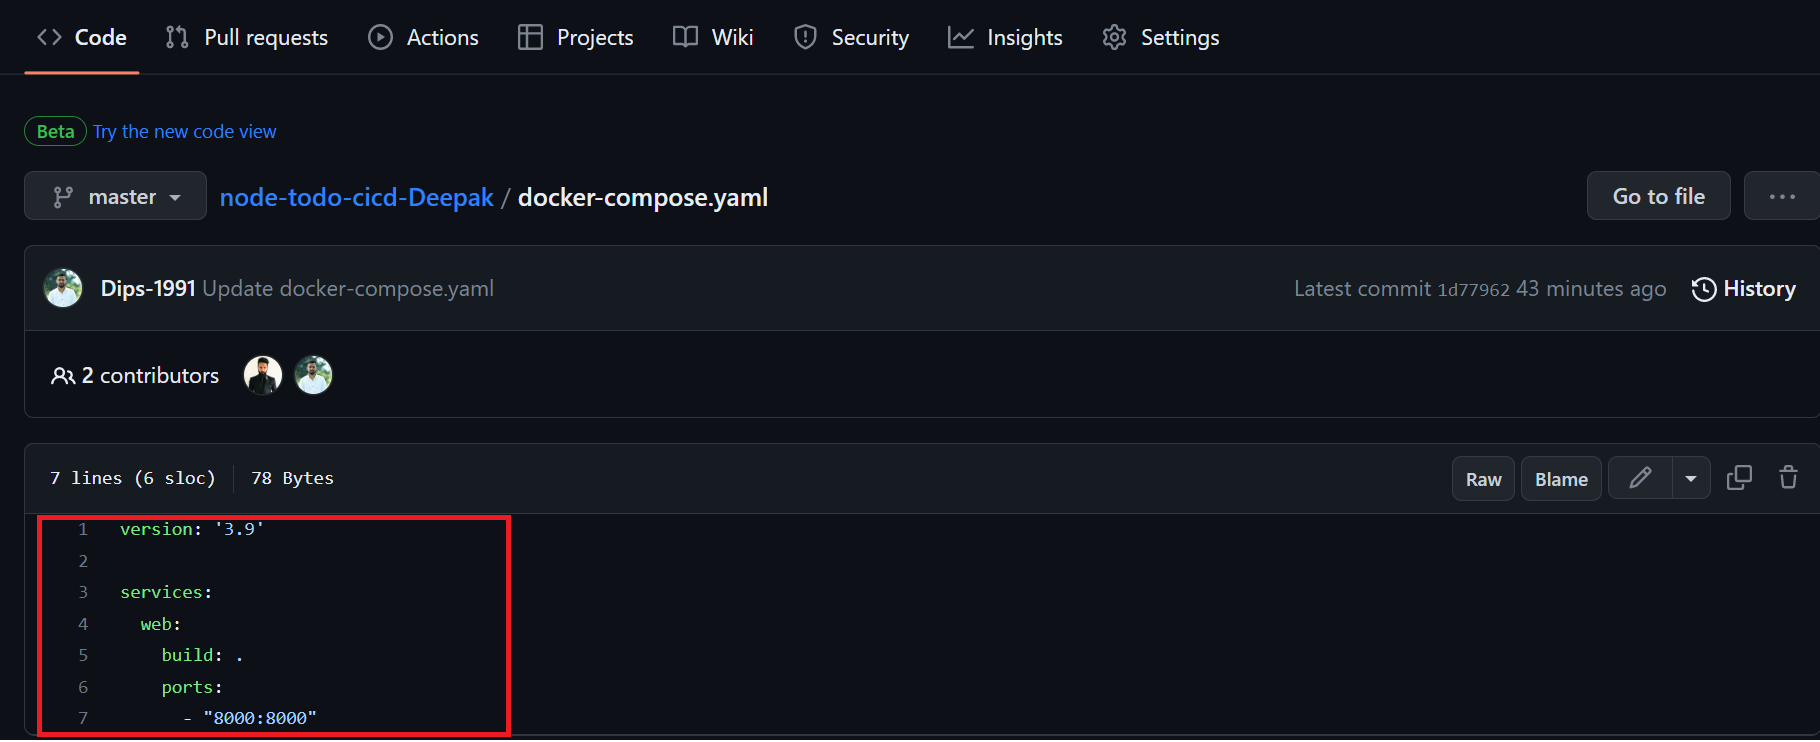
Note: If you got a
Permission denaiedrelated error while buildingAdd the
Jenkins as userin thedocker groupUse the below command and reboot the serversudo usermod -a -G docker jenkins sudo rebbotAfter Click on
Build Nowand after successfully build go theConsole outputand check as asuccessthe message at the end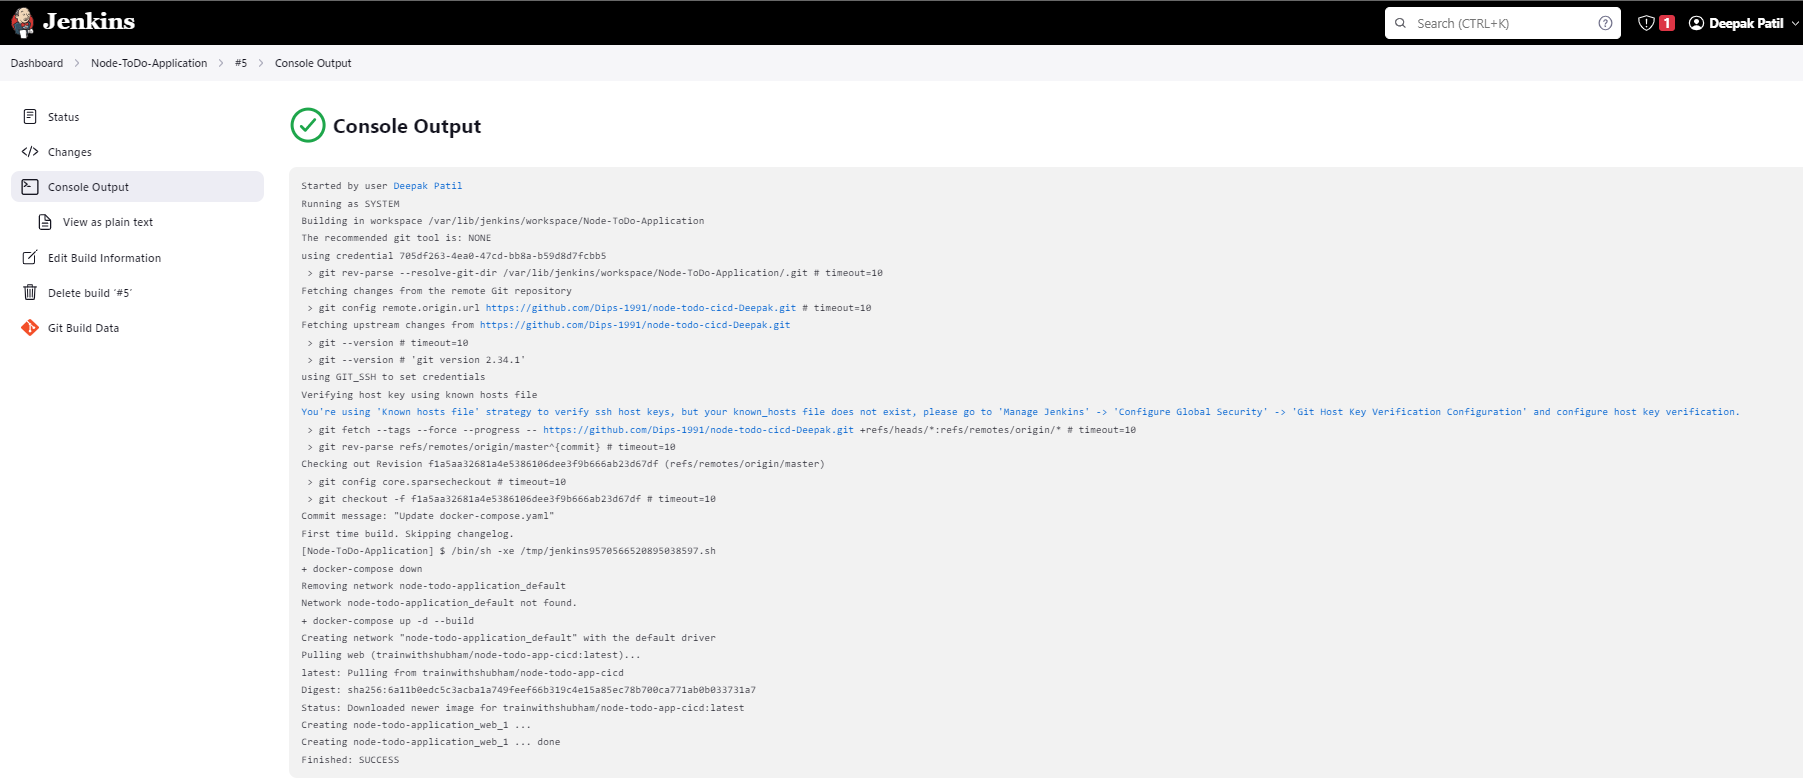
Now you can see the
Docker containeris deployed and up and running
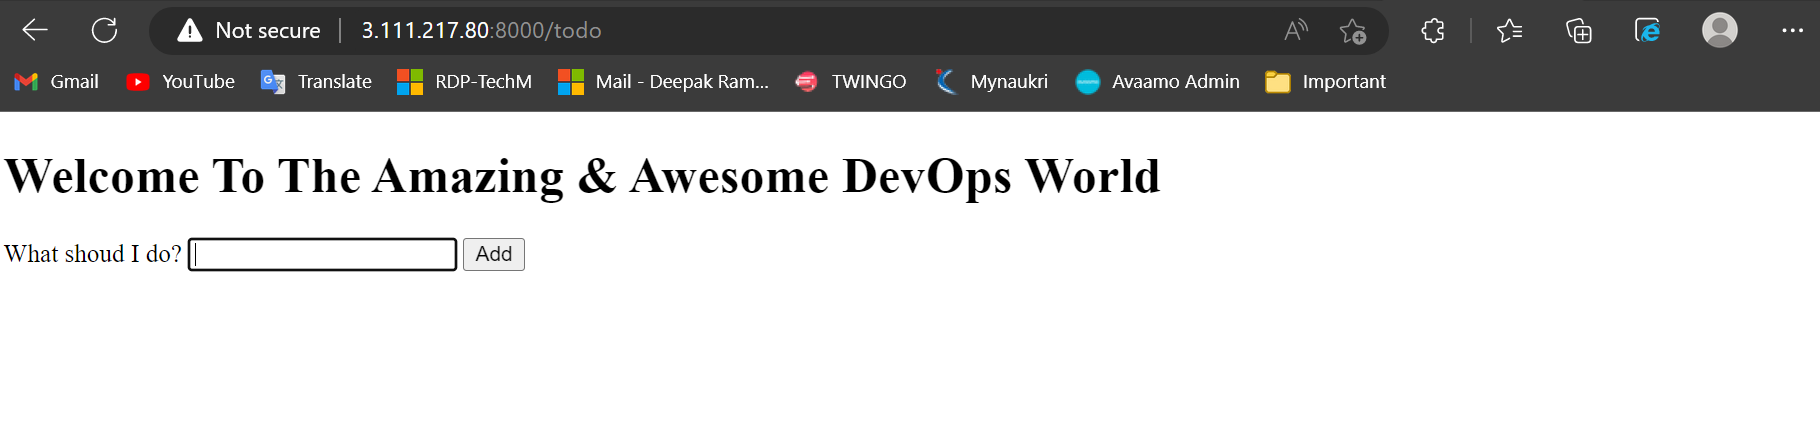
Now copy your Instance Public-IP address and add
:8000/todoto access the application as below[Instance-public-ip]:8000/todoBBBBoooooooooMMMMM Congratulation we have successfully deployed our application using docker 🕺🕺👏👏🎉🎉
Automate Deployment Using Webhook
Install Pugin:
Here we need the
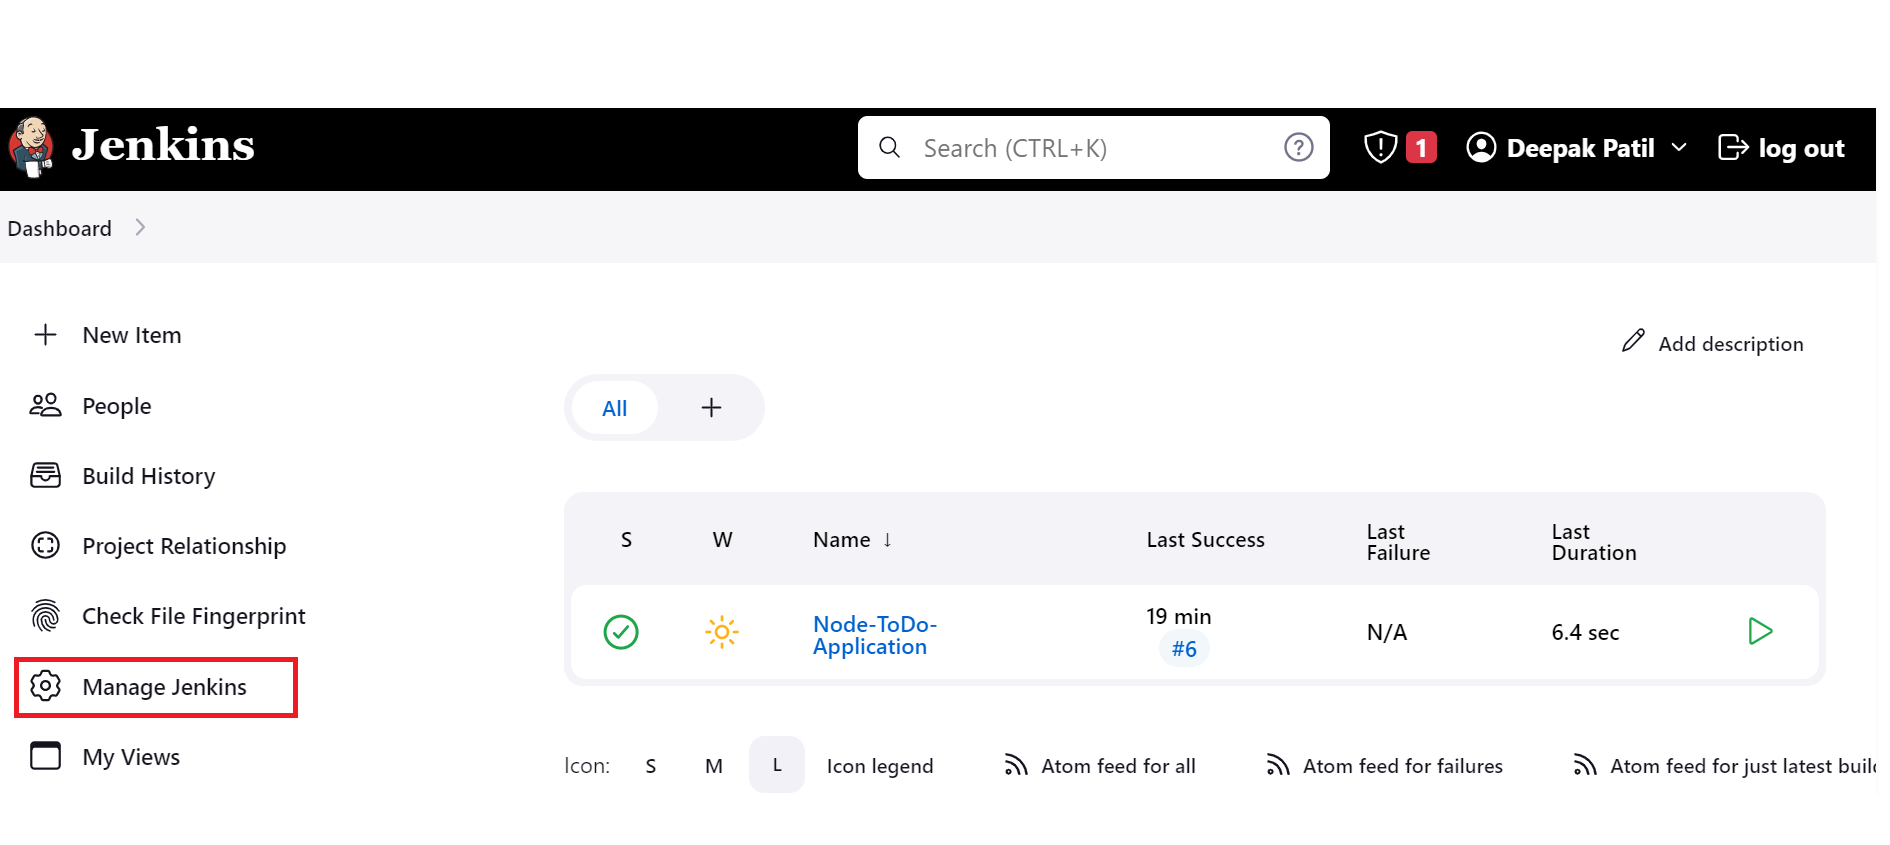
GitHub IntegrationpluginOpen your
Jenkins dashboard.Clickon theManage Jenkinsbutton on your Jenkins dashboardClickonManage PluginsGo to the
Available pluginSearch
GitHub Integrationplugin in thesearch boxClickonInstall without restartClick on Restart Jenkins when installation is complete.
Relogin into Jenkin


GitHub-Webhook Configuration:
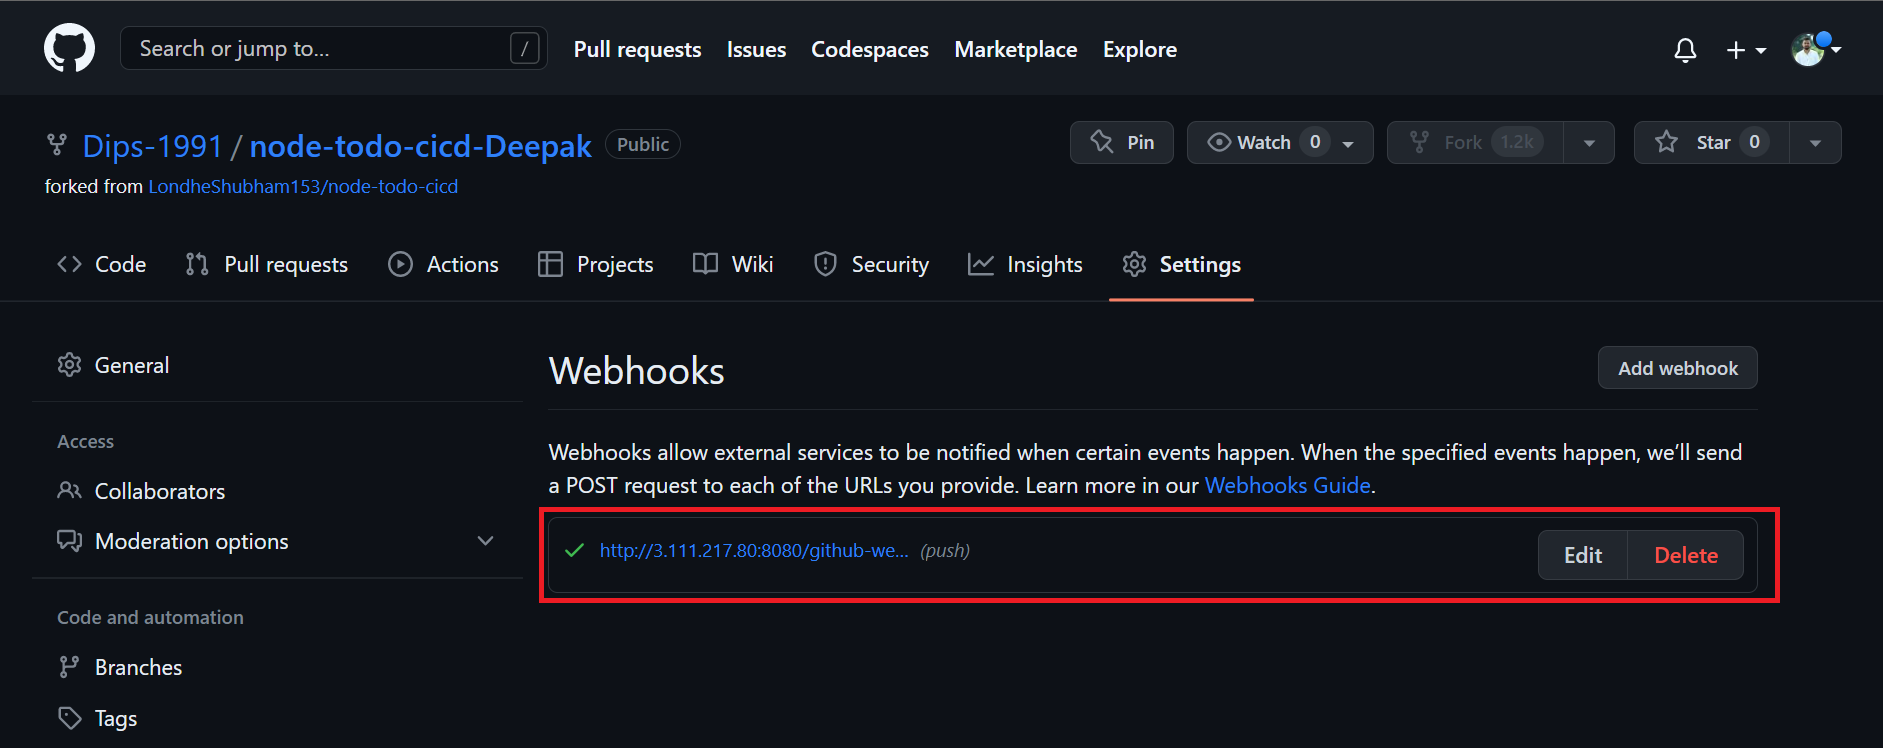
Go to your
GitHub repositoryand click onSettings.Click on
Webhooksand then click onAdd webhook.In the
Payload URLfield copy and paste yourJenkins environment URL. and at the end of this URL add/github-webhook/In the
Content typeselect:application/jsonand leave theSecretfieldempty.In the
Which events would you like to trigger this webhook?section keepJust the push event.and click onAdd webhookRefreshthe page until you will get theRight sign✔

Go to
Jenkins>>Your Job>>Configure>>Build Triggersand selectGitHub hook trigger for GITScm pollingand click onapply and save
Now we are at our final step make some changes in the code and watch the Jenkins dashboard
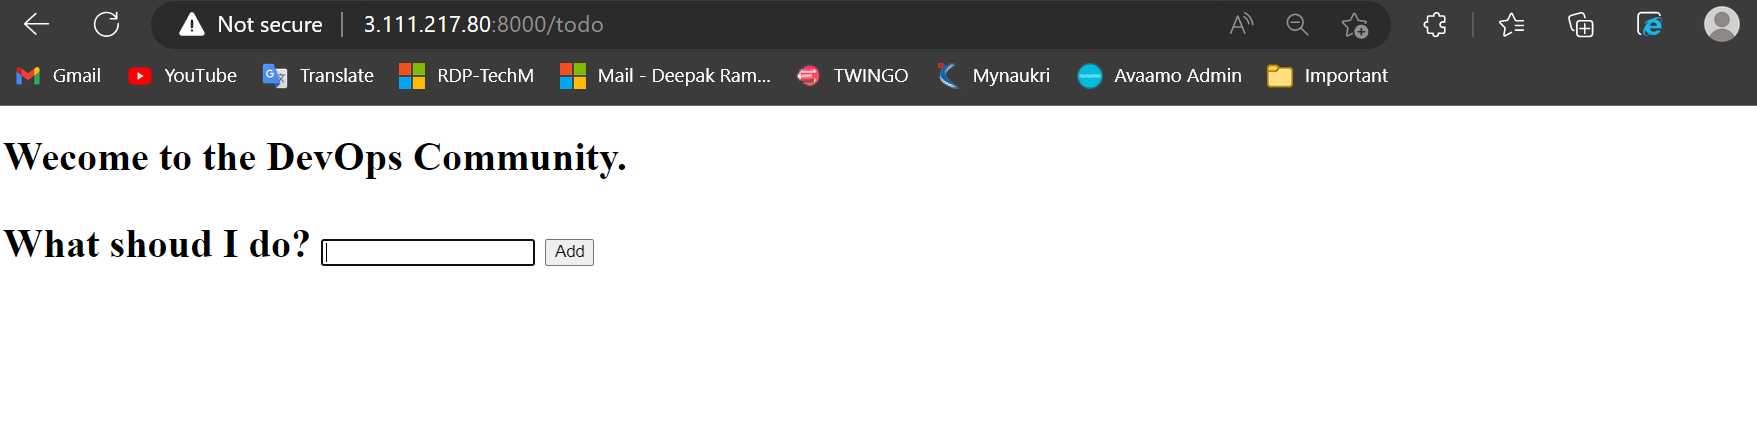
Here we have changed the heading
"Welcome To The Amazing & Awesome DevOps World"to"Welcome To the DevOps Community"and committed the changes at the repository itself
After we have changed the code in the repository and committed the changes the
magic happens🕺🕺👏👏🎉🎉... Our Job build execution starts without clinking onBuild Now.WebHookisadded to triggertheexecution of Jenkins jobsbased onGitHub events. If anyone in the developer team changes the code, it will automate the build now process like this.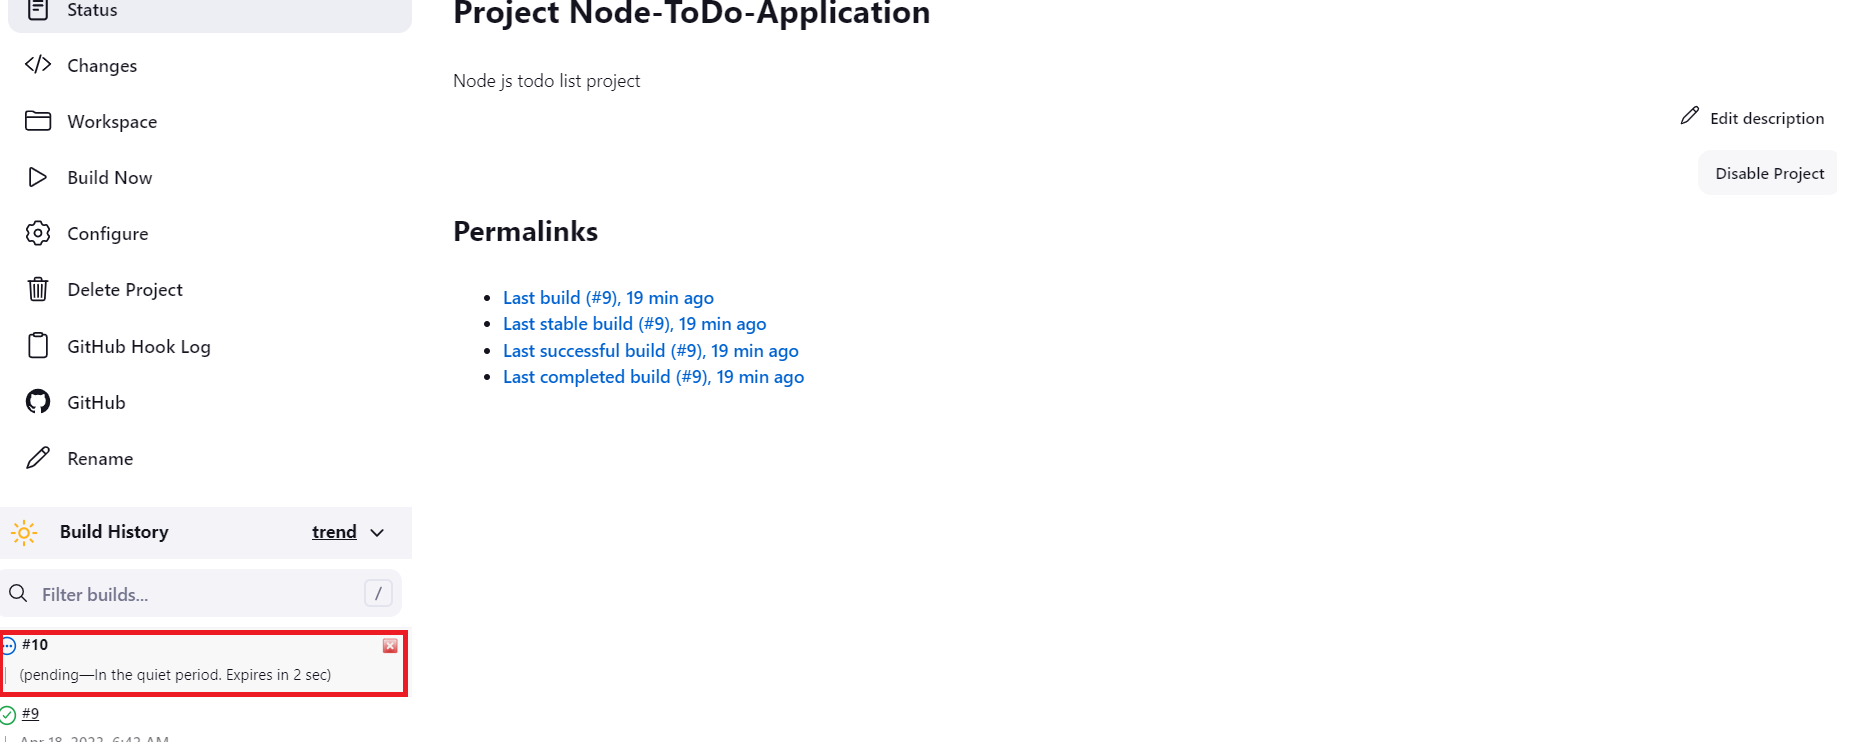
We can also see the
docker containerrunning in the command line
And Finally!!! the changes have been reflected as well
BBBBoooooooooMMMMM Congratulation we have successfully automated to trigger the job using Webhook 🕺🕺👏👏🎉🎉
Thank you for reading the article.
Thanks for your valuable time.
Happy Learning !... Keep Learning ! 😊


